1. Кіріспе
This manual provides detailed instructions for the installation, operation, and maintenance of your Jennov K4-P52-V18 Wireless Solar Video Surveillance Camera Kit. Please read this manual thoroughly before using the product to ensure proper setup and functionality. Keep this manual for future reference.
2. Пакет мазмұны
Carefully unpack the box and verify that all the following items are included:
- 1 x NVR (V18) with Built-in 10-inch Touchscreen Monitor
- 4 x Wireless Solar Cameras
- 1 x 500GB HDD (Built-in)
- 1 x тінтуір
- 1 x NVR Power Adapter
- 1 x 9V Battery (for NVR, included)
- 1 x Пайдаланушы нұсқаулығы (осы құжат)
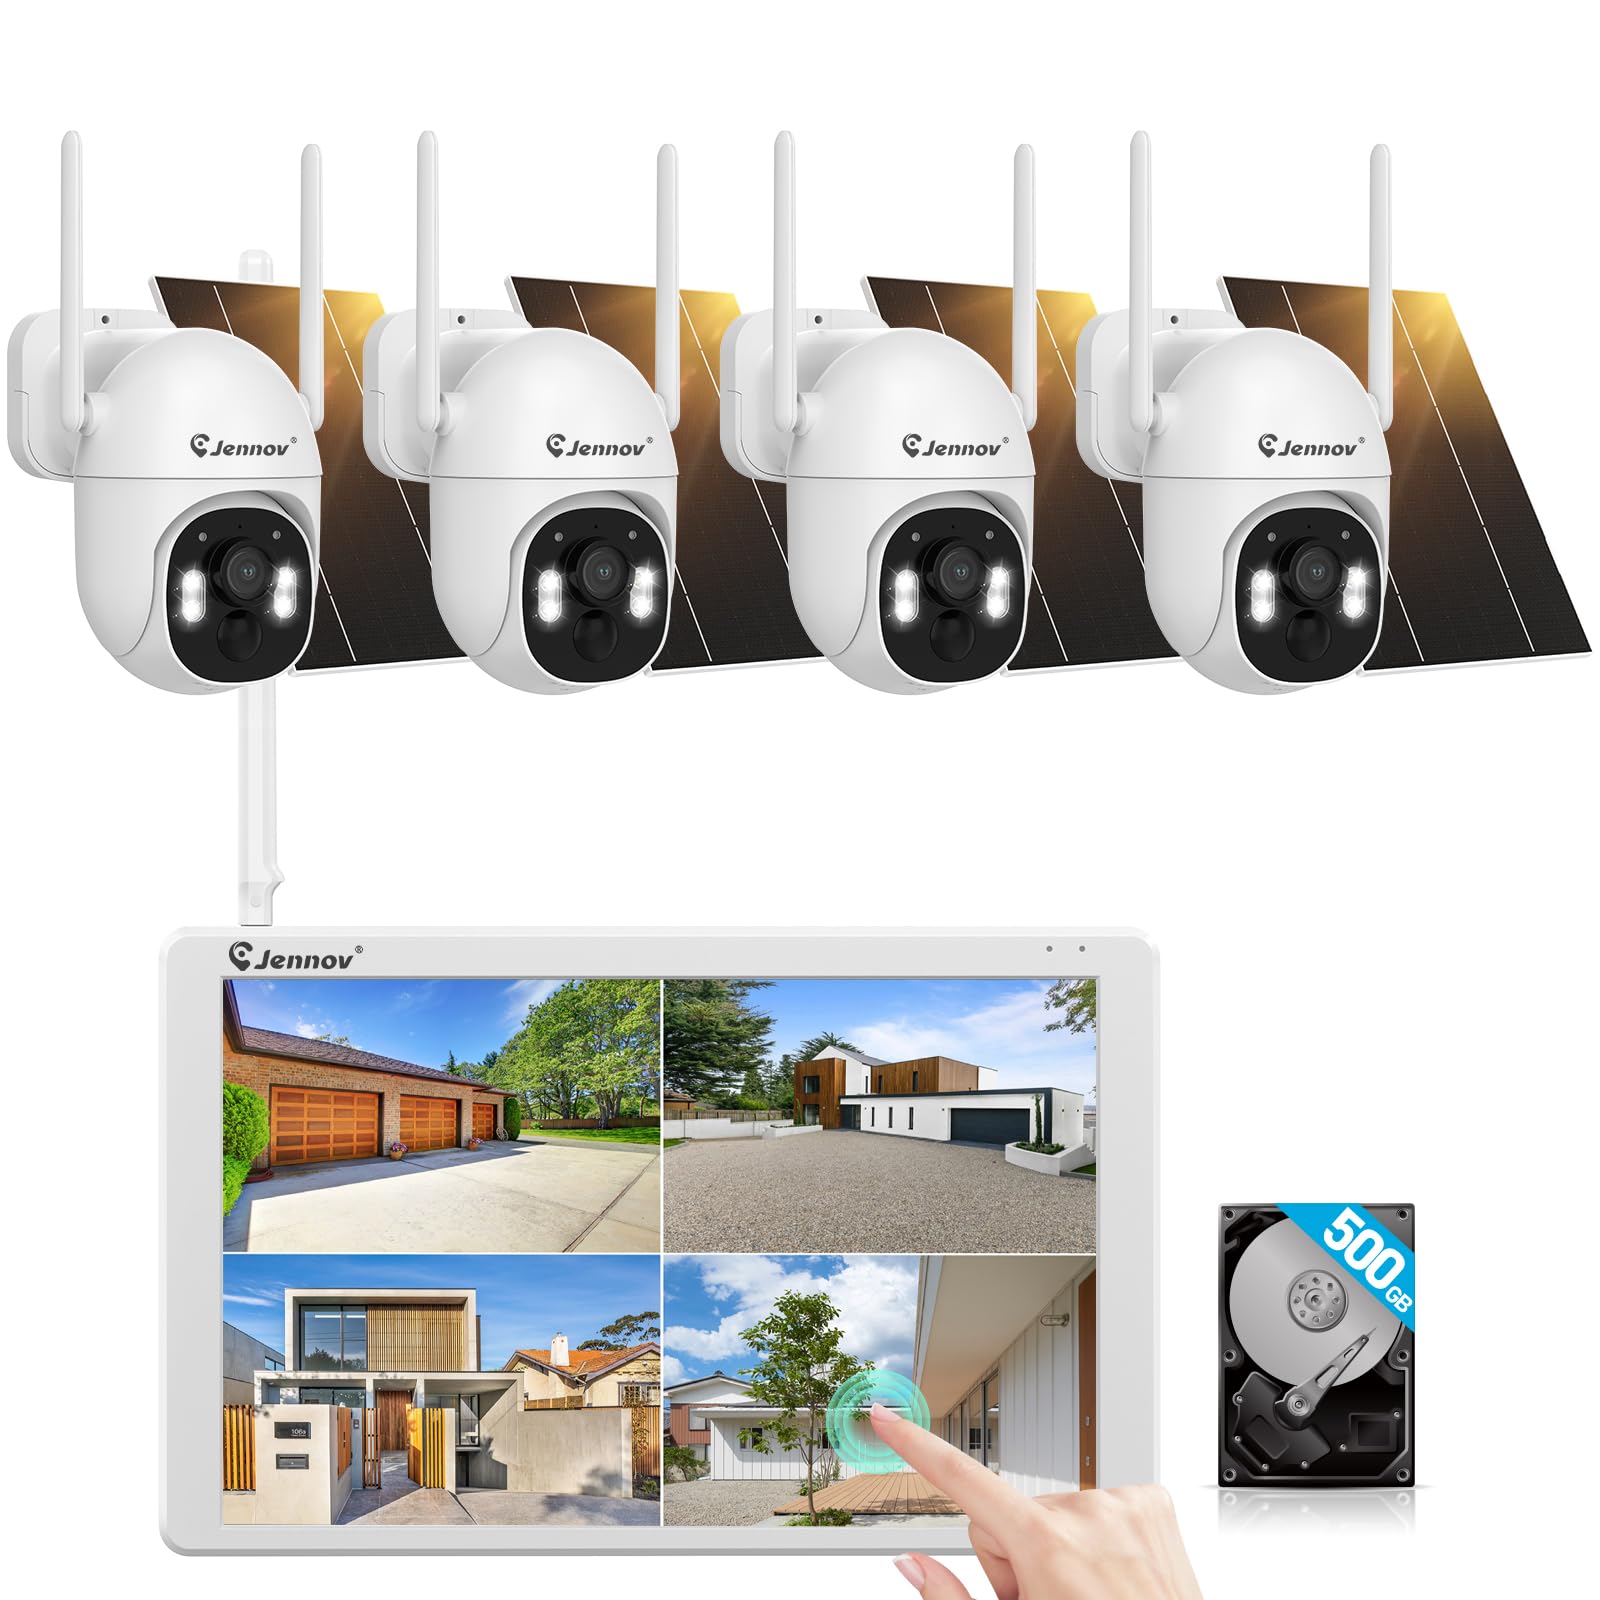
Сурет: аяқталдыview of the Jennov K4-P52-V18 Wireless Solar Video Surveillance Camera Kit, showing the NVR with monitor and multiple cameras.
3. Өнім аяқталдыview
The Jennov K4-P52-V18 is a comprehensive wireless video surveillance system designed for outdoor security. It features a 10-channel NVR with an integrated 10-inch touchscreen monitor for direct viewing and control. The system includes four 1920p resolution cameras, each powered by a solar panel, offering wireless connectivity and PTZ (Pan-Tilt-Zoom) functionality for flexible monitoring. A 500GB hard disk drive (HDD) is pre-installed for local video storage.
4. Орнату
4.1 NVR Setup
- Орналастыру: Place the NVR in a secure, central location within your property, ensuring it is within Wi-Fi range of the cameras.
- Қуат қосылымы: Connect the NVR power adapter to the NVR's power input and then to a power outlet. The NVR will power on automatically.
- Тышқан қосылымы: Навигация үшін берілген USB тінтуірін NVR құрылғысындағы USB портына қосыңыз.
- Бастапқы жүктеу: The NVR will boot up and display the initial setup wizard on the 10-inch touchscreen. Follow the on-screen prompts to configure basic settings such as language, time zone, and password.
4.2 Камераны орнату
- Орын таңдау: Choose suitable outdoor locations for each camera, ensuring a clear line of sight to the monitoring area and sufficient sunlight exposure for the solar panel. The cameras are designed for wall mounting.
- Монтаждау: Use the provided mounting hardware to securely attach each camera to a wall or other stable surface. Adjust the camera angle for optimal coverage.
- Күн панелін қосу: Ensure the solar panel is securely connected to the camera and positioned to receive maximum direct sunlight throughout the day.
- Жұптастыру (қажет болса): The cameras are typically pre-paired with the NVR. If a camera does not connect automatically, refer to the NVR's on-screen menu for manual pairing instructions.
4.3 Желінің конфигурациясы
Қашықтан басқару құралын қосу үшін viewing and software updates, connect the NVR to your home Wi-Fi network:
- On the NVR touchscreen, navigate to Жүйе параметрлері > Желі.
- таңдаңыз Сымсыз дәлдiк and choose your network from the list of available networks.
- Wi-Fi құпия сөзіңізді енгізіп, қосылымды растаңыз.
5. Пайдалану нұсқаулары
5.1 Тікелей View
After successful setup, the NVR will display the live feed from all connected cameras on the 10-inch monitor. You can tap on a specific camera feed to view ол толық экранда.
5.2 PTZ басқару
For cameras with PTZ functionality:
- In full-screen live view, look for PTZ control icons on the screen.
- Tap the directional arrows to pan (left/right) and tilt (up/down) the camera.
- Use the zoom in/out icons to adjust the optical or digital zoom.
5.3 Жазу және ойнату
The system automatically records video to the built-in 500GB HDD based on motion detection or continuous recording settings. To access recorded footage:
- Негізгі мәзірден таңдаңыз Ойнату.
- Choose the desired camera and date/time range.
- Use the timeline to navigate through recordings and play back events.
5.4 Қашықтан қол жеткізу
Download the official Jennov mobile application (available on iOS and Android) to view live feeds, playback recordings, and receive alerts remotely. Follow the app's instructions to add your NVR system using its unique ID or QR code.
6. Техникалық қызмет көрсету
- Тазалау: Regularly clean the camera lenses and solar panels with a soft, damp cloth to ensure clear images and efficient solar charging. Do not use harsh chemicals.
- Бағдарламалық құрал жаңартулары: Periodically check for firmware updates for the NVR and cameras through the system settings or the mobile app to ensure optimal performance and security.
- HDD басқару: The 500GB HDD will overwrite older footage once full. If you need to retain specific recordings, back them up to an external USB drive.
- Батареяны тексеру: Ensure the 9V battery in the NVR is functioning correctly, especially if experiencing power interruptions.
7. Ақаулықтарды жою
| Мәселе | Ықтимал себебі | Шешім |
|---|---|---|
| NVR мониторында кескін жоқ | NVR not powered on; Camera not connected/powered; Loose cable | Check NVR power adapter; Ensure cameras are charged and within range; Reconnect all cables securely. |
| Cameras not recording | Recording settings incorrect; HDD full or faulty | Verify recording schedules in NVR settings; Check HDD status and free space; Format HDD if necessary (this will erase all data). |
| Қашықтан қол жеткізу жұмыс істемейді | NVR not connected to internet; Incorrect app settings | Check NVR Wi-Fi connection; Ensure NVR is online; Re-add NVR to the mobile app. |
| PTZ басқаруы жауап бермейді | Camera power issue; Software glitch | Check camera power and solar charging; Restart the camera and NVR. |
8. Техникалық сипаттамалар
| Ерекшелік | Мәлімет |
|---|---|
| Үлгі нөмірі | K4-P52-V18 |
| Бренд | Дженнов |
| Қосылу технологиясы | Сымсыз, Wi-Fi |
| Қуат көзі | Күннен қуат алады |
| Арнайы мүмкіндіктер | PTZ Technology, 10-inch Touchscreen Monitor |
| Бейне түсіру рұқсаты | 1920p |
| Монтаждау түрі | Қабырғаға аспа |
| Қосылған құрамдас бөліктер | NVR (V18), 4 Cameras, 500GB HDD (Built-in), Mouse, NVR Adapter, 9V Battery |
| Өнім өлшемдері | 18 x 39 x 27 см |
| Элемент салмағы | 4.16 кг |
| Өндіруші | Shenzhen Dianchen Industrial Co.,Ltd |
9. Кепілдік және қолдау
For warranty information and technical support, please refer to the documentation provided with your purchase or contact Jennov customer service directly. Contact details can typically be found on the manufacturer's official webсайтында немесе өнімнің қаптамасында.