1. Кіріспе
Thank you for choosing the KEENSTAR 20Bar Espresso Machine. This manual provides essential information for the safe operation, maintenance, and troubleshooting of your new espresso machine. Please read it thoroughly before first use and keep it for future reference.
2. Маңызды қауіпсіздік нұсқаулары
- Құралды қолданар алдында барлық нұсқауларды оқып шығыңыз.
- Ыстық беттерге қол тигізбеңіз. Тұтқаларды немесе тұтқаларды пайдаланыңыз.
- Өрттен, электр тогының соғуынан және адамдарды жарақаттаудан қорғау үшін сымды, ашаны немесе құрылғыны суға немесе басқа сұйықтыққа батырмаңыз.
- Кез келген құрылғыны балалар немесе оның жанында пайдаланған кезде мұқият қадағалау қажет.
- Қолданбаған кезде және тазалау алдында розеткадан ажыратыңыз. Бөлшектерді киер немесе шешпес бұрын, сондай-ақ құрылғыны тазаламас бұрын салқындатыңыз.
- Сымы немесе ашасы зақымдалған немесе құрылғы дұрыс жұмыс істемей қалғаннан кейін немесе қандай да бір жолмен зақымдалған құрылғыны пайдаланбаңыз.
- Құрылғы өндірушісі ұсынбаған керек-жарақтарды пайдалану өртке, электр тогының соғуына немесе адамдардың жарақаттануына әкелуі мүмкін.
- Сыртта пайдаланбаңыз.
- Сымның үстелдің немесе үстелдің шетінен салбырап тұруына немесе ыстық беттерге тиюіне жол бермеңіз.
- Ыстық газ немесе электр оттығының үстіне немесе жанына немесе қыздырылған пешке қоймаңыз.
- Әрқашан алдымен ашаны құрылғыға қосыңыз, содан кейін сымды розеткаға қосыңыз. Ажырату үшін кез келген басқару элементін «сөндіру» күйіне бұрыңыз, содан кейін розеткадан ашаны ажыратыңыз.
- Құралды мақсатынан басқа мақсатта пайдаланбаңыз.
- Ыстық буды шығарған кезде өте сақ болыңыз.
- Бұл құрылғы тек үйде пайдалануға арналған.
3. Пакет мазмұны
Барлық заттардың бар және зақымдалмағанына көз жеткізу үшін қораптан шығарған кезде пакеттің мазмұнын тексеріңіз.
Сурет: All components included in the KEENSTAR 20Bar Espresso Machine package. This includes the main unit, portafilter with handle, single and double shot filters, coffee spoon with tamper, and a removable drip tray. The water tank and steam nozzle are also visible.
- KEENSTAR 20Bar Espresso Machine Main Unit
- Portafilter тұтқасы
- 1-Shot Filter Basket
- 2-Shot Filter Basket
- Coffee Spoon with Tamper
- Алынбалы тамшы науасы
- Пайдаланушы нұсқаулығы
4. Өнім аяқталдыview
Эспрессо машинасының әртүрлі бөліктерімен танысыңыз.

Сурет: Алдыңғы view of the KEENSTAR 20Bar Espresso Machine, showcasing its sleek stainless steel design and key operational areas.
- Су ыдысы: Detachable, 1.1 Liter capacity. Located at the back of the machine.
- Басқару тақтасы: Intuitive touch screen for selecting brew options (Espresso, Americano, Espresso Cool, Steam, ON/OFF, 2X Espresso).
- Портасүзгі: Қайнату үшін ұнтақталған кофені ұстайды.
- Бу таяқшасы: For frothing milk for lattes and cappuccinos. Features a 360-degree rotation.
- Тамшы науасы: Оңай тазалау үшін алынбалы.
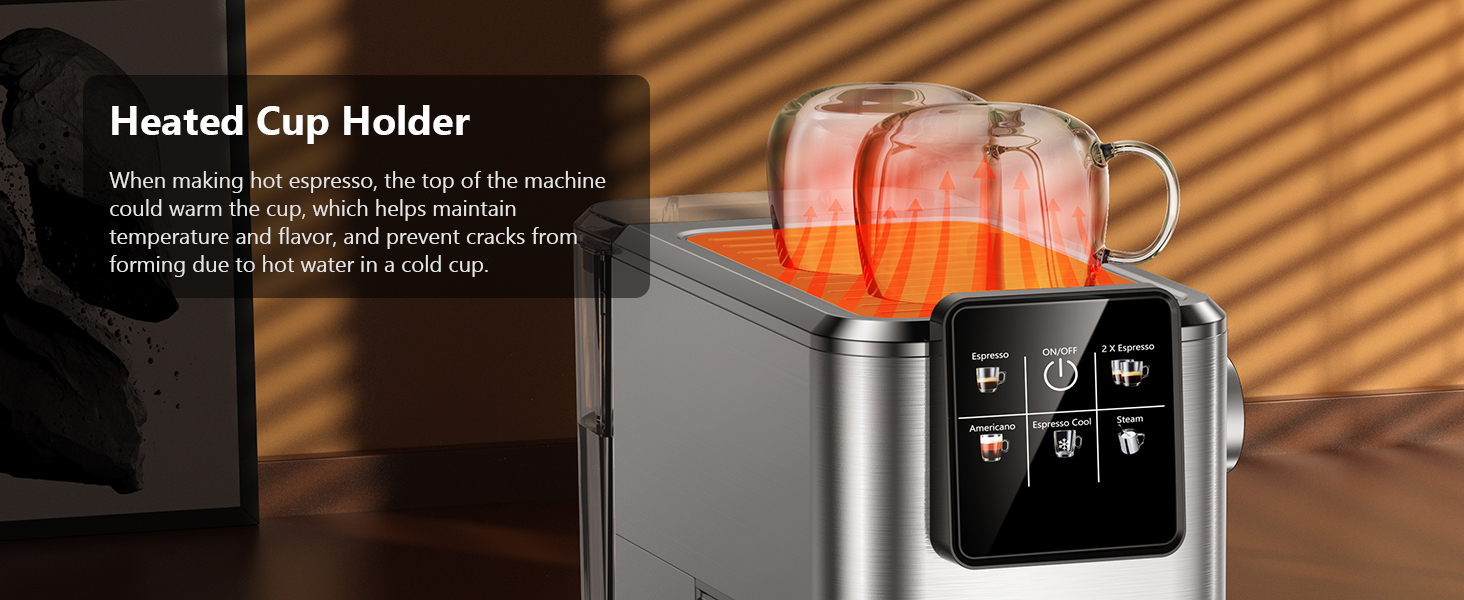
- Heated Cup Holder: Located on top of the machine to warm cups, maintaining coffee temperature.
5. Орнату
5.1 Initial Use and Priming
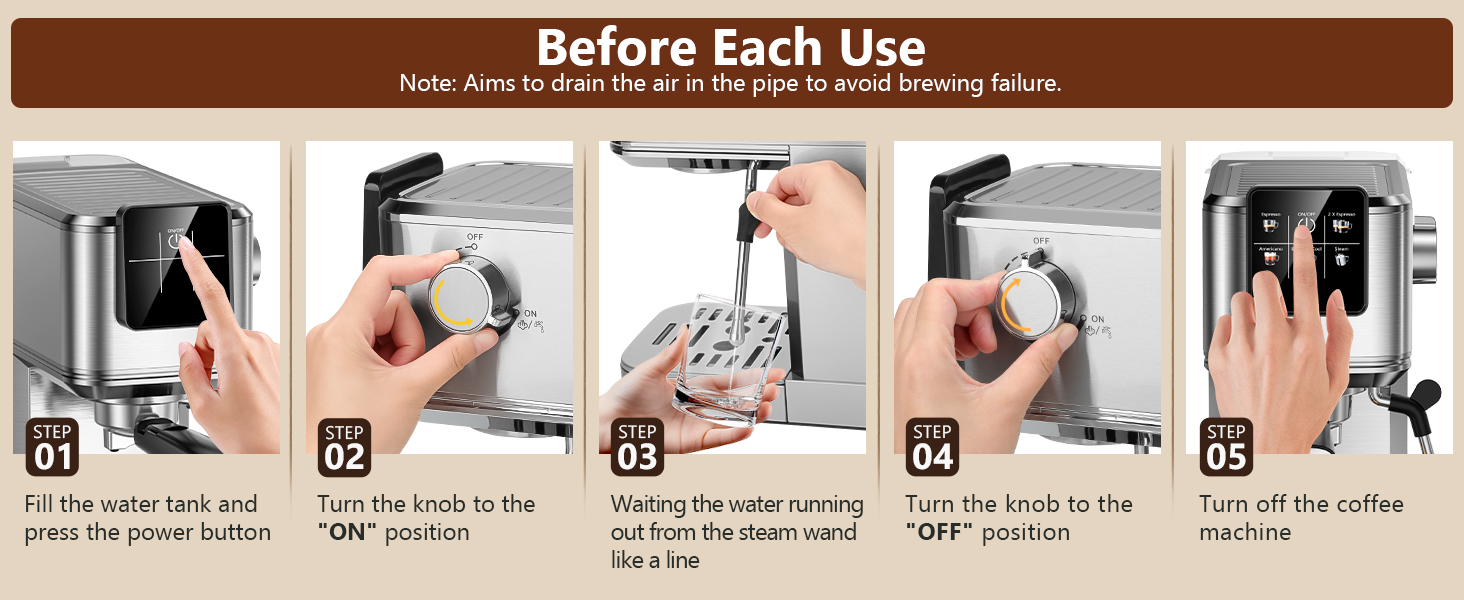
Before first use, or if the machine has not been used for a long time, it is essential to prime the system to ensure proper operation and remove any air from the pipes.
- Fill the water tank with fresh water and place it back into the machine. Ensure the tank cover is properly closed.
- Plug the machine into a power outlet. The ON/OFF button on the touch screen will illuminate.
- Press the ON/OFF button to turn on the machine. The indicator lights will blink as the machine preheats.
- Once the indicator lights are steady, the machine is ready.
- Бу таяқшасының астына бос шыныаяқ қойыңыз.
- Turn the steam knob to the "ON" position. Water will run out from the steam wand like a line. Let it run for about 10-15 seconds to purge air.
- Turn the steam knob to the "OFF" position.
- Press the ON/OFF button to turn off the machine. The machine is now primed and ready for use.

Сурет: Visual steps for priming the espresso machine before its first use or after a period of inactivity. This process drains air from the internal pipes.
5.2 Су ыдысын толтыру
The water tank has a maximum capacity of 1200ml. Do not exceed the maximum fill line to prevent overflow.
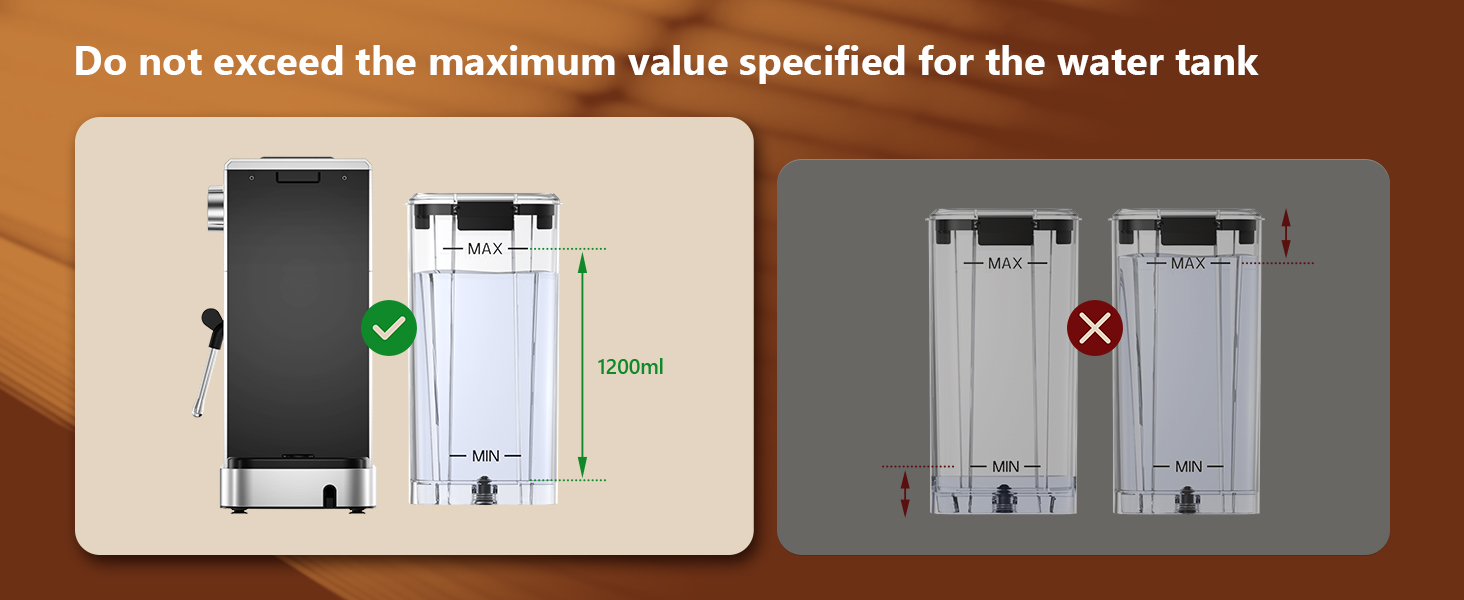
Сурет: Guidance on filling the water tank, indicating the 1200ml maximum fill level to avoid overfilling.
6. Пайдалану нұсқаулары
6.1 Эспрессо қайнату
The machine features a 20-bar pressure system and pre-soak technology for rich espresso extraction.
- Ensure the steam knob is set to the "OFF" position before brewing coffee.
- Fill the water tank with fresh water and press the ON/OFF button to power on. Wait for the indicator to become steady, signifying preheating is complete.
- Select the appropriate filter basket (1-shot or 2-shot) and place it into the portafilter.
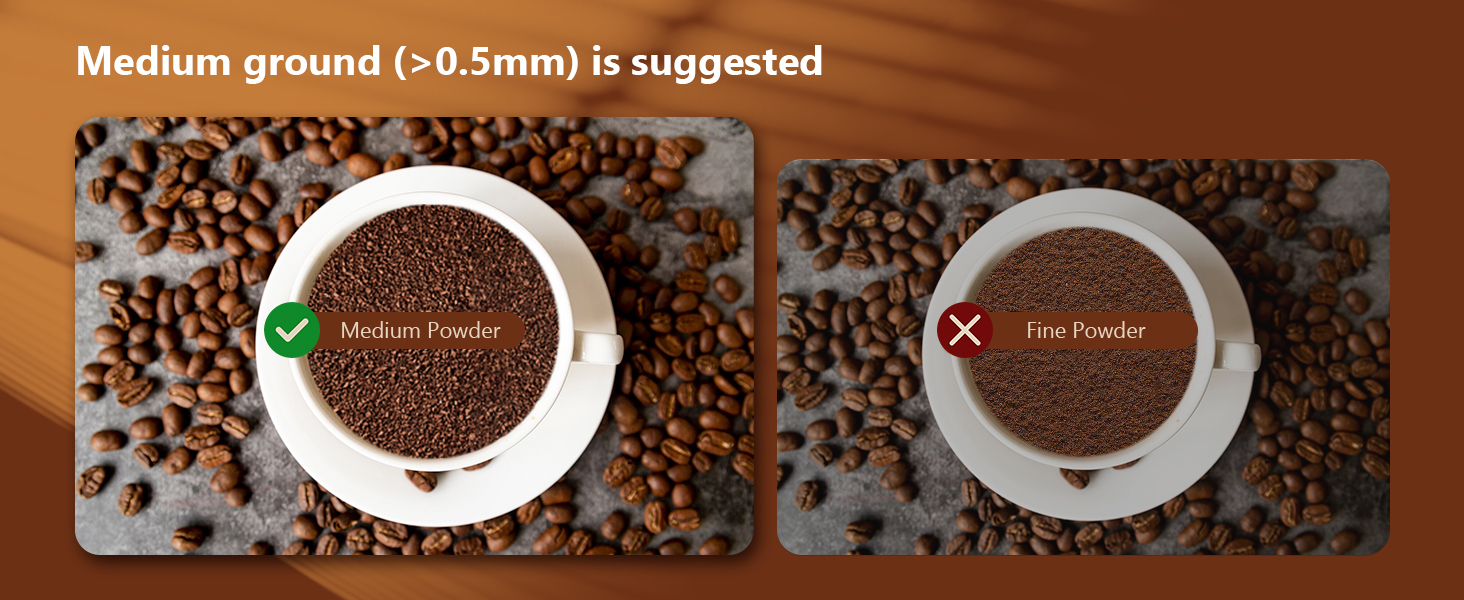
- Add ground coffee to the filter basket. Use medium ground coffee (greater than 0.5mm) for optimal results.
- Tamp the ground coffee firmly and evenly using the coffee tampе.
- Attach the portafilter to the machine, ensuring it is fully locked into place.
- Шыныаяқтарыңызды портативті сүзгінің астындағы тамшы науасына қойыңыз.
- Select "Espresso" for a single shot or "2 X Espresso" for a double shot on the touch screen. The machine will begin brewing.
- Қайнату аяқталғаннан кейін, машина автоматты түрде тоқтайды.

Сурет: Step-by-step visual instructions for brewing espresso, from preparing the machine to the final extraction.
Сурет: Illustration demonstrating the correct way to lock the portafilter before brewing to prevent leaks and ensure proper extraction.

Сурет: Recommended coffee grind size (medium, >0.5mm) for optimal espresso extraction, contrasting it with fine ground coffee.
6.2 Making Cold Brew Espresso
This machine offers a rapid cold brew function, producing smooth cold brew in as little as 10 minutes.
- Ensure the water tank is filled with iced water for the cold brew function.
- Prepare the portafilter with ground coffee as described in Section 6.1.
- Attach the portafilter to the machine and place a cup underneath.
- Select "Espresso Cool" on the touch screen. The machine will begin the cold brew process.
- Enjoy your rapid cold brew espresso.

Сурет: The espresso machine preparing cold brew, emphasizing the requirement for iced water in the tank.
6.3 Көпірткіш сүт
The powerful steam wand allows you to create creamy microfoam for lattes and cappuccinos.
- Fill the water tank with fresh water and press the ON/OFF button to power on.
- Press the "Steam" button on the touch screen to preheat the steam function. The indicator will blink during preheating and become steady when ready.
- After preheating, turn the steam knob to the "ON" position to release any remaining water in the pipe before frothing.
- Insert the steam nozzle approximately 1 inch into the surface of your milk.
- Gradually turn the steam knob to increase steam until the desired foam consistency is achieved.
- Once finished, turn the steam knob to the "OFF" position and clean the steam wand immediately.
Сурет: Visual instructions for frothing milk, detailing the steps from preheating to creating microfoam.
7. Техникалық қызмет көрсету және тазалау
Үнемі тазалау эспрессо машинаңыздың ұзақ қызмет етуін және оңтайлы жұмыс істеуін қамтамасыз етеді.
- Жалпы тазалау: Машинаның сыртын жарнамамен сүртіңізamp шүберек. Абразивті тазалағыштарды немесе тазартқыштарды қолданбаңыз.
- Тамшы науасы: The removable drip tray should be emptied and cleaned regularly.
- Портасүзгі және сүзгі себеттері: Әр қолданғаннан кейін портафильтрді алып тастаңыз және пайдаланылған кофе қалдықтарын тастаңыз. Портафильтр мен сүзгі себетін ағынды сумен шайыңыз.
- Бу таяқшасы: Сүтті көпірткеннен кейін бірден бу таяқшасын жарнамамен сүртіңізamp cloth to prevent milk residue from drying. Purge steam briefly to clear any internal blockages.
- Су ыдысы: Су ыдысын мезгіл-мезгіл жұмсақ жуғыш затпен тазалап, жақсылап шайыңыз.
- Қақтан тазарту: Depending on water hardness, descale the machine every 2-3 months. Follow the instructions provided with a suitable descaling solution.

Сурет: Important cleaning instruction: All accessories must be washed by hand and are not dishwasher safe.
8. Ақаулықтарды жою
Жалпы мәселелер және олардың шешімдері үшін осы бөлімді қараңыз.
| Мәселе | Ықтимал себебі | Шешім |
|---|---|---|
| Кофе берілмейді / Баяу ағын |
|
|
| Water leaks from portafilter edge |
|
|
| Бу таяқшасы бу шығармайды |
|
|
| Кофе жеткілікті ыстық емес |
|
|
9. Техникалық сипаттамалар
- Бренд: КИНСТАР
- Модель атауы: JH-C5210
- Қысым жүйесі: 20 бар
- Қуат: 1350 Вт
- Су ыдысының сыйымдылығы: 1.1 Liters (37oz)
- Өнім өлшемдері: 11.8"D x 12.6"W x 5.5"H
- Элемент салмағы: 4.6 фунт
- Материал: Тот баспайтын болат
- Ерекше ерекшелігі: Programmable, Touch Screen, Milk Frother, Hot & Rapid Cold Brew
- Кофенің кіріс түрі: Ұнтақталған кофе
- Сүзгі түрі: Қайта пайдалануға болады
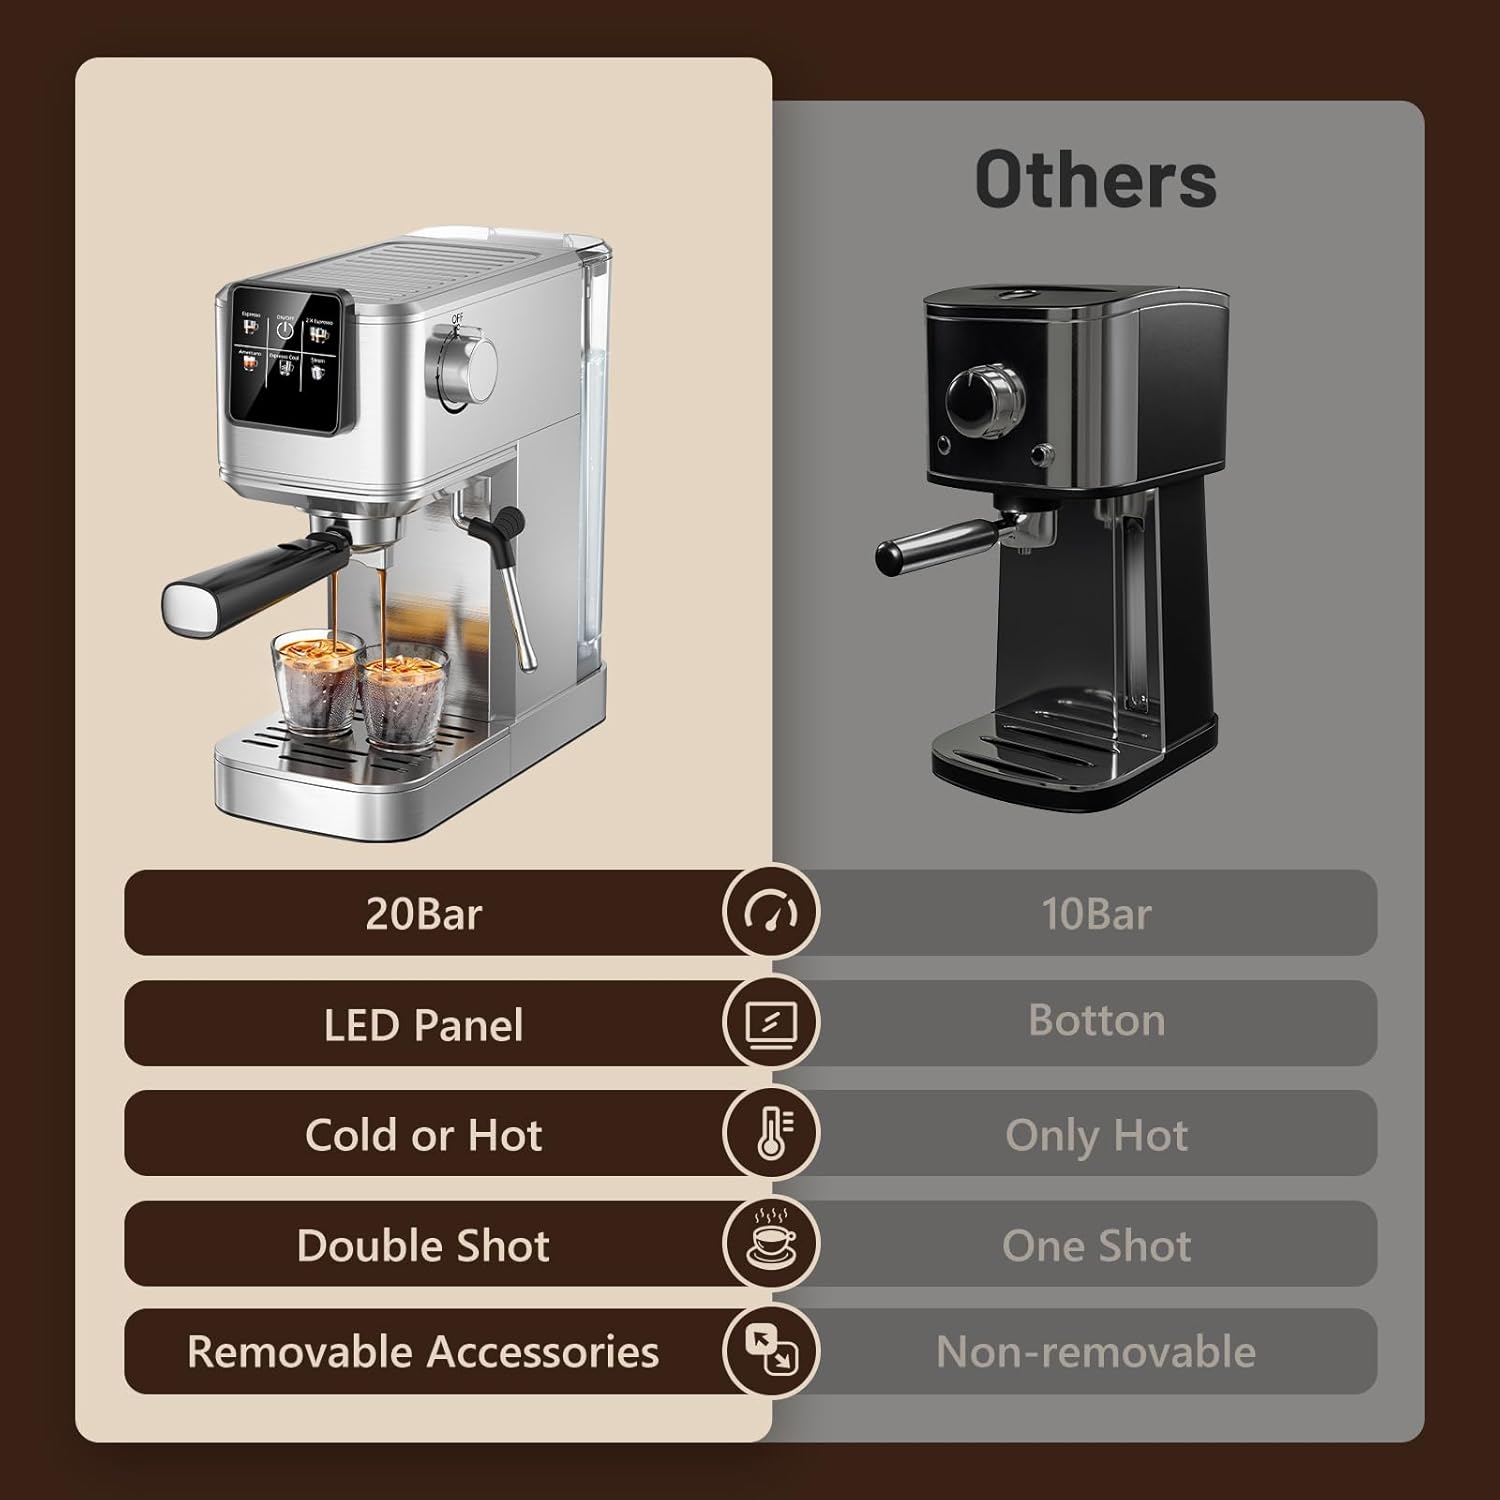
Сурет: Feature comparison of the KEENSTAR machine, emphasizing its 20Bar pressure, LED panel, and versatility for hot and cold beverages.

Сурет: Dimensions of the KEENSTAR espresso machine, indicating its compact size.
10. Кепілдік және қолдау
For warranty information or technical support, please refer to the contact details provided on the product packaging or visit the official KEENSTAR webсайт. Кез келген кепілдік талаптары үшін сатып алуды растайтын құжатты сақтаңыз.