1. Кіріспе
The FNIRSI DST-210 is a compact and versatile 3-in-1 handheld device designed for electronic testing and measurement. It integrates the functions of a digital oscilloscope, a true RMS multimeter, and a signal generator into a single portable unit. This manual provides detailed instructions to help you effectively use and maintain your device.
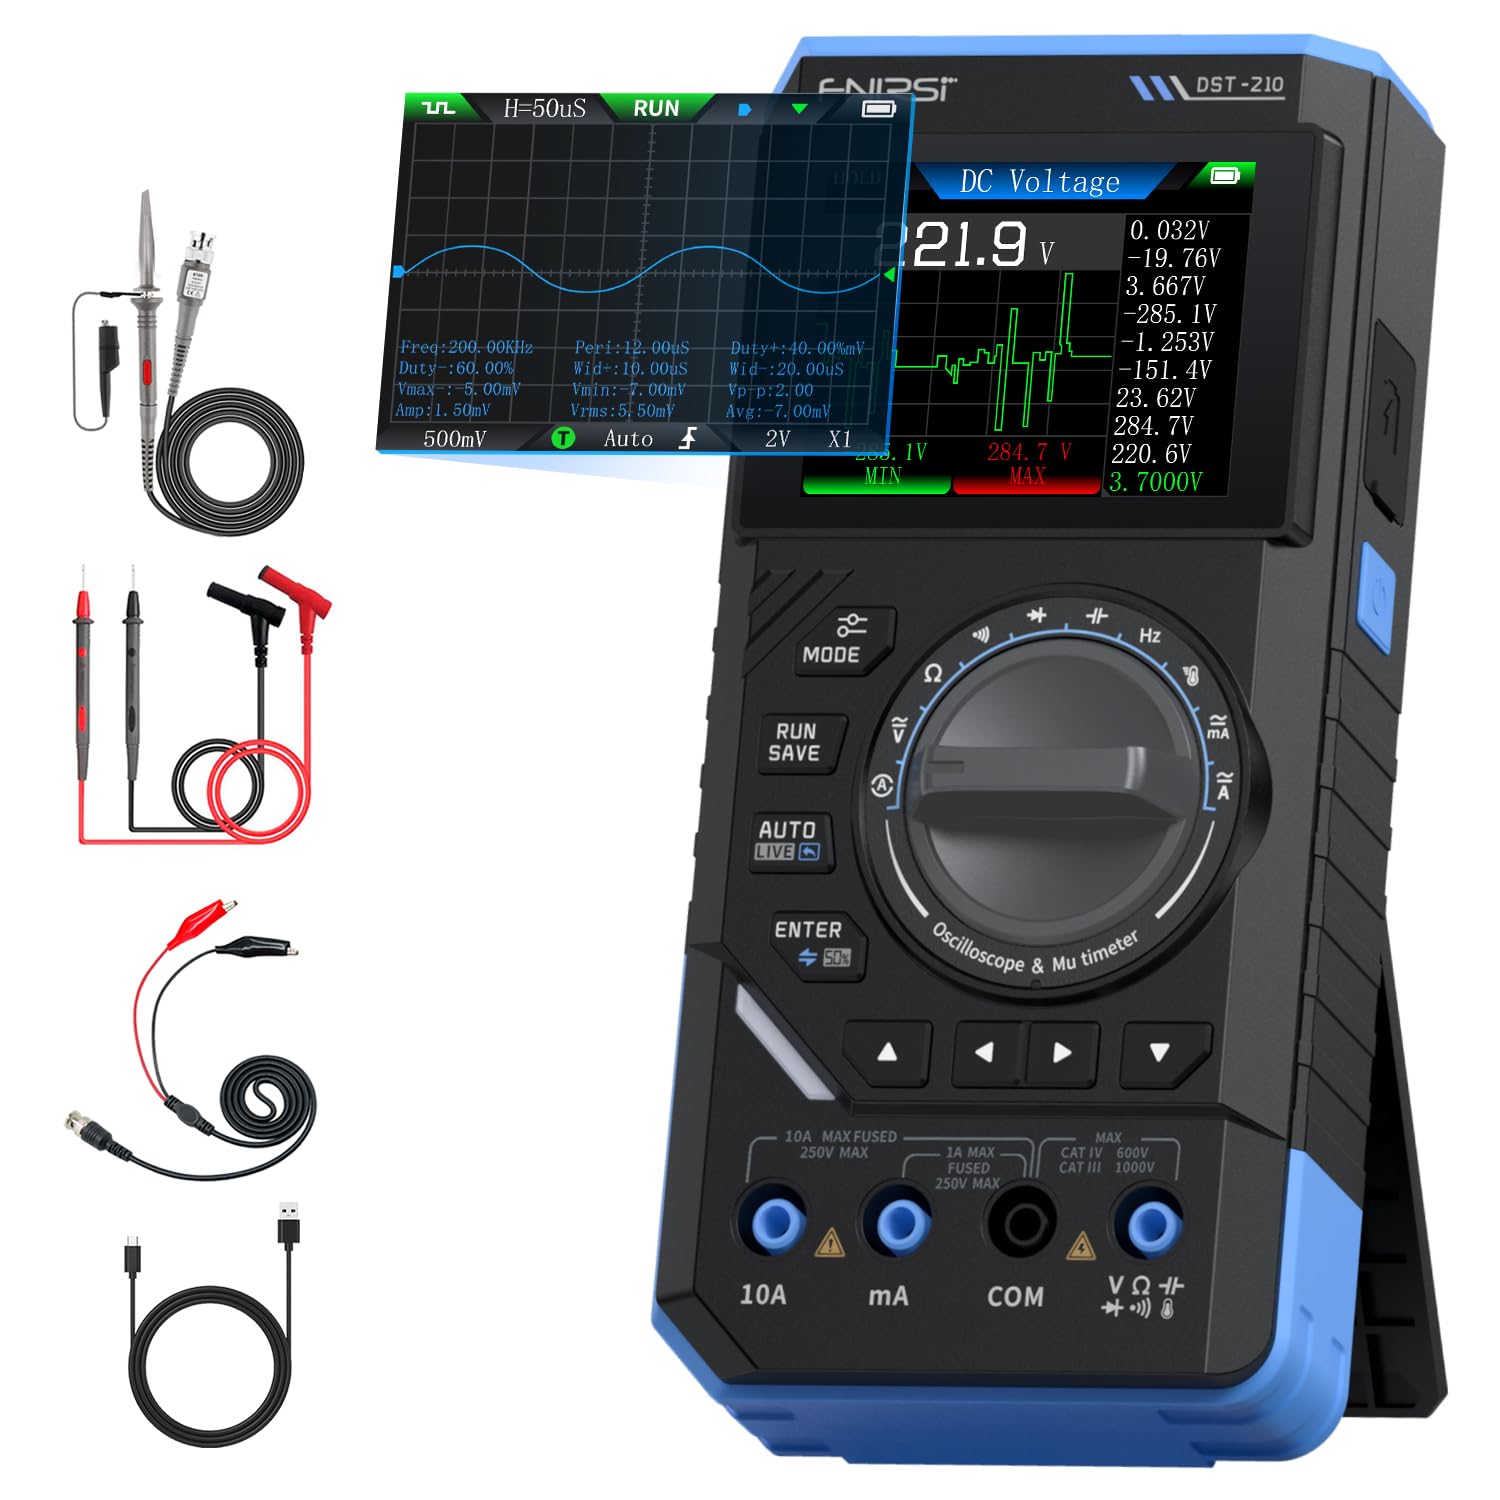
Figure 1: FNIRSI DST-210 3-in-1 Handheld Device
2. Өнім аяқталдыview
2.1 Негізгі мүмкіндіктер
- 3-і 1 функциясы: Combines a digital oscilloscope, a true RMS multimeter, and a signal generator.
- Көрсеткіш: 2.8-inch TFT color LCD for clear data visualization.
- Осциллограф: 10MHz analog bandwidth, 48MSa/s real-time sampling rate, supports Auto/Normal/Single trigger modes, waveform image saving and display.
- Мультиметр: 19999-count true RMS measurement for DC/AC voltage, DC/AC current, resistance, capacitance, frequency, temperature, diode, and continuity. Features data hold, record mode with graphical display, and LIVE function for voltage қатысуды анықтау.
- Сигнал генераторы: Outputs 13 types of waveforms (Sine, Square, Sawtooth, Half-wave, Full-wave, Step, Reverse Step, Index Up/Down, DC, Multi-audio, Sink Pulse, Lorentz Wave) with adjustable frequency (0-50KHz), amplitude (0.1-3.0V), and duty cycle (0-100%).
- Тасымалдау: Compact design with an integrated stand, powered by a 3000mAh rechargeable lithium battery providing up to 10 hours of continuous use. Type-C charging supported.
2.2 Пакет мазмұны
Барлық элементтер пакетте бар екенін тексеріңіз:
- FNIRSI DST-210 Main Unit
- P6100 High Voltage Зерттеу
- Сынақ сымдары (қызыл және қара)
- Аллигатор клиптері
- C типті зарядтайтын кабель
- Instruction Manual (PDF version available online)
- Қаптама қорабы

2-сурет: Қосылған керек-жарақтар
3. Орнату
3.1 Құрылғыны зарядтау
Before initial use, fully charge the DST-210. Connect the provided Type-C charging cable to the device's Type-C port and a compatible USB power adapter (5V/1A). The battery indicator on the display will show charging status.
3.2 Зондтарды қосу
For accurate measurements, ensure probes are correctly connected:
- Multimeter Measurements: Insert the red test lead into the VΩHzmA or 10A jack (depending on the measurement) and the black test lead into the COM jack.
- Oscilloscope Measurements: Connect the P6100 high voltage probe to the oscilloscope input jack. Ensure the probe's attenuation setting (e.g., X1 or X10) matches the device's setting for accurate readings.
- Signal Generator Output: Connect the output cable to the signal generator output port.

Figure 3: Input Jacks and Controls
4. Пайдалану нұсқаулары
4.1 Қуатты қосу/өшіру
Press and hold the power button (located on the side) to turn the device on or off.
4.2 Режимді таңдау
Rotate the central knob to switch between Multimeter, Oscilloscope, and Signal Generator modes. Within each mode, further sub-functions can be selected using the knob or dedicated buttons.

Figure 4: Using the Oscilloscope Function
4.3 Мультиметрдің жұмысы
In Multimeter mode, the device offers various measurement functions:
- Тtage/Current (DC/AC): Select the appropriate DC V, AC V, DC A, or AC A setting. Connect test leads to the circuit. The device supports a record mode that displays measurement trends graphically, and can store up to 10 sets of data.
- Кедергі (Ω): Select the resistance function. Connect test leads across the component.
- Сыйымдылық (F): Select the capacitance function. Connect test leads across the capacitor.
- Жиілік (Гц): Select the frequency function. Connect test leads to the signal source.
- Диод сынағы: Select the diode function. Connect test leads across the diode to check its forward voltage құлдырау.
- Үздіксіздік сынағы: Select the continuity function. Connect test leads across a conductor; a beep indicates continuity.
- Температура: Use a K-type thermocouple (not included) connected to the appropriate jacks for temperature measurement.
- LIVE Function: For single-probe voltage қатысуды анықтау.

Figure 5: Multimeter Measurement Examples
4.4 Осциллографтың жұмысы
In Oscilloscope mode, the device displays waveforms:
- Толқын пішінінің дисплейі: Connect the oscilloscope probe to the circuit. The device automatically adjusts settings for stable waveform display.
- Триггер режимдері: Select between Auto, Normal, and Single trigger modes to capture different types of signals.
- Waveform Saving: Press the 'RUN/SAVE' button to save the current waveform image. Saved images can be reviewөңделеді және экспортталады.

Figure 6: Oscilloscope Waveform Display
4.5 Сигнал генераторының жұмысы
In Signal Generator mode, the device outputs various waveforms:
- Waveform Selection: Choose from 13 different waveform types using the menu options.
- Параметрді реттеу: Adjust the frequency (0-50KHz), amplitude (0.1-3.0V), and duty cycle (0-100%) as required for your application.

Figure 7: Signal Generator Waveform Selection
4.6 PC Connection and Data Export
The DST-210 can connect to a PC via its Type-C USB port for data management and firmware updates.
- Waveform Screenshots: Long-press the 'RUN/SAVE' button to save waveform screenshots.
- Деректерді экспорттау: Connect the device to a computer to view, save, and export recorded waveform images and data.
- Микробағдарламаны жаңарту: Periodically check the official FNIRSI website for firmware updates to ensure optimal performance and access to new features. Follow the instructions provided with the firmware update package.

Figure 8: PC Connection for Data Management
5. Техникалық қызмет көрсету
- Тазалау: Құрылғыны тазалау үшін жұмсақ, құрғақ шүберекті пайдаланыңыз. Абразивті тазартқыштарды немесе еріткіштерді қолданбаңыз.
- Сақтау орны: Құрылғыны салқын, құрғақ жерде, тікелей күн сәулесінен және төтенше температурадан алыс жерде сақтаңыз.
- Батареяға күтім жасау: Батареяның қызмет ету мерзімін ұзарту үшін батареяны жиі толық зарядсыздандырудан аулақ болыңыз. Ұзақ уақыт бойы пайдаланылмаса да, құрылғыны үнемі зарядтаңыз.
- Зонд күтімі: Inspect test leads and probes for damage before each use. Replace any damaged accessories immediately.
6. Ақаулықтарды жою
| Мәселе | Ықтимал себебі | Шешім |
|---|---|---|
| Құрылғы қосылмайды. | Low battery or faulty power button. | Charge the device fully. If the issue persists, contact support. |
| Unstable or inaccurate readings in Multimeter mode. | Poor probe connection, incorrect mode selection, or external interference. | Ensure probes are securely connected. Verify the correct measurement mode is selected. Minimize external electrical interference. |
| Oscilloscope waveform is not stable. | Incorrect trigger settings or probe attenuation. | Adjust trigger level and mode. Ensure probe attenuation (X1/X10) matches the device setting. |
| Signal generator output is incorrect. | Incorrect waveform type, frequency, amplitude, or duty cycle settings. | Verify all signal generator parameters are set as desired. |
| Cannot connect to PC or export data. | Faulty USB cable, incorrect PC driver, or software issue. | Try a different Type-C cable. Ensure necessary drivers are installed on your PC. Refer to the official website for software and driver downloads. |
7. Техникалық сипаттамалар
7.1 Осциллографтың параметрлері
| Санат | Техникалық сипаттама |
|---|---|
| Нақты уақыттағы Сampling Rate | 48МСа / с |
| Аналогтық өткізу қабілеттілігі | 10 МГц |
| Кіріс кедергісі | 1МΩ |
| Қосылу әдісі | AC/DC |
| Өлшем томtage Ауқым | 1:1 Probe: ±80Vpp (±40V), 10:1 Probe: ±800Vpp (±400V) |
| Тік сезімталдық | 10mV/div ~ 10V/div (at X1) |
| Тік ығысу | Adjustable (with indicator) |
| Horizontal Time Base Range | 50ns ~ 20s |
| Триггер режимі | Авто, Қалыпты, Жалғыз |
| Edge Trigger | Rising/Falling Edge |
| Триггер деңгейі | Adjustable (with indicator) |
| Толқын пішінін мұздату | Supported (HOLD function) |
| Автоматты өлшеу | Max, Min, Average, RMS, Peak-to-Peak, Frequency, Duty Cycle, etc. |
7.2 Мультиметр параметрлері
| Өлшеу функциясы | Ауқым | Дәлдік |
|---|---|---|
| DC томtage | 1.9999В/19.999В/199.99В/1000В | ±(0.5%+3) |
| Айнымалы дыбысtage | 1.9999В/19.999В/199.99В/750В | ±(1.0%+3) |
| Тұрақты ток | 19.999мА/199.99мА/1.9999А/9.999А | ±(1.2%+3) |
| Айнымалы ток | 19.999мА/199.99мА/1.9999А/9.999А | ±(1.5%+3) |
| Қарсылық | 19.999MΩ/199.99kΩ/19.999kΩ | ±(2.0%+5) |
| Сыйымдылық | 999.9uF/99.99uF/9.999uF/999.9nF/99.99nF, 9.999mF/99.99mF | ±(2.0%+5) |
| Жиілік | 9.999MHz/999.9kHz/99.99kHz/9.999kHz/999.9Hz/99.99Hz | ±(0.1%+2) |
| Температура | [-55~1300°C] / [-67~2372°F] | ±(2.5%+5) |
| Диод/Үздіксіздік | Қолдау көрсетіледі | Жоқ |
| LIVE Function | Қолдау көрсетіледі | Жоқ |
7.3 Сигнал генераторының параметрлері
| Санат | Техникалық сипаттама |
|---|---|
| Output Waveforms | 13 түрі |
| Толқын пішінінің жиілігі | 0 ~ 50 кГц |
| Жұмыс циклі | 0 ~ 100% (adjustable) |
| Толқын пішіні Ampбойлық | 0.1 ~ 3.0 В |
7.4 Жалпы техникалық шарттар
| Санат | Техникалық сипаттама |
|---|---|
| Өнім үлгісі | DST-210 |
| Дисплей | 2.8 дюймдік TFT түрлі-түсті дисплей |
| Артқы жарық | Жарықтық реттелетін |
| Нәр беруші | Type-C (5V/1A) |
| Батарея | 3000 мАч |
| Тілдік қолдау | Қытай, ағылшын |
| Өнім өлшемі | Шамамен 177.43 мм x 87 мм x 35 мм |
| Өнімнің салмағы | Шамамен 300 г |
8. Кепілдік және қолдау
For any questions, issues, or support needs regarding your FNIRSI DST-210, please contact us through the following methods:
- Amazon хабарламасы: If you purchased the product on Amazon, you can contact us via the Amazon messaging system. Go to your 'Order History', select the relevant order, and click 'Problem with order' or 'Contact Seller'.
- Электрондық поштаны қолдау: You can also reach our after-sales service center directly via email at support@fnirsi.com. Please include your order number and a detailed description of your issue for faster assistance.
When attaching large photos or videos, email support is recommended due to potential attachment size limits on Amazon's messaging system.
Video 1: Demonstration of FNIRSI DST-210's Multimeter, Oscilloscope, and Signal Generator Functions.