
1. Кіріспе
This manual provides essential information for setting up, operating, maintaining, and troubleshooting your NIMO 15.6-inch FHD Business Laptop. Please read this guide thoroughly to ensure optimal performance and longevity of your device. Keep this manual for future reference.
2. Қорапта не бар
Қаптамада барлық заттардың бар екенін тексеріңіз:
- 1 x Nimo N154 Laptop
- 1 x Type-C 65 Вт PD жылдам зарядтағыш
- 1 x Пайдаланушы нұсқаулығы (осы құжат)
- Windows 11 Home (pre-installed)
3. Өнім аяқталдыview
Familiarize yourself with the components and ports of your NIMO laptop.
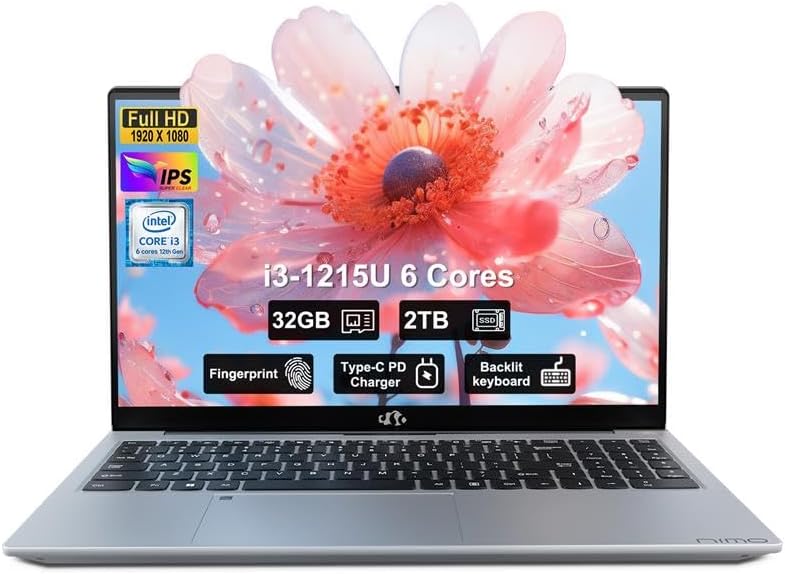
Сурет: алдыңғы view of the NIMO 15.6-inch FHD Business Laptop, showcasing дисплей мен пернетақта.
3.1. Порттар мен қосқыштар
The NIMO N154 laptop features a variety of ports for connecting peripherals and external devices.

Image: Diagram illustrating the various ports on the left and right sides of the NIMO laptop, including USB, HDMI, Type-C, and audio jack.
- Сол жағы:
- Kensington Lock: For securing your laptop.
- Headphone Combo Jack: For audio output and microphone input.
- USB 3.0 Port (x2): For high-speed data transfer.
- USB 2.0 Port (x1): For connecting standard USB devices.
- Micro SD Card Reader: For expanding storage or transferring fileжад карталарынан.
- Оң жағы:
- Type-C Port (Charge Only): For connecting the 65W PD charger.
- USB 3.0 Port (x1): For high-speed data transfer.
- HDMI Port: For connecting to external displays.
- Type-C Port (Multifunction): Supports data transfer and display output.
- Charge LED Indicator: Shows charging status.
4. Орнату
4.1. Бастапқы қуат қосу және зарядтау
- Қаптамадан шығару: Ноутбукті және барлық керек-жарақтарды қаптамадан абайлап алыңыз.
- Қуатты қосу: Plug the 65W Type-C PD Fast Charger into a power outlet and then connect the Type-C connector to the designated "Charge Only" Type-C port on the laptop.
- Батареяны зарядтау: Allow the laptop to charge for at least 30 minutes before initial use, or until the charge LED indicates a full charge.
- Қуат қосулы: Open the laptop lid and press the power button, typically located on the top right of the keyboard or side.

Image: The 65W Type-C PD Fast Charger, illustrating its compact design and universal compatibility.
4.2. Windows 11 орнату
Follow the on-screen instructions to complete the Windows 11 initial setup:
- Аймақты және пернетақта орналасуын таңдаңыз.
- Wi-Fi желісіне қосылыңыз.
- Microsoft тіркелгісімен кіріңіз немесе жаңасын жасаңыз.
- Жылдам кіру үшін PIN кодын орнатыңыз.
- Review және құпиялылық параметрлерін қабылдаңыз.
5. Пайдалану нұсқаулары
5.1. Саусақ ізін оқу құрылғысы
The integrated fingerprint sensor allows for secure and quick login without passwords.
- Орнату: Navigate to Windows Settings > Accounts > Sign-in options > Fingerprint recognition (Windows Hello).
- Саусақ ізін тіркеу: Саусақ ізін тіркеу үшін экрандағы нұсқауларды орындаңыз. Саусағыңызды әртүрлі бұрыштардан бірнеше рет сканерлеу қажет болуы мүмкін.
- Қолданылуы: To log in, simply place your registered finger on the fingerprint sensor when prompted.

Image: Close-up of the laptop's touchpad area showing the fingerprint reader, and a separate image of the webcam with a privacy shield.
5.2. Backlit Keyboard
The backlit keyboard enhances visibility in low-light conditions.
- Артқы жарықты ауыстыру/өшіру: Use the dedicated function key (often Fn + Fx, where Fx is a key with a keyboard backlight icon) to cycle through backlight brightness levels or turn it off. Refer to your keyboard for the specific key combination.
5.3. Webcam Privacy Shield
The laptop includes a physical webcam privacy shield for enhanced security.
- Іске қосу/өшіру: Slide the physical switch located next to the webcam to cover or uncover the camera lens.
5.4. Сыртқы дисплейлерді қосу
You can extend your workspace by connecting an external monitor or projector.
- Кабельді қосу: Use an HDMI cable to connect your external display to the laptop's HDMI port, or a compatible Type-C to DisplayPort/HDMI adapter for the multifunction Type-C port.
- Configure Display: түймесін басыңыз Windows пернесі + P to open the Project menu. Select your preferred display mode (e.g., Duplicate, Extend, Second screen only).
6. Техникалық қызмет көрсету
6.1. Ноутбукті тазалау
- Экран: Жұмсақ, түксіз матаны жеңіл пайдаланыңыз dampсумен немесе экран тазалағышпен аяқталады. Сұйықтықты тікелей экранға шашпаңыз.
- Пернетақта мен шасси: Жұмсақ, құрғақ шүберекті пайдаланыңыз. Қатты кірлер үшін аздап damp жұмсақ сабын ерітіндісі бар матаны қолдануға болады, бұл саңылауларға сұйықтықтың кірмеуін қамтамасыз етеді.
- Порттар: Порттардағы шаңды ақырын тазалау үшін сығылған ауаны пайдаланыңыз.
6.2. Батареяны күту
- Батареяны жиі толық зарядсыздандырудан аулақ болыңыз.
- Ұзақ уақыт бойы пайдаланылмаса, ноутбукты салқын, құрғақ жерде сақтаңыз.
- Ноутбукті өте жоғары температураға ұшыратпаңыз.
6.3. Бағдарламалық құралды жаңарту
- Жүйенің тұрақтылығы мен қауіпсіздігін қамтамасыз ету үшін Windows жаңартуларын үнемі тексеріп, орнатыңыз. Параметрлер > Windows жаңарту бөліміне өтіңіз.
- Оңтайлы өнімділік үшін құрылғы драйверлерін жаңартып отырыңыз.
7. Ақаулықтарды жою
Бұл бөлім сізде кездесетін жалпы мәселелерді қарастырады.
7.1. Ноутбук қосылмайды
- Зарядтағыштың ноутбукке де, жұмыс істейтін қуат розеткасына да сенімді жалғанғанына көз жеткізіңіз.
- Басқа құрылғыны қосу арқылы розетканың жұмыс істеп тұрғанын тексеріңіз.
- Allow the laptop to charge for at least 30 minutes if the battery is completely drained.
- Try a hard reset by holding the power button for 15-20 seconds.
7.2. Дисплей мәселелері (сурет жоқ, жыпылықтау)
- If an external monitor is connected, disconnect it to see if the laptop's screen works.
- Adjust screen brightness using the function keys (e.g., Fn + F5/F6).
- Ноутбукті қайта іске қосыңыз.
- If connected to an external display, ensure the cable is properly seated and try a different cable or port.
7.3. Wi-Fi қосылымының мәселелері
- Ensure Wi-Fi is enabled in Windows Settings > Network & Internet > Wi-Fi.
- Маршрутизатор мен модемді қайта іске қосыңыз.
- Желіні ұмытып, қайта қосылыңыз.
- Wi-Fi драйверлерін жаңартыңыз.
7.4. Баяу өнімділік
- Фондық режимде жұмыс істейтін қажет емес қолданбаларды жабыңыз.
- Check Task Manager (Ctrl+Shift+Esc) for processes consuming high CPU, RAM, or disk usage.
- SSD дискісінде жеткілікті бос орын болуын қамтамасыз етіңіз.
- Дискіні тазалау және дефрагментациялауды іске қосыңыз (қатты диск үшін, бірақ бұл SSD болса да).
- Зиянды бағдарламаларды немесе вирустарды іздеңіз.
8. Техникалық сипаттамалар
Detailed technical specifications for the NIMO N154 Laptop.

Image: Diagram illustrating the Intel Core i3-1215U processor with details on cores, threads, power consumption, and Turbo Boost frequency.

Image: Visual representation of 32GB DDR4 RAM and 2TB PCIe 4.0 SSD, highlighting dual RAM channel capability.
| Ерекшелік | Техникалық сипаттама |
|---|---|
| Модель атауы | NIMO N154 |
| Экран өлшемі | 15.6 дюйм |
| Экран ажыратымдылығы | 1920 x 1080 пиксель (FHD IPS) |
| Процессор | Intel Core i3-1215U (6-core, 8-thread, up to 4.4GHz) |
| Жедел Жадтау Құрылғысы | 32 ГБ DDR4 (3200 МГц) |
| Сақтау | 2 TB PCIe SSD |
| Графикалық сопроцессор | Біріктірілген Intel графикасы |
| Операциялық жүйе | Windows 11 Home |
| Сымсыз түрі | 802.11a/b/g/n/ac (Wi-Fi 6) |
| USB порттары | 2x USB 3.0, 1x USB 2.0, 2x Type-C (1x Charge Only, 1x Multifunction) |
| HDMI порты | 1x HDMI 2.1 |
| Арнайы мүмкіндіктер | Backlit Keyboard, Fingerprint Reader, HD Audio, Memory Card Slot, Numeric Keypad, Webcam Privacy Shield |
| Батареяның қызмет ету мерзімі (орташа) | 5 сағат |
| Элемент салмағы | 3.8 фунт |
| Өнім өлшемдері (LxWxH) | 14.07 x 8.98 x 0.76 дюйм |
| Түс | Күміс |
9. Кепілдік және қолдау
Nimo Direct Inc. is committed to customer satisfaction.
- Өндірушінің кепілдігі: Your NIMO laptop is covered by a comprehensive 2-Year Manufacturer's Warranty. This warranty covers defects in materials and workmanship under normal use.
- Қайтару саясаты: We offer 90-Day Hassle-Free Returns. If you are not satisfied with your purchase, you may return it within 90 days of receipt.
- Тұтынушыларды қолдау: Our dedicated US support team is available to provide swift issue resolution or immediate replacements. For assistance, please refer to the contact information provided on the NIMO official webсайт немесе сатып алу құжаттамасы.

Image: Illustration of NIMO's after-sales support, including partial US assembly, 90-day free returns, 2-year after-sales support, and 24/7 customer service.