LBS-BCBE8FE0CD717A0FE854B0DCE81EEBBD
Lubosi HDZero Whoop Lite VTX User Manual
Model: HDZero Whoop Lite VTX By Divimath (LBS-BCBE8FE0CD717A0FE854B0DCE81EEBBD)
Бренд: Жалпы
1. Кіріспе
The HDZero Whoop Lite VTX is a cutting-edge digital video transmitter designed specifically for lightweight FPV drones, particularly 1S tiny whoops. It addresses the challenge of integrating digital video into small, weight-sensitive platforms. With its ultra-light design, it enables a world-first production digital FPV solution for drones where every gram is critical. This manual provides essential information for the proper installation, operation, and maintenance of your HDZero Whoop Lite VTX.
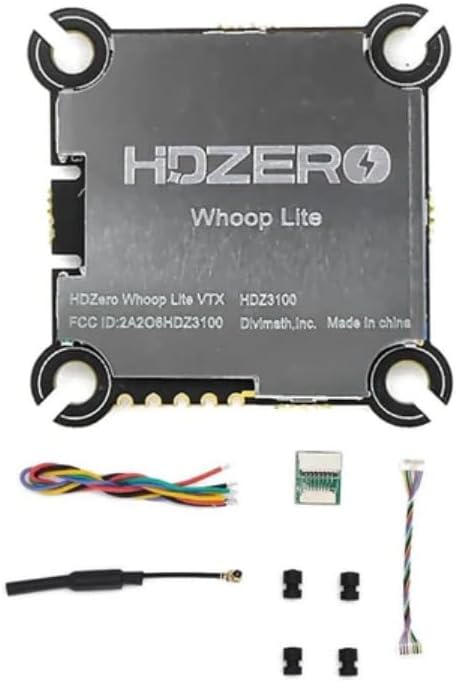
Figure 1: HDZero Whoop Lite VTX with its complete package contents, including the VTX module, connecting wires, dipole antenna, hardware, dampers, and zip ties.
2. Пакет мазмұны
Төменде тізімделген заттардың барлығы сіздің пакетіңізге қосылғанын тексеріңіз:
- 1x HDZero Whoop Lite VTX
- 1x Connecting Wire Set
- 1х дипольдік антенна
- 1x аппараттық құрал жинағы
- 4x Dampers
- 2х Zip байланыстары

2-сурет: егжей-тегжейлі view of all components included in the HDZero Whoop Lite VTX package, laid out for inspection.
3. Техникалық сипаттамалар
Key technical specifications for the HDZero Whoop Lite VTX:
| Ерекшелік | Техникалық сипаттама |
|---|---|
| Кіріс көлеміtage | 1С-3С |
| РЖ шығыс қуаты | 25 мВт / 200 мВт |
| Smart Audio Support | Иә |
| Орнату үлгісі | 25.5x25.2 M2 soft mounting |
| Dimensions (w/o shielding) | 32.4x32.5mm (29x29mm inner) |
| Thickness (w/o shielding) | 4мм |
| Weight (w/o shielding) | 4.5 грамм |
| Антенна түрі | Dipole (0.4g) |
| Материал | Композиттік материал |

3-сурет: Жоғарғы view of the HDZero Whoop Lite VTX, showing the HDZero branding and model information.

4-сурет: Бұрыштық view of the HDZero Whoop Lite VTX, highlighting the various connectors and mounting holes.
4. Орнату және орнату
Careful installation is crucial for optimal performance and longevity of your VTX. Always ensure power is disconnected before making any connections.
4.1 Монтаждау
- The HDZero Whoop Lite VTX features 25.5x25.2 M2 soft mounting holes. Use the provided dampers to reduce vibrations.
- Mount the VTX securely to your drone frame, ensuring it does not interfere with other components or propeller clearance.
- Consider airflow around the VTX for proper heat dissipation, especially during extended use.
4.2 Сымды қосылымдар
Refer to the included connecting wire set. Typical connections include:
- Power Input (1S-3S): Connect the VTX to a stable power source within the specified voltage range. Observe polarity carefully (positive to positive, negative to negative).
- Бейне сигналы: Connect the video output from your camera to the video input on the VTX.
- Smart Audio/Control: Connect the Smart Audio line to a UART on your flight controller for remote VTX control (e.g., changing channels, power levels). Consult your flight controller's documentation for specific UART pinouts.
- Жер: Ensure a common ground connection between the VTX, camera, and flight controller.
4.3 Антеннаны орнату
- Connect the provided dipole antenna to the VTX's antenna connector. Ensure it is securely fastened.
- Position the antenna away from carbon fiber or other conductive materials as much as possible to minimize signal interference.
- Never power on the VTX without an antenna connected, as this can permanently damage the unit.
5. Пайдалану нұсқаулары
Once installed, the HDZero Whoop Lite VTX can be configured and operated.
5.1 Қуатты қосу
- Барлық байланыстардың дұрыс және қауіпсіз екендігіне көз жеткізіңіз.
- Connect the battery to your drone. The VTX will power on.
- Observe the LED indicators on the VTX (if present) for status.
5.2 Channel and Power Level Selection (Smart Audio)
- The HDZero Whoop Lite VTX supports Smart Audio for remote configuration.
- Access the OSD (On-Screen Display) menu via your flight controller (e.g., Betaflight OSD).
- Navigate to the VTX settings menu. From here, you can select the desired frequency band, channel, and RF output power (25mW or 200mW).
- Always adhere to local regulations regarding FPV transmission frequencies and power levels.
6. Техникалық қызмет көрсету
Regular maintenance helps ensure the longevity and reliable performance of your VTX.
- Тазалау: Keep the VTX free from dust, dirt, and moisture. Use a soft, dry brush or compressed air for cleaning. Avoid liquid cleaners.
- Қосылымды тексеру: Periodically inspect all wiring connections for looseness or damage. Re-solder or replace wires as necessary.
- Антеннаның жағдайы: Check the antenna for any bends, breaks, or damage to the connector. A damaged antenna can significantly reduce range and performance.
- Жылуды басқару: Ensure the VTX has adequate ventilation. Avoid covering it with materials that could trap heat.
7. Ақаулықтарды жою
If you encounter issues with your HDZero Whoop Lite VTX, refer to the following common problems and solutions:
7.1 No Video Signal / Black Screen
- Қуатты тексеру: Verify the VTX is receiving power within the 1S-3S range.
- Антенна қосылымы: Ensure the antenna is securely connected to the VTX.
- Камераға қосылу: Confirm the camera is properly connected to the VTX and is powered.
- Арна сәйкессіздігі: Ensure your FPV goggles/receiver are on the exact same frequency and band as the VTX.
- Damaged VTX: If all connections are correct and power is present, the VTX may be damaged.
7.2 Poor Video Quality / Static
- Antenna Orientation/Damage: Re-orient the antenna or check for damage.
- Интерференция: Move away from sources of electromagnetic interference (e.g., Wi-Fi routers, power lines).
- Қуатты сүзу: Ensure your power supply to the VTX is clean. Add a low ESR capacitor if experiencing noise.
- Ауқым: You may be too far from your receiver.
- Қуат деңгейі: Ensure the VTX is set to an appropriate power level for your environment (e.g., 200mW for outdoor flying).
7.3 VTX қызып кетуі
- Ауа шығыны: Ensure adequate airflow around the VTX. Avoid enclosing it in tight spaces without ventilation.
- Power Without Antenna: Never power on the VTX without an antenna connected.
- Excessive Power: Using higher power levels (e.g., 200mW) for extended periods without sufficient cooling can cause overheating.
8. Кепілдік және қолдау
For warranty information or technical support, please contact the seller or manufacturer directly. Keep your proof of purchase for any warranty claims.
For further assistance, you may refer to the official HDZero documentation and community forums online.
Ask a question about this manual
Ask about setup, troubleshooting, compatibility, parts, safety, or missing instructions. Manuals+ will review the question and use this page’s manual context to help answer it.