
1. Кіріспе
This manual provides detailed instructions for the installation, operation, and maintenance of your GeeekPi DeskPi Lite Pi5 Case. Designed specifically for the Raspberry Pi 5, this case enhances functionality with PCIe expansion for M.2 NVMe SSDs, an active cooling system, and convenient connectivity options.
Негізгі ерекшеліктері:
- Үйлесімділік: Specifically designed for the Raspberry Pi 5.
- Кеңейту мүмкіндігі: Supports PCIex1 expansion for M.2 NVMe SSDs (2230, 2242, 2260, 2280 sizes).
- Жетілдірілген салқындату: Integrated Armor Lite V5 Active Cooler for optimal thermal management.
- Ыңғайлы қосылым: PCB daughter board with MicroHDMI to standard HDMI adapter and rear-routed USB-C port.
- GPIO Access: Features a GPIO expansion board and dust cover for easy and protected access.
- Энергияны басқару: Includes a power switch button and a reset push button for the Pi 5 board.

2. Пакет мазмұны
Төменде тізімделген барлық құрамдастардың пакетте бар екеніне көз жеткізіңіз:
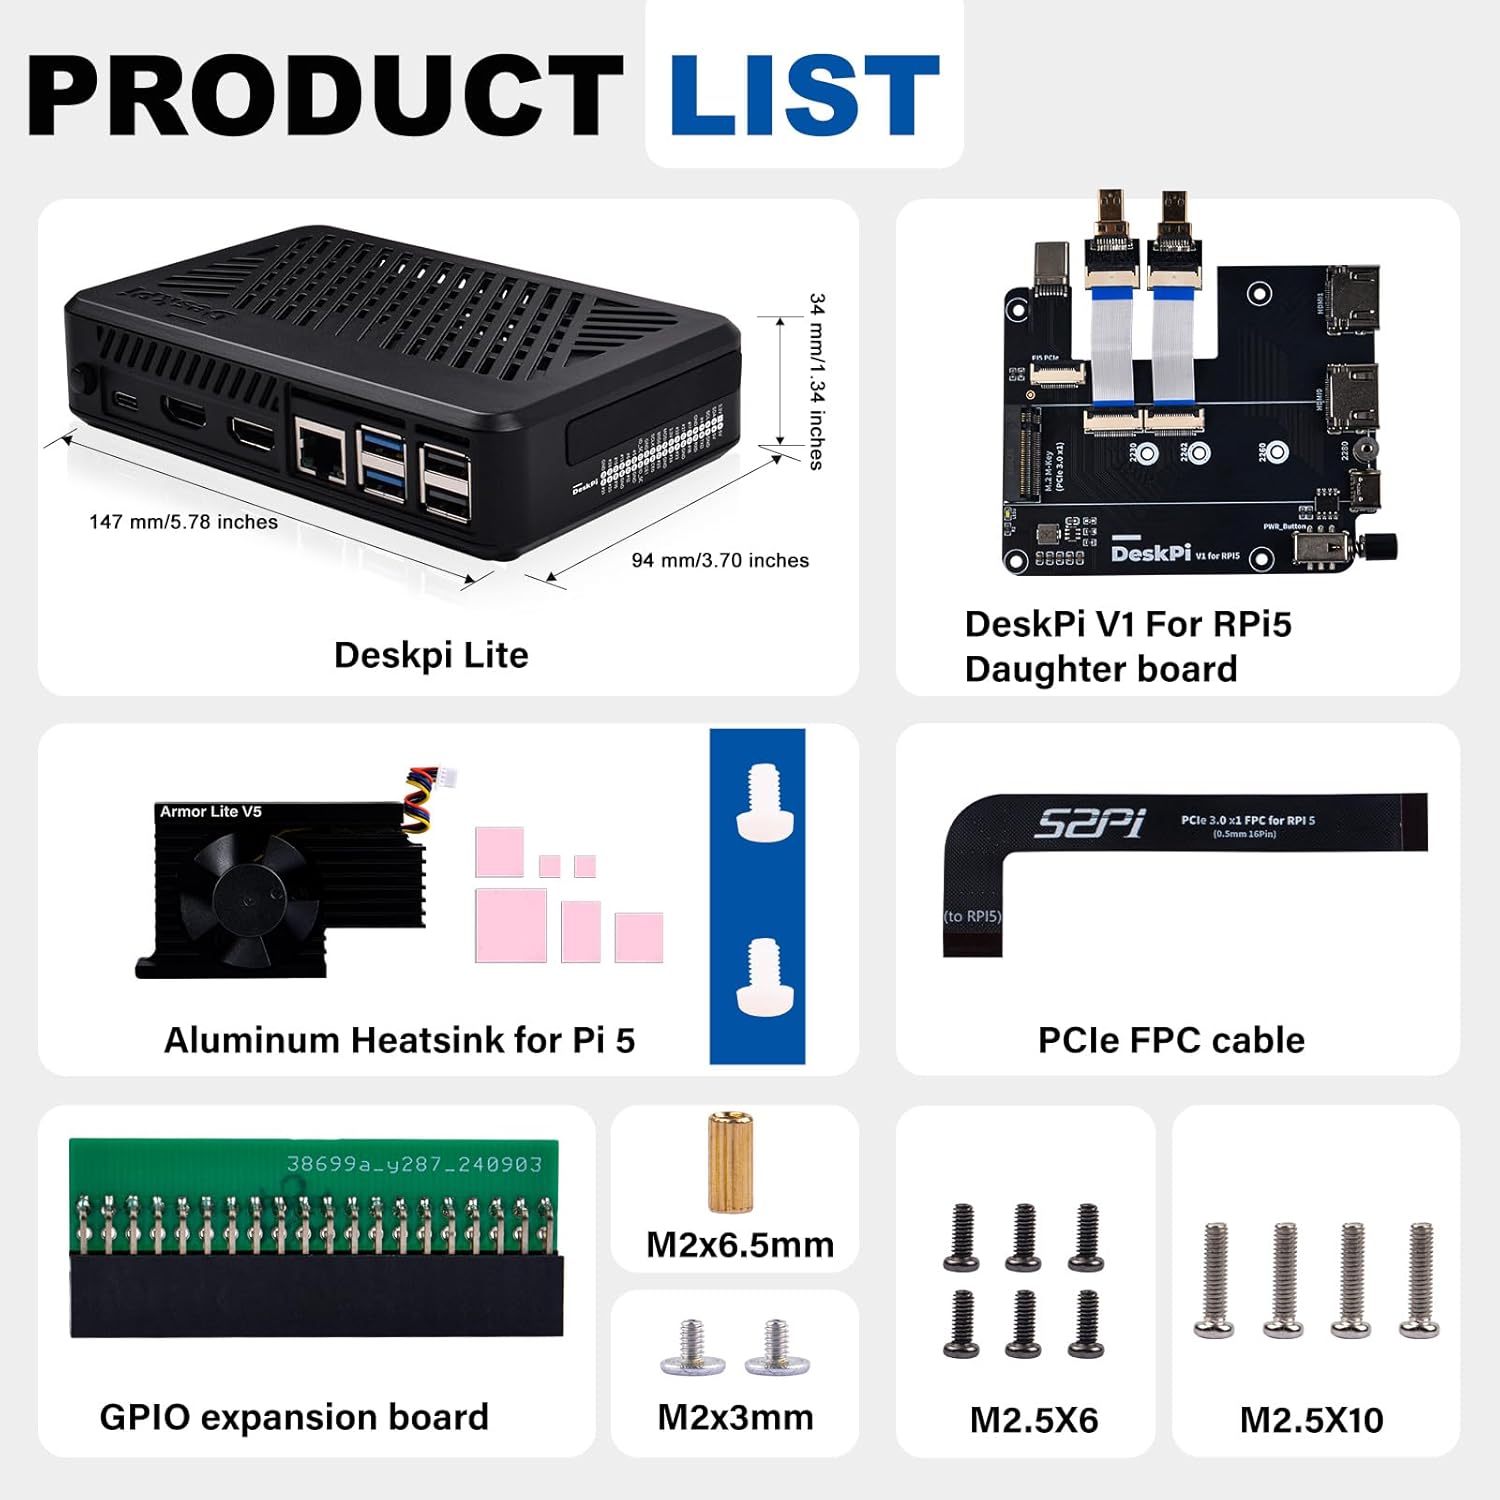
- DeskPi Lite Pi5 Case (Top and Bottom Shell)
- DeskPi V1 For RPi5 Daughter Board
- Armor Lite V5 Active Cooler (Aluminum Heatsink with Fan)
- PCIe FPC Cable
- GPIO Expansion Board
- Thermal Pads (various sizes)
- M2x6.5mm Standoff
- M2x3mm бұрандалар
- M2.5x6 бұрандалар
- M2.5x10 бұрандалар
3. Орнату нұсқаулары
Follow these steps carefully to assemble your GeeekPi DeskPi Lite Pi5 Case with your Raspberry Pi 5 and M.2 NVMe SSD.

3.1. Heatsink and Thermal Pad Installation
- Carefully peel off the protective films from both sides of the thermal pads.
- Apply the thermal pads to the corresponding chips on your Raspberry Pi 5 board as indicated in Figure 3, Step 1. Ensure good contact.
- Align the Armor Lite V5 Active Cooler with the Raspberry Pi 5 board, ensuring the fan connector is near the fan header. Gently press down to secure it, making sure the thermal pads create firm contact between the heatsink and the chips.
- Secure the heatsink to the Raspberry Pi 5 board using the provided screws, as shown in Figure 3, Step 2.
- Connect the fan cable from the Armor Lite V5 Active Cooler to the appropriate fan header on the Raspberry Pi 5 board.

3.2. Daughter Board and PCIe Cable Connection
- Connect the PCIe FPC cable to the Raspberry Pi 5's PCIe slot and the DeskPi V1 Daughter Board's PCIe slot. Ensure the cable is inserted correctly and securely.
- Carefully align and connect the Raspberry Pi 5 board to the DeskPi V1 Daughter Board, ensuring all ports and connectors are properly seated. This connection includes the USB-C port and the HDMI ports.
- Insert the M.2 NVMe SSD into the designated slot on the DeskPi V1 Daughter Board. Secure it with the provided M2x6.5mm standoff and M2x3mm screw. The case supports M.2 NVMe SSDs of sizes 2230, 2242, 2260, and 2280.

3.3. Case Assembly
- Place the assembled Raspberry Pi 5 and daughter board into the bottom shell of the DeskPi Lite case. Ensure it sits flush and all ports align with the case openings.
- Secure the board assembly to the bottom case using the M2.5x6 screws.
- Attach the GPIO expansion board to the GPIO pins on the Raspberry Pi 5.
- Place the top shell of the case onto the bottom shell, aligning the screw holes. Secure the top shell with the M2.5x10 screws.
3.4. Бейне орнату нұсқаулығы
Көрнекі қадамдық нұсқаулық үшін ресми орнату бейнесін қараңыз:
4. Пайдалану нұсқаулары
Once assembled, the DeskPi Lite Pi5 Case provides enhanced control and monitoring features.
4.1. Power and Reset Buttons
- Қуатты ауыстыру түймесі: Located on the side of the case, this button allows for convenient power on/off control of your Raspberry Pi 5.
- Қалпына келтіру түймесі: Positioned on the front, this button provides a quick way to reset the Raspberry Pi 5 board.
4.2. Жарықдиодты индикаторлар
The case features LED indicators to provide status information:
- Жасыл жарық диоды: Indicates disk status.
- Қызыл жарық диоды: Қуат күйін көрсетеді.

4.3. GPIO Access
The integrated GPIO expansion board allows for easy access to the Raspberry Pi 5's GPIO pins from the outside of the case, protected by a rubber cover.
4.4. MicroSD картасының ұясы
The MicroSD card slot remains accessible from the outside, allowing for easy insertion and removal of the card without disassembling the case.
5. Техникалық қызмет көрсету
To ensure the longevity and optimal performance of your DeskPi Lite Pi5 Case and Raspberry Pi 5, follow these maintenance guidelines:
- Тазалау: Periodically clean the exterior of the case with a soft, dry cloth. For dust accumulation in the ventilation grilles, use compressed air. Ensure the device is powered off and disconnected from power before cleaning.
- Желдеткіш техникалық қызмет көрсету: If the active cooler fan becomes noisy or less effective, inspect it for dust buildup and gently clean it with compressed air or a soft brush.
- Қоршаған орта жағдайлары: Operate the case in a well-ventilated area, away from direct sunlight, excessive heat, and moisture.
6. Ақаулықтарды жою
Бұл бөлім сізде кездесетін жалпы мәселелерді қарастырады.
6.1. SSD анықталмады
- Check PCIe Cable: Ensure the PCIe FPC cable is securely connected at both ends (Raspberry Pi 5 and daughter board).
- SSD Seating: Verify that the M.2 NVMe SSD is correctly seated in its slot and secured with the screw.
- Raspberry Pi OS Configuration: Ensure your Raspberry Pi OS is updated and configured to recognize NVMe drives. You may need to force PCIe to Gen3.0 in
config.txtқосу арқылыdtparam=pciex1_gen=3. - SSD үйлесімділігі: Confirm your M.2 NVMe SSD is compatible with the PCIe interface and supported sizes (2230/2242/2260/2280).

lsblk and wireless signal information.6.2. Салқындату өнімділігі
- Thermal Pad Contact: Ensure the thermal pads are correctly placed and make firm contact between the Raspberry Pi 5 chips and the heatsink.
- Желдеткіш қосылымы: Verify the active cooler fan is properly connected to the Raspberry Pi 5's fan header.
- Желдеткіштің жұмысы: Note that the fan typically activates when the CPU temperature reaches approximately 65 degrees Celsius. This is normal operation.

6.3. Құрастырудағы қиындықтар
- Ribbon Cables: Be gentle when handling and connecting the FPC ribbon cables. Ensure they are fully inserted and the latches are secured.
- Компоненттерді туралау: Double-check the alignment of the Raspberry Pi 5 board with the daughter board and the case. Do not force components if they do not fit easily.
- Power Button Mechanism: When installing the Raspberry Pi 5, ensure the case's power button mechanism aligns correctly with the Pi's onboard power button to avoid damage.
7. Техникалық сипаттамалар
| Ерекшелік | Техникалық сипаттама |
|---|---|
| Бренд | GeeekPi |
| Модель атауы | DP-0038 |
| Үйлесімділік | Raspberry Pi 5 |
| M.2 NVMe SSD Support | 2230, 2242, 2260, 2280 (PCIe x4 interface) |
| Салқындату жүйесі | Armor Lite V5 Active Cooler |
| HDMI порттары | Dual Full-Size HDMI Output (via adapter) |
| USB порттары | 2x USB 3.0, 2x USB 2.0 (routed from Pi 5) |
| Ethernet порты | 1x Gigabit Ethernet (routed from Pi 5) |
| Қуат кірісі | USB-C 5V Power IN (routed to rear) |
| GPIO Access | External GPIO expansion board with dust cover |
| Өлшемдері (шамамен) | 147 мм (L) x 94 мм (W) x 34 мм (H) |
| Элемент салмағы | 7.4 унция |
| Материал | Пластмасса |
8. Кепілдік және қолдау
For warranty information and technical support, please refer to the official GeeekPi website or contact their customer service directly. Details regarding warranty periods, coverage, and support channels are typically provided by the manufacturer.
Кепілдік талаптары үшін әрқашан сатып алуды растайтын құжатты сақтаңыз.