1. Кіріспе
This manual provides detailed instructions for the setup, operation, and maintenance of your JoFomp 17.3" Large Digital Wall Clock. Please read this manual thoroughly before use to ensure proper functionality and longevity of the product.
2. Қауіпсіздік туралы ақпарат
- Ensure the clock is connected to a stable power source (5V/2A adapter included).
- Құрылғыны шектен тыс температураға, тікелей күн сәулесіне немесе жоғары ылғалдылыққа шығармаңыз.
- Балалардың қолы жетпейтін жерде сақтаңыз.
- Құрылғыны өзіңіз бөлшектеуге немесе жөндеуге әрекеттенбеңіз. Көмек алу үшін тұтынушыларды қолдау қызметіне хабарласыңыз.
- Қашықтан басқару құралына 2 AAA батареясы қажет (жинаққа кірмейді).
- A 1 AAA battery (not included) is required for the memory function to retain settings during power outages.
3. Пакет мазмұны
Барлық элементтер пакетте бар екенін тексеріңіз:
- JoFomp 17.3" Digital Wall Clock
- Қашықтан басқару құралы
- 5В/1А тұрақты ток адаптері
- Қуат сымы
- Mounting Hooks (2)
- Mounting Template Ruler
- Пайдаланушы нұсқаулығы (бұл құжат)

3.1-сурет: Қосылған керек-жарақтар мен негізгі құрылғы.
4. Өнім аяқталдыview
The JoFomp 17.3" Large Digital Wall Clock features a clear LED display and multiple functions for convenience.

Figure 4.1: Front display of the digital wall clock.
4.1 Дисплей мүмкіндіктері
- Уақытты көрсету: Large 17.3" LED digits.
- Күнді көрсету: Month and Day.
- Апта күні: Indicated by illuminated text (Mon-Sun).
- Температура: Displays in Celsius or Fahrenheit.
- Ылғалдылық: Displays relative humidity percentage.
- Қос дабыл: Екі тәуелсіз дабыл параметрлері.
- DST индикаторы: Daylight Saving Time status.

Figure 4.2: Labeled display functions.
4.2 Back Panel and Buttons
The back of the clock houses control buttons and connection ports.

Figure 4.3: Back panel with labeled components.
- Баптау түймелері: Five buttons for manual adjustments (Light, SET, +, -, Alarm).
- Memory Battery Compartment: For 1 AAA battery (not included) to retain settings.
- Қуат порты: Қуат адаптерін қосу үшін.
- Монтаждау тесіктері: For wall installation.
5. Орнату
5.1 Қуат қосылымы
- Connect the power cord to the clock's power port.
- Plug the 5V/2A power adapter into a standard electrical outlet. The clock will power on and display.
Ескерту: The clock requires continuous power to operate. It is not battery-powered for primary display.
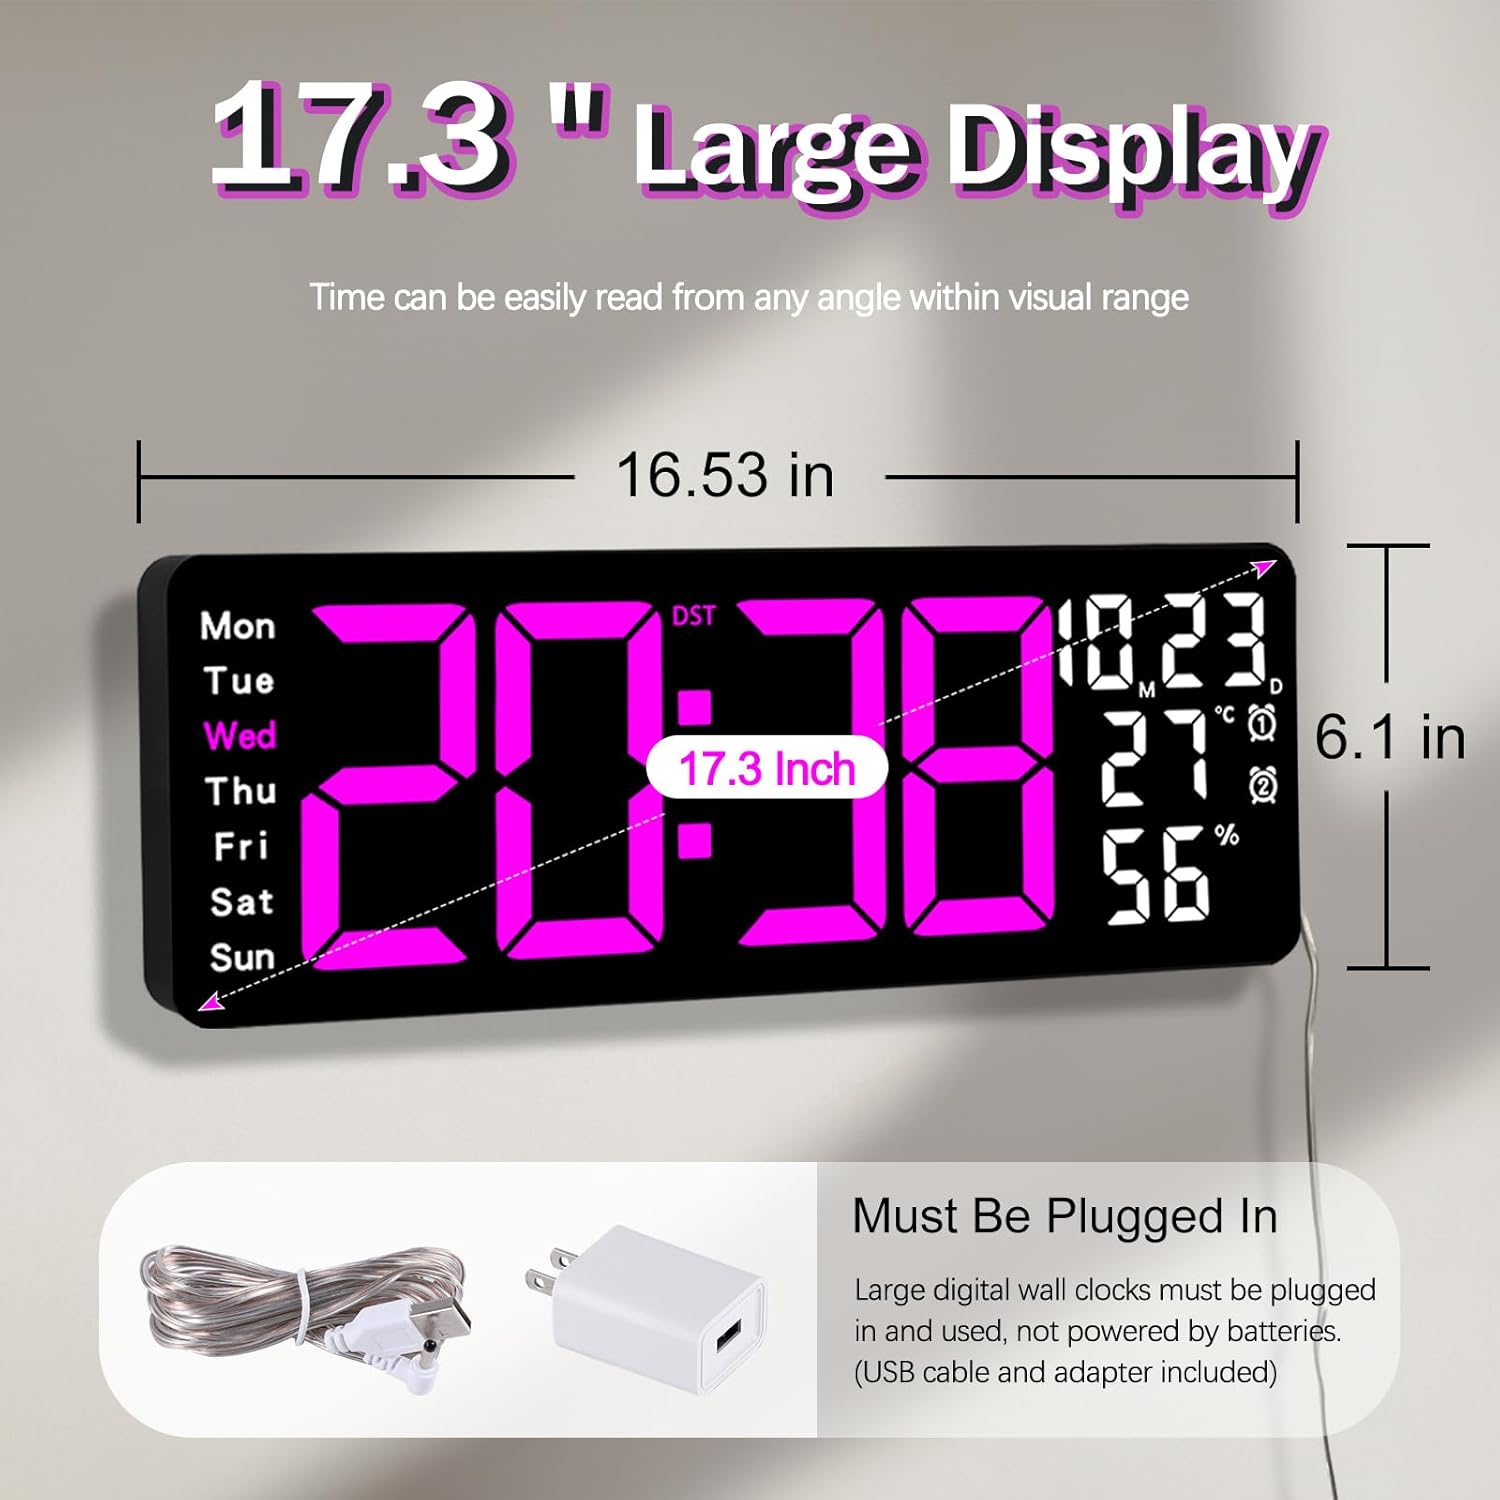
Figure 5.1: Power connection and dimensions.
5.2 Жад батареясын орнату (міндетті емес)
To retain time and settings during a power outage, install a 1 AAA battery (not included) into the memory battery compartment on the back of the clock.
- Locate the memory battery compartment on the back of the clock.
- Бөлменің қақпағын ашыңыз.
- Insert one 1.5V AAA battery, ensuring correct polarity (+/-).
- Бөлменің қақпағын мықтап жабыңыз.
5.3 Қабырғаға орнату
Use the included mounting template ruler and hooks for easy wall installation.
- Determine the desired location for your clock.
- Place the mounting template ruler on the wall at the desired height.
- Mark the positions for the mounting hooks according to the ruler's indications.
- Install the mounting hooks into the wall at the marked positions.
- Carefully hang the clock onto the installed hooks, ensuring it is level and secure.
6. Пайдалану нұсқаулары
The clock can be operated using either the remote control or the buttons on the back.
6.1 Уақыт пен күнді орнату
Use the remote control or the "SET" button on the back of the clock.
- түймесін басыңыз ОРНАТУ button (on remote or back of clock) to enter setting mode.
- пайдаланыңыз + және - жыпылықтайтын мәнді реттеуге арналған түймелер (мысалы, сағат, минут, жыл, ай, күн).
- түймесін басыңыз ОРНАТУ again to confirm the current setting and move to the next parameter.
- Барлық параметрлер орнатылғанша қайталаңыз.
6.2 12/24 Hour Format Conversion
12 сағаттық және 24 сағаттық уақыт пішімдері арасында ауысу үшін:
- Арнайы түймесін басыңыз 12/24 сағ қашықтан басқару пультіндегі түймені басыңыз.
- Alternatively, during time setting, the format option will appear.

Figure 6.1: 12/24H format conversion.
6.3 Температура бірлігін түрлендіру (°C/°F)
Цельсий және Фаренгейт температура бірліктері арасында ауысу үшін:
- түймесін басыңыз ° C / ° F қашықтан басқару пультіндегі түймені басыңыз.
6.4 Alarm Setting (Dual Alarms)
Сағат екі тәуелсіз дабылды қолдайды.
- түймесін басыңыз Дабыл қашықтан басқару пультіндегі немесе сағаттың артқы жағындағы түймені басыңыз.
- Қолдану + және - қалаған дабыл уақытын орнату үшін.
- түймесін басыңыз Дабыл again to confirm and move to the next alarm or exit.
- To activate/deactivate an alarm, press the corresponding alarm button (e.g., AL1 or AL2) қашықтан басқару пультінде.
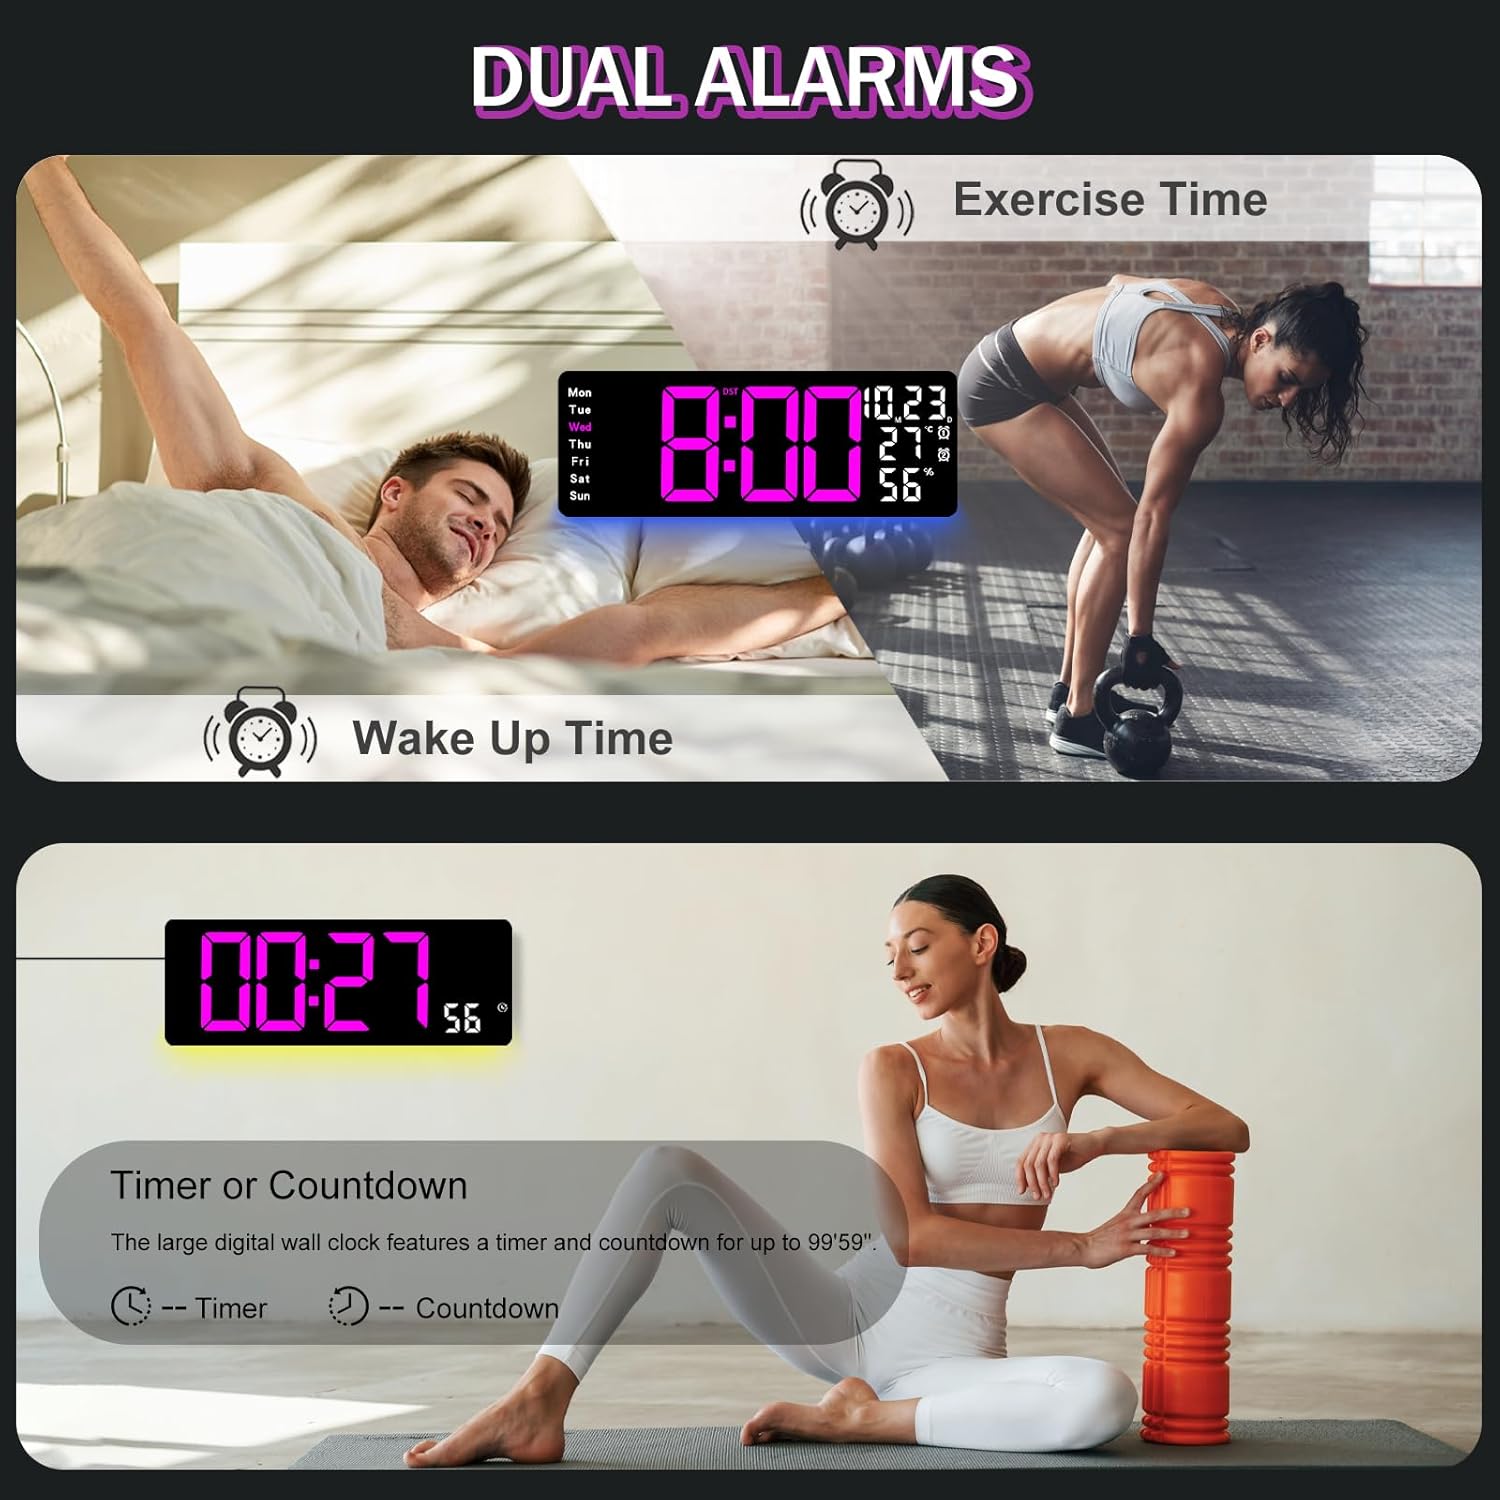
Figure 6.2: Dual alarm and timer functions.
6.5 Жарықтықты реттеу
The clock offers 10 levels of brightness, adjustable manually or automatically.
- Автоматты жарықтық: The built-in light sensor adjusts brightness based on ambient light. Activate this mode by pressing the АВТО қашықтан басқару пультіндегі түйме.
- Қолмен реттелетін жарықтық: түймесін басыңыз ЖАРҚЫНДЫҚ button on the remote, then use + және - to select one of the 10 levels.

Figure 6.3: Custom and auto-brightness settings.

Figure 6.4: Brightness regulator illustration.
6.6 Ambient Light Features
The clock includes a night light feature at the bottom with multiple color options.
- түймесін басыңыз ЖАРЫҚ button on the remote control or the back of the clock to cycle through 8 fixed colors and 1 multi-color mode.
- In multi-color mode, the colors automatically convert. Press OK to fix a favorite color.
- Adjust the brightness of the ambient light using the + және - buttons when the ambient light is active.

Figure 6.5: Multiple ambient night light options.

Figure 6.6: 9 color ambient light options.
6.7 Timer and Countdown Function
The clock features a timer (count-up) and countdown function up to 99 minutes and 59 seconds.
- түймесін басыңыз ТАЙМЕР қашықтан басқару пультіндегі түймені басыңыз.
- Қолдану + және - to set the desired time for countdown.
- түймесін басыңыз БАСТАУ/ТОҚТАТУ to begin or pause the timer/countdown.
- түймесін басыңыз RESET таймерді тазалау үшін.

Figure 6.7: Timing function (count-up/countdown).
Video 6.1: Demonstration of multi-functional features including night light change, brightness control, count-up, and countdown. This video also shows the time, date, day, alarm clock, temperature, and humidity displayed on the same screen, along with 12/24 hour conversion, Celsius/Fahrenheit conversion, and DST enablement. The back design and buttons are also briefly shown.
6.8 Жазғы уақыт (DST)
If DST is observed in your region, you can enable or disable it.
- түймесін ұзақ басыңыз - button on the remote control to enable or disable DST. The DST indicator will appear/disappear on the display.

Figure 6.8: Enabling and disabling Daylight Saving Time.

Figure 6.9: Daylight Saving Time (DST) functionality.
6.9 Қашықтан басқару құралын пайдалану
The remote control provides convenient access to all clock functions without needing to reach the clock directly.

Figure 6.10: Remote control and its functions.

6.11-сурет: Қашықтан басқару пульті пайдаланылуда.
- Ensure the remote control has 2 AAA batteries installed (not included).
- Point the remote control directly at the clock for optimal response.
- Each button on the remote corresponds to a specific function as described in this manual.
7. Техникалық қызмет көрсету
- Clean the clock's display and body with a soft, dry cloth. Avoid abrasive cleaners or solvents.
- Ensure the power adapter and cord are free from damage.
- Replace the memory battery annually to ensure settings are retained during power interruptions.
8. Ақаулықтарды жою
| Мәселе | Ықтимал себебі | Шешім |
|---|---|---|
| Сағат дисплейі өшірулі. | Қуат көзі жоқ. | Check if the power adapter is securely plugged into the clock and the outlet. Ensure the outlet is functional. |
| Қашықтан басқару пульті жұмыс істемейді. | Low or dead batteries in remote; obstruction; remote out of range. | Replace remote batteries (2 AAA). Ensure no obstructions between remote and clock. Point directly at the clock within effective range. |
| Қуат өшірілгеннен кейін параметрлер жоғалдыtage. | No memory battery or dead memory battery. | Install a fresh 1.5V AAA battery in the memory compartment. |
| Incorrect temperature/humidity reading. | Sensor interference or placement. | Ensure the clock is not placed near heat sources, direct sunlight, or in areas with extreme drafts. Allow time for the sensor to stabilize. |
| Ambient light not changing colors. | Stuck in fixed color mode. | Press the LIGHT button on the remote to cycle through modes. If stuck on a fixed color, press the OK button to release it from fixed mode. |
9. Техникалық сипаттамалар
| Ерекшелік | Мәлімет |
|---|---|
| Бренд | JoFomp |
| Үлгі нөмірі | 6669 |
| Дисплей түрі | Сандық жарықдиодты |
| Дисплей өлшемі | 17.3 дюйм |
| Өнім өлшемдері | 16.5"Е x 6.7"H |
| Қуат көзі | Corded Electric (5V/2A adapter included) |
| Жад батареясы | 1 x AAA (қоспаған) |
| Жарықтық деңгейлері | 10 (Auto/Manual) |
| Қоршаған ортаның ашық түстері | 8 Fixed + 1 Multi-color |
| Арнайы мүмкіндіктер | Large Display, Adjustable Brightness, Temperature Display, Humidity Display, Dual Alarms, Timer, Countdown, DST, Remote Control |
| Монтаждау түрі | Қабырғаға аспа |
| Элемент салмағы | 1.95 фунт |
10. Кепілдік және қолдау
JoFomp products are designed for reliability and performance. For warranty information or technical support, please refer to the contact details provided with your purchase or visit the official JoFomp webсайт. Сатып алуды растау ретінде сатып алу түбіртегіңізді сақтаңыз.