1. Өнім аяқталдыview
The Fuers H.265+ 8-Channel Security DVR Recorder (Model A1008CH) is a versatile surveillance solution designed for home and business security. This DVR supports various camera types including HD-CVBS, TVI, CVI, XVI, AHD, and IP analog cameras, allowing for flexible system expansion. It features H.265+ video compression for efficient storage and comes with a pre-installed 1TB hard drive for 24/7 recording.
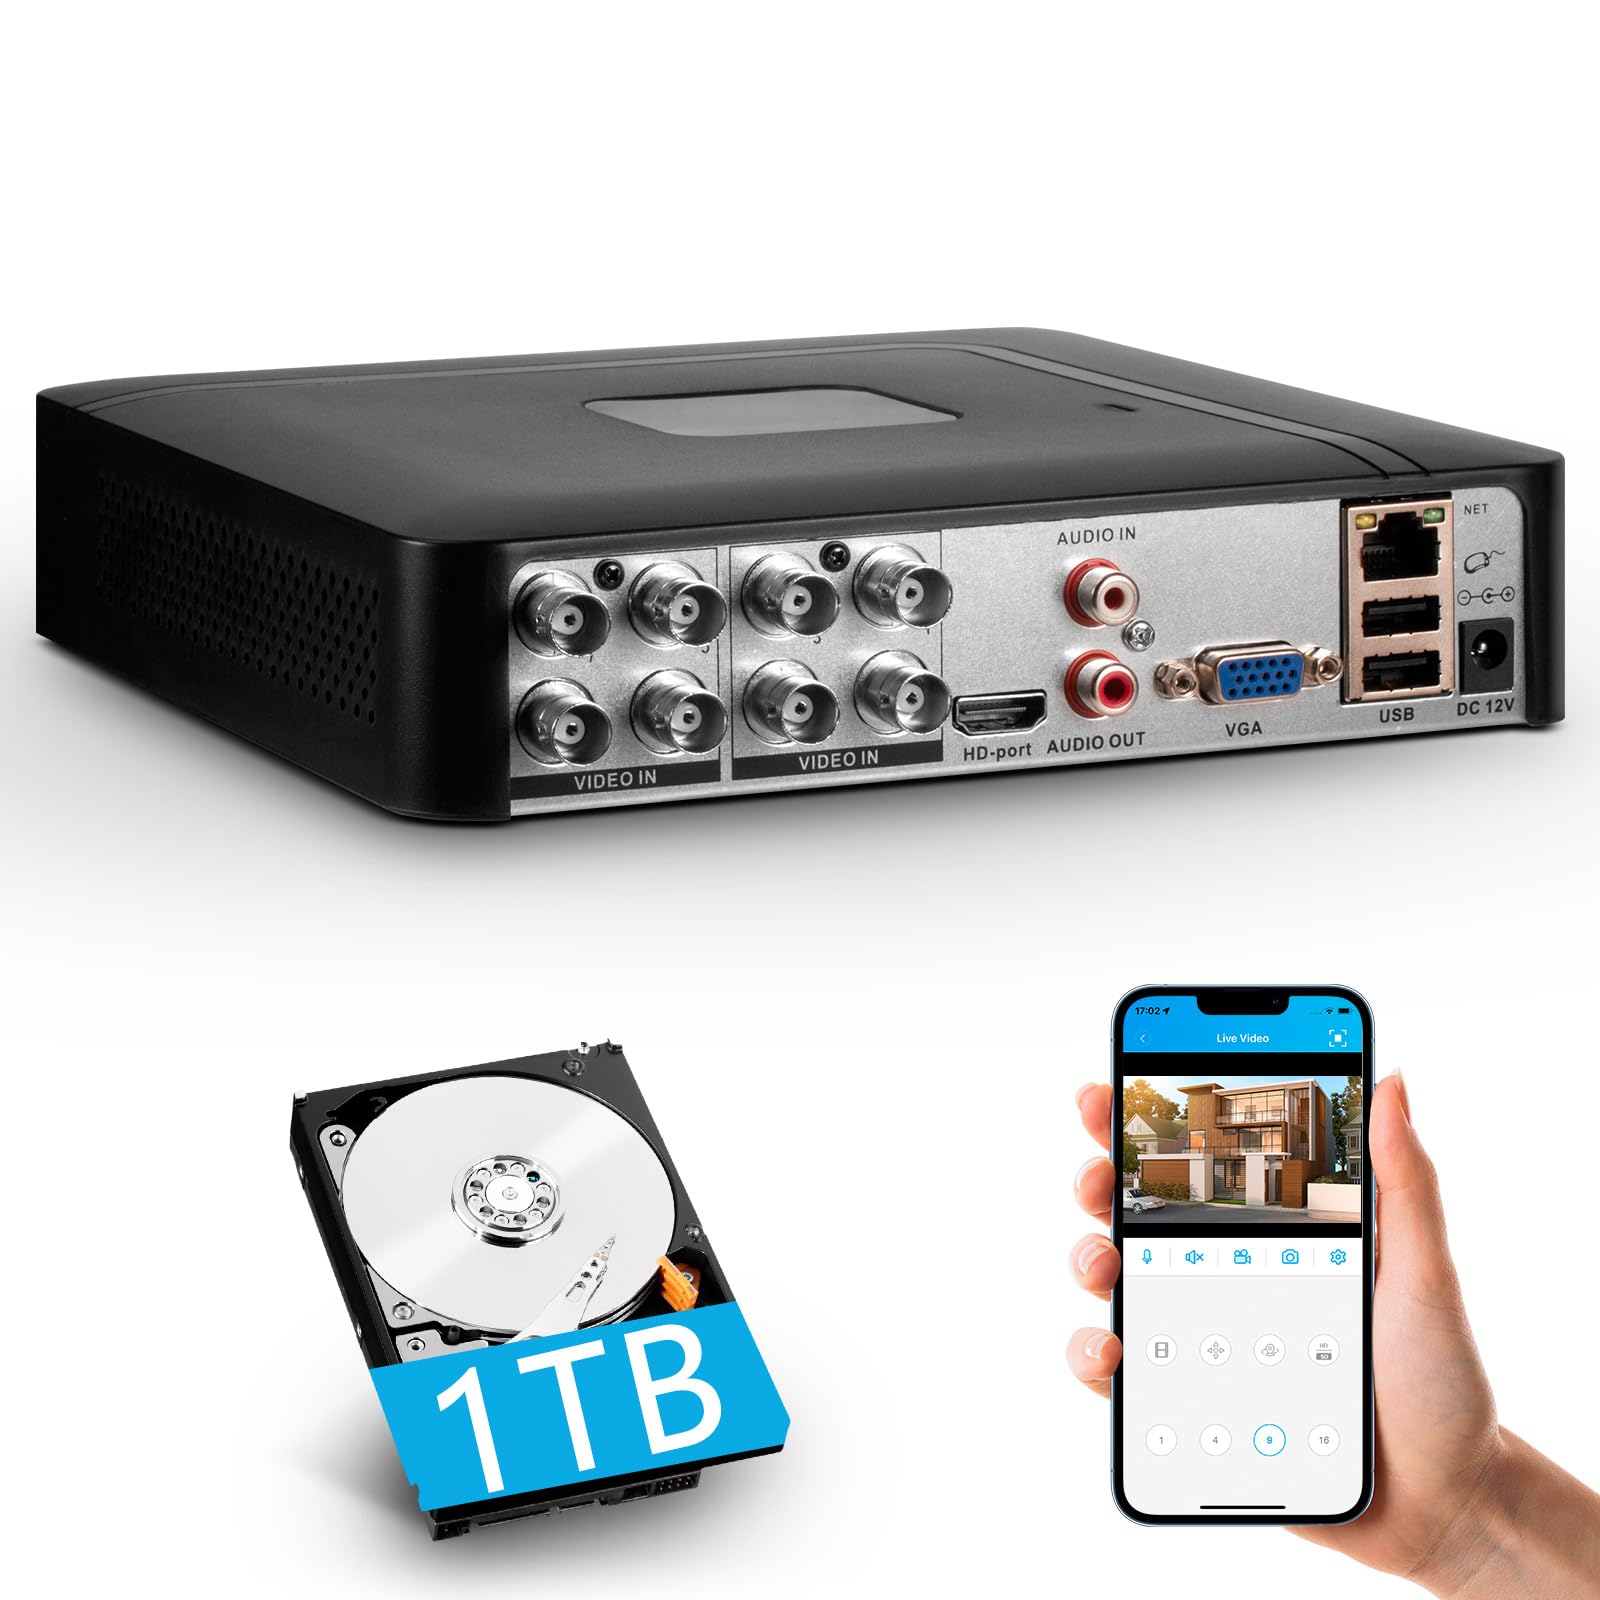
Image 1.1: Fuers H.265+ 8-Channel Security DVR Recorder.
Негізгі ерекшеліктері:
- 8-Channel System: Supports up to 8 cameras simultaneously, compatible with HD-TVI, CVBS, CVI, XVI, AHD, and IP cameras.
- H.265+ бейнені қысу: Offers extended recording time and saves up to 50% storage space compared to H.265 systems.
- Алдын ала орнатылған 1TB HDD: Security-grade hard drive for continuous surveillance recording. Expandable up to 14TB via SATA port.
- Қашықтан қол жеткізу: View and manage your system remotely using the free iCSee App (iOS/Android) or VMS Client (Windows/Mac).
- Интеллектуалды қозғалысты анықтау: Receive mobile push notifications for detected motion types, including person and face detection.
- Plug & Play орнату: Easy connection with simultaneous VGA/HDMI output.
2. Орнату және орнату
2.1 Қорапта не бар
Бастамас бұрын барлық компоненттердің бар екеніне көз жеткізіңіз:
- 1x A1008 8CH DVR
- 1x 1TB HDD (Pre-installed on DVR)
- 1x DVR Power Adapter
- 1x USB тінтуірі
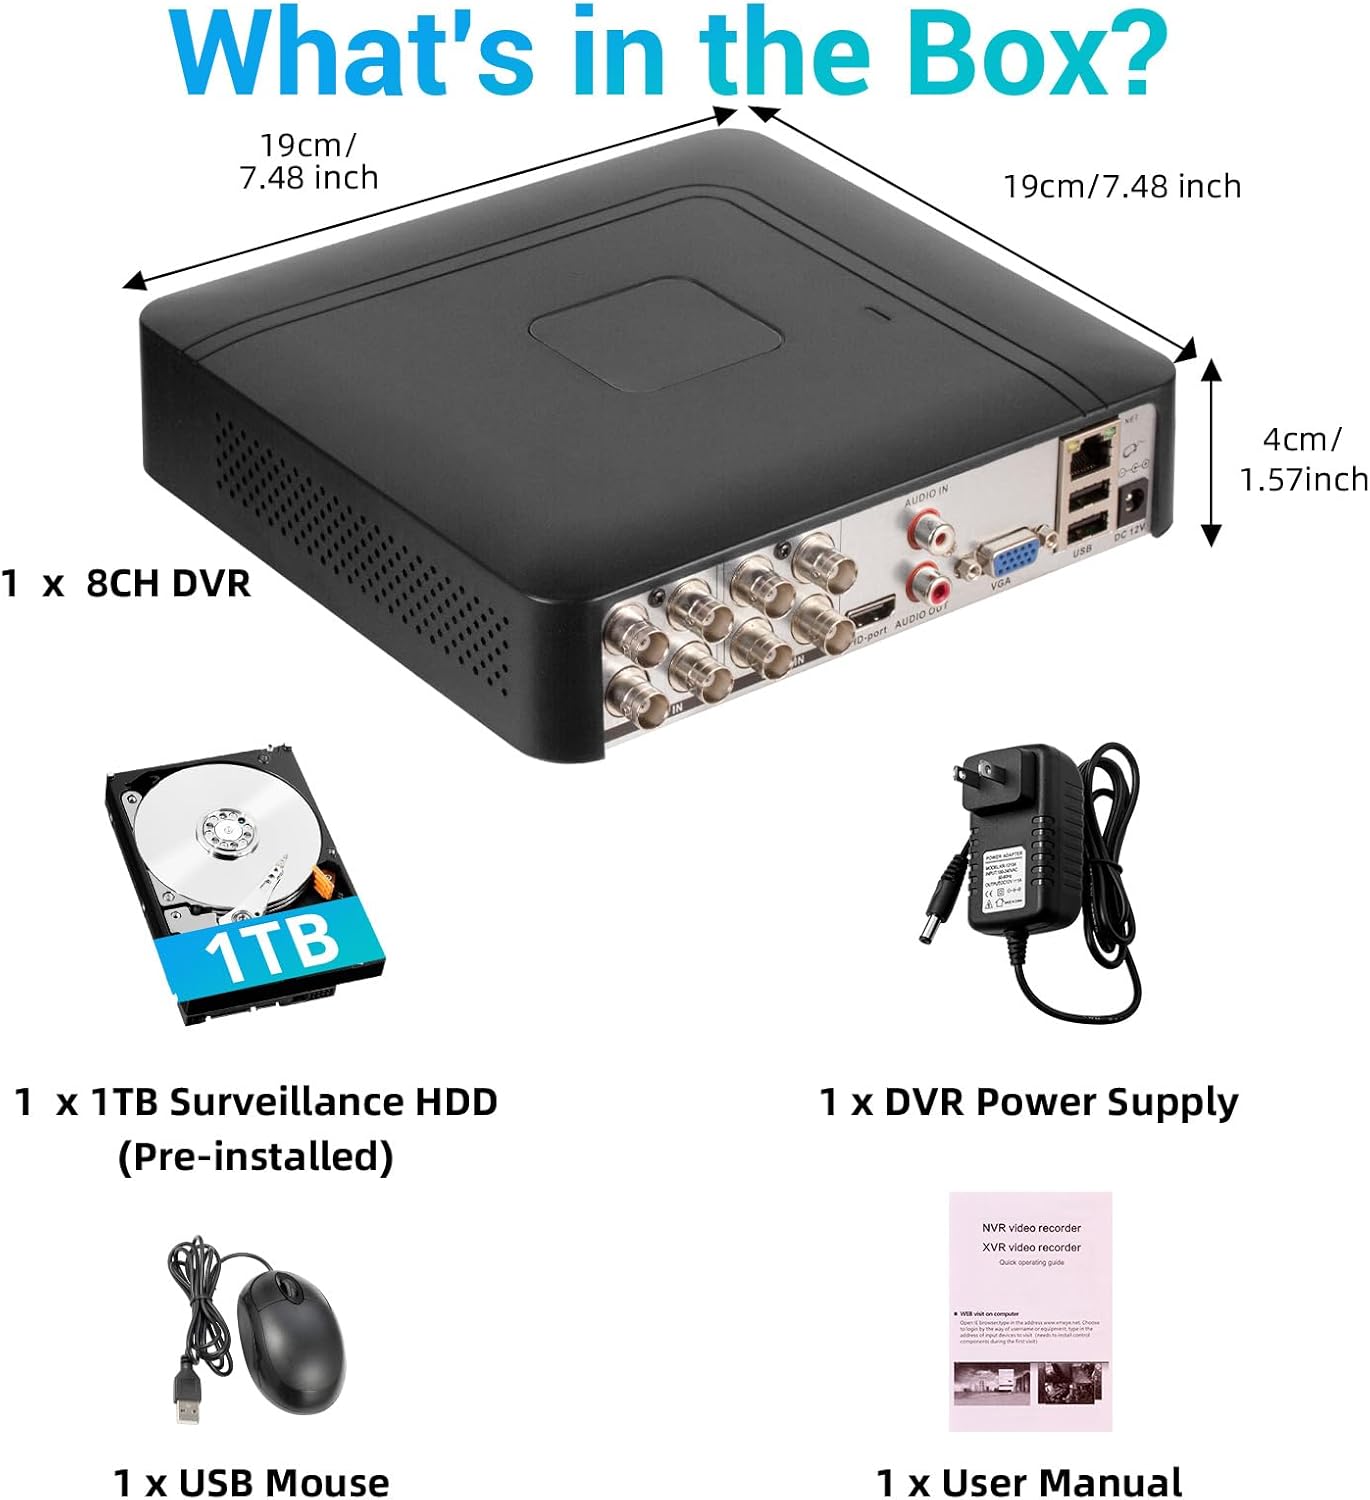
2.1-сурет: Өнім қаптамасының мазмұны.
2.2 Hard Drive Installation (if not pre-installed or for upgrade)
The DVR comes with a pre-installed 1TB HDD. If you need to replace or upgrade the hard drive (up to 14TB), follow these steps:
- Unscrew the bottom cover of the DVR unit.
- C қақпағын абайлап ашыңызasing.
- Connect the SATA data cable and power cable from the DVR to the new hard drive.
- Secure the hard drive within the casing using the provided screws.
- Close the DVR casing and secure it with screws.

Image 2.2: Hard drive installation and expansion options.
2.3 Connecting the DVR System
Follow these steps to connect your DVR system:
- Камераларды қосу: Connect your security cameras to the 'VIDEO IN' ports on the back of the DVR using BNC cables.
- Мониторды қосу: Мониторды DVR-ге HDMI немесе VGA порты арқылы қосыңыз.
- USB тінтуірін қосу: Берілген USB тінтуірін DVR құрылғысындағы USB порттарының біріне қосыңыз.
- Connect Network (Optional for Remote Access): Қашықтан үшін viewing and notifications, connect an Ethernet cable from your router to the 'NET' port on the DVR.
- Қуат қосулы: Connect the DVR power adapter to the 'DC 12V' port and then plug it into a power outlet.

Image 2.3: Connecting cameras and network to the DVR.
2.4 Initial Setup and Channel Type Selection
Upon first power-on, the system may prompt for initial setup. You may need to select the appropriate channel type for your cameras.
- Right-click on the screen to access the Main Menu.
- Келесіге өтіңіз Жүйе > Сандық > Арна түрі.
- Select the configuration that matches your camera setup:
- First row: Supports 8 XVI, CVBS, AHD, TVI, CVI coaxial cameras.
- Second row: Supports 8 XVI, CVBS, AHD, TVI, CVI coaxial + 4 IP cameras.
- Third row: Supports 16 1080P IP cameras.
- Fourth row: Supports 16 5MP IP cameras.
- басыңыз OK to apply changes. The system may restart.

Image 2.4: DVR Channel Type selection screen.
3. Пайдалану нұсқаулары
3.1 Тікелей View және Жазу
Once the DVR is powered on and cameras are connected, you should see the live feed on your connected monitor. The system is configured for 24/7 recording to the pre-installed 1TB hard drive.

Сурет 3.1: Тікелей view of multiple camera feeds.
3.2 Remote Access via Mobile App
To access your DVR remotely, download the free iCSee App (for iOS/Android) or VMS Client (for Windows/Mac).
- Download the iCSee App from your device's app store.
- Open the app and register an account if you don't have one.
- In the DVR's main menu, navigate to Ақпарат > Нұсқа to find the DVR's QR code.
- Use the iCSee app to scan the QR code to add your device.
- Қосылғаннан кейін сіз жасай аласыз view live feeds, playback recordings, and receive alerts from anywhere with an internet connection.

Image 3.2: Steps for remote access via mobile app.
3.3 Playback Recorded Footage
Қайтаview жазылған бейне:
- Right-click on the screen to access the Main Menu.
- таңдаңыз Жазба > Ойнату.
- Choose the desired channel(s) and date/time range for playback.
- басыңыз Ойнатуды бастау дейін view фуtage.

Image 3.3: Playback interface with timeline.
3.4 Қозғалысты анықтау туралы ескертулер
The DVR supports intelligent motion detection, including person and face detection. When motion is detected, you can receive instant mobile push notifications.
- Configure motion detection settings in the DVR's Дабыл мәзір.
- Ensure your mobile app is properly linked and notifications are enabled.

Image 3.4: Human and face detection in action.
4. Техникалық қызмет көрсету
4.1 Қатты дискіні басқару
The pre-installed 1TB hard drive provides ample storage. Due to H.265+ compression, storage is optimized. If more storage is needed, you can replace the internal HDD with a larger one (up to 14TB). Regularly check the hard drive status in the DVR's system settings to ensure optimal performance.
4.2 Жалпы күтім
- Keep the DVR in a cool, dry, and well-ventilated area.
- Avoid exposing the unit to direct sunlight, extreme temperatures, or moisture.
- DVR сыртын жұмсақ, құрғақ шүберекпен тазалаңыз. Сұйық тазартқыштарды қолданбаңыз.
- Барлық кабель қосылымдарының қауіпсіз екеніне көз жеткізіңіз.
5. Ақаулықтарды жою
5.1 Мониторда бейне шығысы жоқ
- Check if the DVR is powered on and the power adapter is securely connected.
- Verify the HDMI or VGA cable connection between the DVR and the monitor.
- Монитордың дұрыс кіріс көзіне (HDMI/VGA) орнатылғанын тексеріңіз.
5.2 Камералар көрсетілмейді
- Check all camera power and video cable connections.
- Verify that the camera type (AHD, TVI, CVI, etc.) is compatible with the DVR.
- Ensure the correct channel type is selected in the DVR settings (refer to Section 2.4).
- Test cameras individually if possible to isolate the issue.
5.3 Қашықтан қол жеткізу жұмыс істемейді
- Confirm the DVR is connected to the internet via an Ethernet cable.
- Маршрутизатордың интернет байланысын тексеріңіз.
- Ensure the iCSee app is updated to the latest version.
- Verify that the DVR was added correctly to the app by scanning the QR code.
- For some networks, you might need to adjust router settings (e.g., port forwarding), consult your network administrator or ISP.
6. Техникалық сипаттамалар
| Ерекшелік | Мәлімет |
|---|---|
| Бренд | Жанармай |
| Үлгі нөмірі | A1008CH |
| Арналар саны | 8 |
| Қосылу технологиясы | HDMI, USB, VGA |
| Үйлесімді құрылғылар | Desktop, Tablet, Camera, Smartphone |
| Өнім өлшемдері | 7.48"L x 7.48"W x 1.57"H |
| Жад сақтау сыйымдылығы | 1 ТБ (алдын ала орнатылған) |
| Hard-Drive Size | 1 TB (Expandable up to 14 TB) |
| Media Format Digital Video | H.265 + |
| Бейне енгізу | AHD, CVI, HDMI, HDTVI, IP Input, VGA |
| UPC | 765142240850 |
7. Кепілдік және қолдау
7.1 Өнімнің кепілдігі
This Fuers DVR Recorder is covered by a standard manufacturer's warranty. Please refer to the warranty card included with your product or visit the official Fuers webегжей-тегжейлі кепілдік талаптары мен шарттары үшін сайт. Сатып алу түбіртегін кепілдік талаптары үшін сатып алудың дәлелі ретінде сақтаңыз.
7.2 Техникалық қолдау
For technical assistance, troubleshooting, or any questions regarding your Fuers DVR, please contact Fuers customer support. Contact information can typically be found on the product packaging, the official Fuers webсайты немесе сатушы арқылы.
Онлайн ресурстар:
- -ге барыңыз Fuers Store on Amazon өнім туралы ақпарат пен жаңартулар үшін.