
1. Кіріспе
This user manual provides comprehensive instructions for the setup, operation, and maintenance of your Pro-Ject Debut EVO 2 Audiophile Turntable. The Debut EVO 2 represents the next generation of Pro-Ject's best-selling audiophile turntables, featuring a carbon fiber tonearm, electronic speed selection, and a pre-mounted Pick it MM EVO cartridge. Designed for longevity, this turntable offers premium vinyl listening experience.
2. Қауіпсіздік нұсқаулары
Please read these safety instructions carefully before operating your turntable. Keep this manual for future reference.
- Нәр беруші: Only use the power adapter supplied with the unit. Ensure the voltage жергілікті қуат көзіне сәйкес келеді.
- Су және ылғал: Do not expose the turntable to rain or moisture. Do not place objects filled with liquids, such as vases, on the apparatus.
- Жылу көздері: Do not place the turntable near heat sources such as radiators, heat registers, stoves, or other apparatus (including ampжылу шығаратын көтергіштер).
- Желдету: Тиісті желдетуді қамтамасыз етіңіз. Желдету саңылауларын жаппаңыз.
- Тазалау: Тек құрғақ шүберекпен тазалаңыз. Сұйық немесе аэрозольді тазартқыштарды пайдаланудан аулақ болыңыз.
- Қызмет көрсету: Do not attempt to service the turntable yourself. Refer all servicing to qualified service personnel. Servicing is required when the apparatus has been damaged in any way, such as power-supply cord or plug is damaged, liquid has been spilled or objects have fallen into the apparatus, the apparatus has been exposed to rain or moisture, does not operate normally, or has been dropped.
- Балалар: Балалардың қолы жетпейтін жерде сақтаңыз. Ұсақ бөлшектері тұншығу қаупін тудыруы мүмкін.
3. Қорапта не бар
Carefully unpack all items from the packaging. Please ensure all components listed below are present:
- Pro-Ject Debut EVO 2 Turntable Unit
- Transparent Dustcover
- Connection Cable (RCA)
- Қуат адаптері
- Туралау транспортир
- Single Adapter (for 45 RPM records with large center hole)
- Платтер
- Белдікпен жүріңіз
- Қарсы салмақ
- Конькиге қарсы салмақ
4. Орнату нұсқаулығы
Follow these steps to set up your Pro-Ject Debut EVO 2 turntable for optimal performance.
4.1. Орналастыру және деңгейлеу
Place the turntable on a stable, level surface away from vibrations and direct sunlight. Use a spirit level to ensure the turntable is perfectly horizontal. The adjustable feet can be used for fine-tuning the level.

Image: The Pro-Ject Debut EVO 2 turntable in Satin Steel Blue, showcasing its sleek design and stable base. Proper placement on a level surface is crucial for optimal sound quality.
4.2. Табақ пен жетек белдігін орнату
- Carefully place the heavy die-cast aluminum platter onto the spindle.
- Locate the drive belt. Gently stretch the belt around the sub-platter and the motor pulley. Ensure the belt is not twisted.

Сурет: егжей-тегжейлі view of the turntable's platter and the drive belt mechanism. The belt connects the motor pulley to the sub-platter, ensuring consistent rotation.
4.3. Tonearm Balancing and Tracking Force Adjustment
The Debut EVO 2 comes with a pre-mounted Pick it MM EVO cartridge. Follow these steps to balance the tonearm and set the tracking force:
- Картриджден стилус қорғағышын алып тастаңыз.
- Lower the tonearm lift.
- Carefully rotate the counterweight on the rear of the tonearm until the tonearm floats freely and is perfectly balanced horizontally.
- Once balanced, hold the counterweight steady and rotate the tracking force dial (the numbered ring on the front of the counterweight) to '0'.
- Rotate the entire counterweight (including the dial) counter-clockwise until the dial shows the recommended tracking force for the Pick it MM EVO cartridge, which is typically 1.8 grams. Refer to the cartridge specifications for precise values.

Image: A close-up of the tonearm assembly, showing the counterweight and the anti-skate mechanism. Proper adjustment of these components is vital for accurate tracking and sound reproduction.
4.4. Конькиге қарсы реттеу
The anti-skate mechanism prevents the tonearm from being pulled towards the center of the record. The Debut EVO 2 uses a weight-on-string anti-skate system.
- Locate the small anti-skate weight and the anti-skate stub on the tonearm.
- Hang the loop of the anti-skate weight's string over the second groove of the anti-skate stub. This setting is generally suitable for the pre-mounted cartridge.
4.5. Анға қосылу Ampқұтқарушы
Connect the supplied RCA cable from the turntable's output jacks (L and R) to the PHONO input on your ampкөтергіш немесе фоно преamplifier. Ensure the ground wire is connected from the turntable to the ground terminal on your ampөмірлік/алдын алаampгуілді азайту үшін көтергіш.
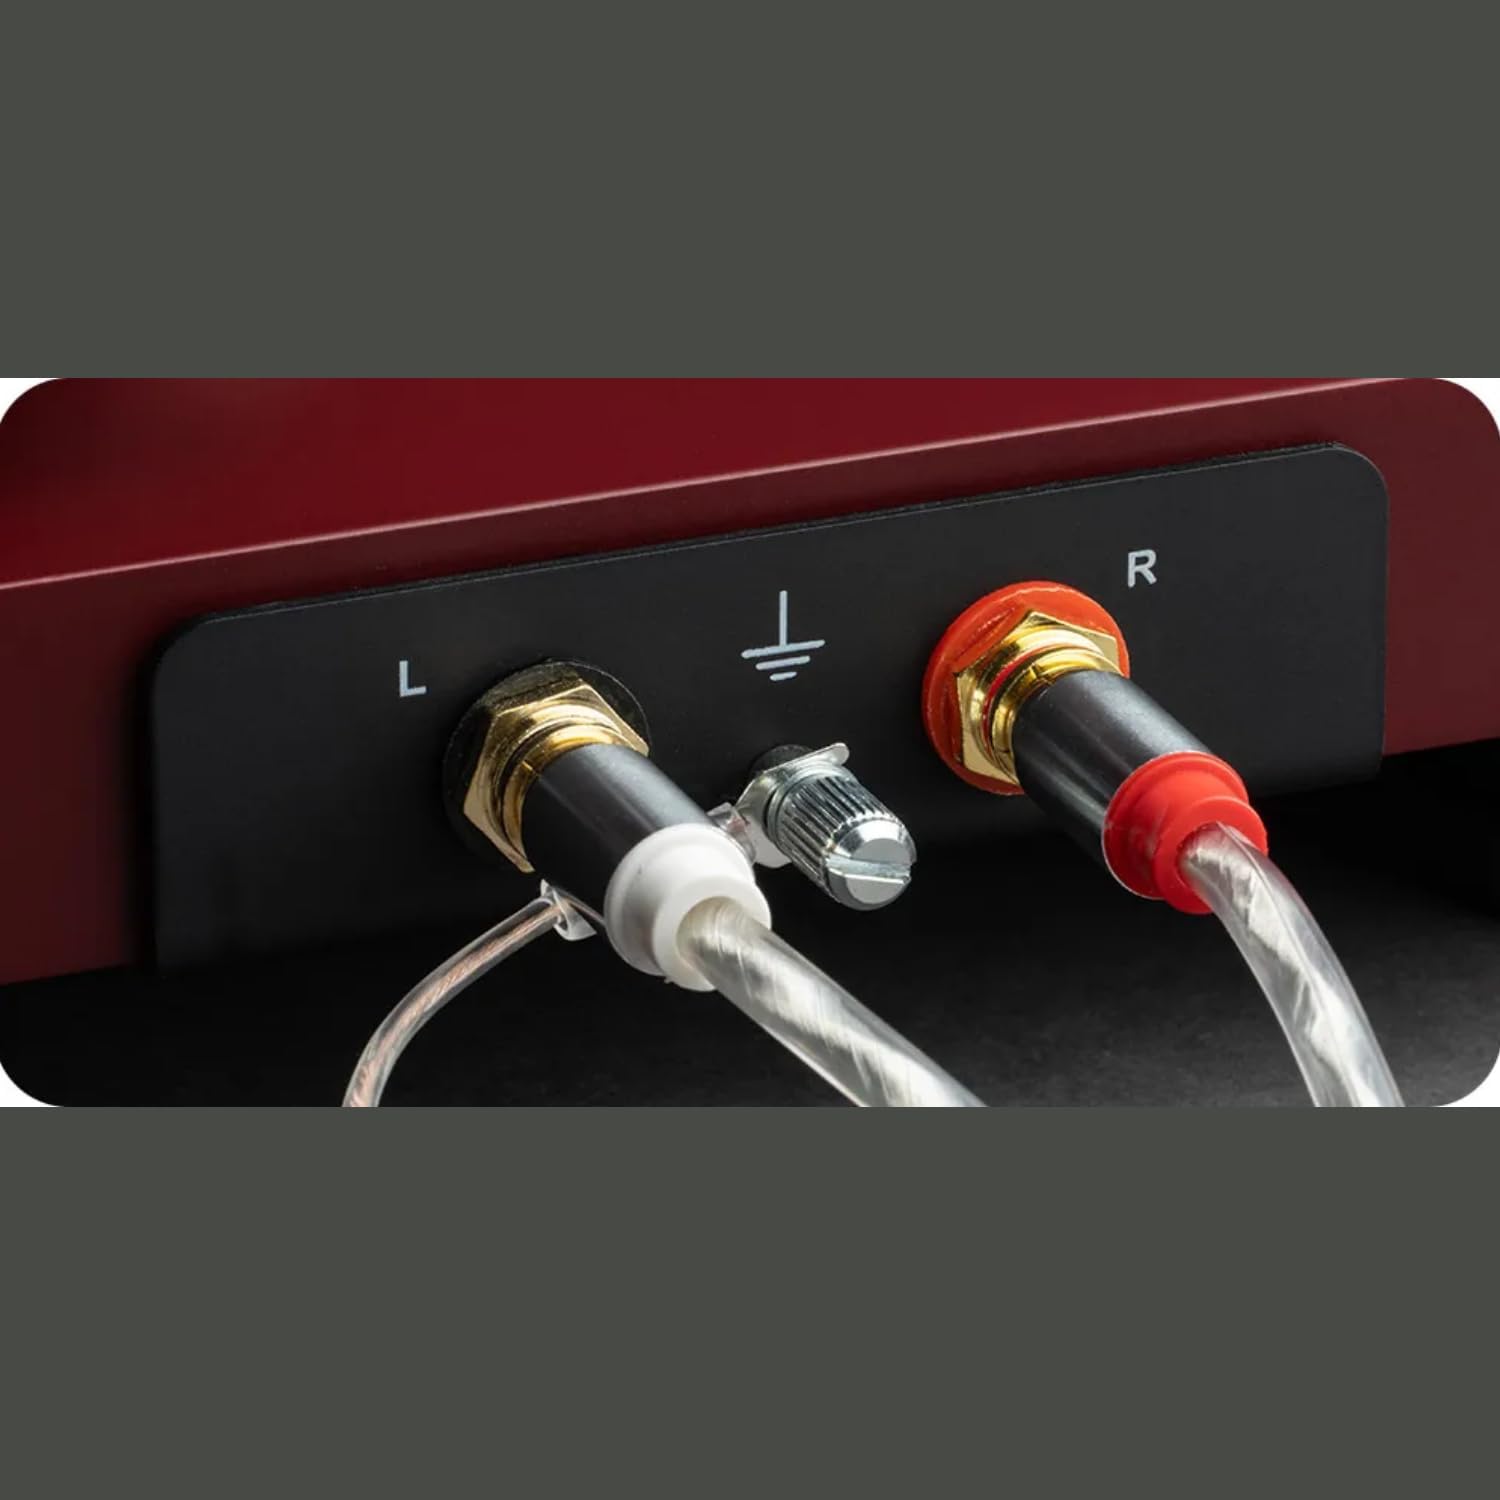
Сурет: егжей-тегжейлі view of the turntable's rear panel, showing the left (L) and right (R) RCA output jacks, along with the ground terminal. These connections are essential for transmitting the audio signal to an ampқұтқарушы.
4.6. Қуат қосылымы
Қуат адаптерін айналмалы үстелдегі тұрақты ток кірісіне қосыңыз, содан кейін оны қабырға розеткасына қосыңыз.
4.7. Dustcover Installation
Carefully insert the hinges of the transparent dustcover into the receptacles at the rear of the turntable plinth.
5. Пайдалану нұсқаулары
5.1. Қосу / Өшіру
The turntable is powered on when the power adapter is connected. There is no separate power switch. To turn off, disconnect the power adapter.
5.2. Жылдамдықты таңдау
The Debut EVO 2 features electronic speed selection. Use the switch located on the plinth to select between 33 ⅓ RPM and 45 RPM. For 78 RPM records, a special belt and stylus are required (sold separately), and the speed switch can be set to 78 RPM after installing the appropriate belt.
5.3. Жазбаны ойнату
- Жазбаны табаққа салыңыз.
- Select the correct playback speed (33 ⅓ or 45 RPM).
- Қолды көтеру рычагының көмегімен қолды көтеріңіз.
- Carefully position the stylus over the lead-in groove of the record.
- Gently lower the tonearm using the tonearm lift lever. The stylus will descend onto the record and playback will begin.
5.4. Ойнатуды тоқтату
- At the end of a record, the tonearm will remain in the run-out groove.
- Қолды көтеру рычагының көмегімен қолды көтеріңіз.
- Return the tonearm to its rest and secure it with the tonearm clamp.
- Remove the record from the platter.
6. Техникалық қызмет көрсету
Regular maintenance will ensure the longevity and optimal performance of your turntable.
6.1. Айналмалы табақшаны тазалау
- Always disconnect the turntable from the power outlet before cleaning.
- Use a soft, lint-free cloth to wipe down the plinth and platter. Avoid abrasive cleaners or solvents.
- The dustcover can be cleaned with a soft, damp cloth. Avoid harsh chemicals that may scratch or cloud the acrylic.
6.2. Стилусты тазалау
- Use a dedicated stylus cleaning brush or fluid.
- Always brush the stylus from back to front (from the pivot point towards the tip) to avoid damaging the cantilever.
- Clean the stylus regularly to remove dust and debris that can degrade sound quality and damage records.

Сурет: жақыннан түсірілген view of the pre-mounted Pick it MM EVO cartridge on the carbon fiber tonearm. Regular cleaning of the stylus is important for maintaining audio fidelity.
7. Ақаулықтарды жою
Егер сіз айналмалы табақпен мәселелерге тап болсаңыз, келесі жиі кездесетін мәселелер мен шешімдерді қараңыз.
| Мәселе | Ықтимал себебі | Шешім |
|---|---|---|
| No power / No rotation | Power adapter not connected; Power outlet faulty; Drive belt dislodged or broken. | Check power connections; Try a different outlet; Re-seat or replace drive belt. |
| Бір немесе екі арнадан дыбыс жоқ | Cable connection issues; Cartridge wiring loose; Amplifier input incorrect. | Check RCA and ground connections; Verify cartridge wires are secure; Ensure amplifier is set to PHONO input. |
| Гыңылдаған дыбыс | Ground wire not connected; Nearby electronic interference; Faulty cable. | Connect ground wire; Move turntable away from other electronics; Try a different RCA cable. |
| Distorted or skipping sound | Incorrect tracking force; Incorrect anti-skate; Dirty stylus; Damaged record. | Re-adjust tracking force and anti-skate; Clean stylus; Inspect record for damage. |
| Incorrect playback speed | Wrong speed selected; Drive belt issue. | Ensure correct speed (33/45 RPM) is selected; Check drive belt for proper seating. |
If the problem persists after attempting these solutions, please contact Pro-Ject customer support or your authorized dealer for assistance.
8. Техникалық сипаттамалар
| Ерекшелік | Мәлімет |
|---|---|
| Модель атауы | Дебют EVO 2 |
| Бренд | Pro-Ject |
| Өнім өлшемдері | 16.4 x 12.6 x 4.5 дюйм |
| Элемент салмағы | 13.2 фунт (6 килограмм) |
| Материал | Carbon Fiber (tonearm) |
| Түс | Satin Steel Blue (as per current product) |
| Мотор түрі | Белдік жетек |
| Қосылу технологиясы | Auxiliary (RCA output) |
| Қосылған құрамдас бөліктер | Turntable, transparent dustcover, connection cable, power adapter, alignment protractor, single adapter |
| Картридж | Pre-mounted Pick it MM EVO |
| Платтер | 1.7kg anti-magnetic die-cast aluminum |
9. Кепілдік және қолдау
Pro-Ject Audio Systems stands behind the quality of its products. The Pro-Ject Debut EVO 2 turntable is designed for longevity and comes with a 25-year spare parts availability guarantee, ensuring that your turntable can be maintained for a lifetime.
For technical support, warranty claims, or further assistance, please contact your authorized Pro-Ject dealer or visit the official Pro-Ject Audio Systems webсайт. Сатып алу түбіртегін кепілдік мақсаттары үшін сатып алудың дәлелі ретінде сақтаңыз.
Қосымша ақпаратты және қолдау ресурстарын мына жерден таба аласыз Pro-Ject Store on Amazon.