1. Кіріспе
This manual provides essential information for the safe and effective operation of the FNNEMGE MY2600D Digital Clamp Meter. This versatile instrument is designed for precise measurement of AC/DC voltage, AC/DC current, resistance, capacitance, frequency, duty cycle, diode, continuity, and temperature. It features True RMS measurement, Non-Contact Voltage (NCV) detection, Low Pass Filter (LPF), and Low Impedance (LowZ) functions, making it suitable for industrial, automotive, household, and educational applications.

Image 1.1: The FNNEMGE MY2600D Digital Clamp Сынақ сымдары мен қорғаныш қапшығын қоса алғанда, есептегіш.
2. Қауіпсіздік туралы ақпарат
To ensure safe operation and prevent damage to the meter, please read and follow all safety instructions carefully. This device complies with IEC 61010-1, CAT III 600V, and CE standards.
- Жалпы қауіпсіздік: Always use the meter according to the instructions. Do not operate the meter if it appears damaged or if the insulation is compromised.
- Тtage Лимиттері: Бағаланған көлемнен артық қолданбаңызtage, as marked on the meter, between the terminals or between any terminal and earth ground. The maximum operating voltage - 600 вольт.
- Ағымдағы өлшеу: Ensure the circuit is de-energized before connecting the clamp meter for current measurements, especially when measuring high currents.
- Сынақ жетекшілері: Use only the test leads provided with the meter. Inspect test leads for damage before each use.
- Live Circuits: Exercise extreme caution when working with live circuits. Avoid contact with bare conductors or terminals.
- Қоршаған орта: Есептегішті жарылыс қаупі бар газ, бу немесе шаңды ортада қолданбаңыз.
- Шамадан тыс жүктемеден қорғау: The meter features overload protection, double ceramic fuses, and thermistors to protect the circuit. However, always operate within specified ranges.
- Батареяны ауыстыру: Батарея заряды аз деген индикатор пайда болған кезде, дәл көрсеткіштерді қамтамасыз ету үшін батареяларды дереу ауыстырыңыз.

Image 2.1: Illustration of the internal overload protection mechanism within the clamp meter, designed to prevent damage from misuse.
3. Өнім аяқталдыview
Familiarize yourself with the components of your FNNEMGE MY2600D Digital Clamp Есептегіш:

Image 3.1: Detailed diagram of the clamp meter indicating its various parts and controls.
- Clamp: Айнымалы ток/тұрақты токты контактісіз өлшеу үшін қолданылады.
- Қауіпсіздік кедергісі: Indicates the safe limit for hand placement.
- Function Range Switch: Rotary dial to select measurement functions.
- Деректерді ұстап тұру түймесі (H): Дисплейдегі ағымдағы көрсеткішті тоқтатады.
- Шам түймесі: Activates the built-in LED flashlight.
- СКД экраны: Digital display for readings, units, and indicators.
- Кіріс терминалы: Positive input for test leads.
- COM кіріс терминалы: Common (negative) input for test leads.
- Backlight Reset Button: Дисплейдің артқы жарығын басқарады.
- Function Selection Button (SEL): Toggles between functions within a rotary switch position (e.g., AC/DC, Diode/Continuity).
- Ескерту индикаторы: Visual alert for certain conditions (e.g., NCV detection).
- Триггер: cl ашады және жабадыamp жақ.
- Жарықтандыру Лamp: Provides light for the measurement area.
- NCV Detection Probe: Area for Non-Contact Voltagе анықтау.
4. Орнату
4.1 Батареяны орнату
The FNNEMGE MY2600D requires two AAA batteries (included). To install or replace batteries:
- Есептегіштің өшірілгеніне көз жеткізіңіз.
- Есептегіштің артқы жағындағы батарея бөлігінің қақпағын табыңыз.
- Use a screwdriver to loosen the screw(s) and remove the cover.
- Бөлімнің ішінде көрсетілгендей дұрыс полярлықты (+ және -) сақтай отырып, екі AAA батареясын салыңыз.
- Батарея бөлімінің қақпағын орнына салып, бұрандамен бекітіңіз.

4.1 сурет: clamp meter package contents, including the meter, manual, test leads, and AAA batteries.
5. Пайдалану нұсқаулары
Жұмысқа кіріспес бұрын, есептегіштің жақсы жағдайда екеніне және батареялардың дұрыс орнатылғанына көз жеткізіңіз.
5.1 Қуатты қосу/өшіру
Rotate the Function Range Switch to any desired measurement function to turn the meter ON. Rotate it to the "OFF" position to turn the meter OFF. The meter features an automatic shutdown function to conserve battery life after a period of inactivity.
5.2 AC/DC Current Measurement (0-600A)
To measure current using the clamp:
- Rotate the Function Range Switch to the "600A" or "60A" position for AC/DC current.
- Press the "SEL" button to switch between AC and DC current measurement if necessary.
- cl ашу үшін триггерді басыңызamp жақ.
- Enclose only one conductor (not a cable with multiple conductors) within the clamp жақ.
- Release the trigger to close the jaw. The current reading will appear on the LCD.

5.1 сурет: clamp jaw open, demonstrating how to enclose a single conductor for current measurement. The jaw opening is 26mm.
5.3 AC/DC Voltage Өлшем
Өлшеу үшін томtage:
- Insert the red test lead into the "INPUT" terminal and the black test lead into the "COM" terminal.
- Rotate the Function Range Switch to the "V~" (AC Voltage) немесе "V-" (Тұрақты ток көлеміtage) position. The meter may automatically detect AC or DC.
- Press the "SEL" button to switch between AC and DC voltage қажет болса.
- Сынақ сымдарын өлшегіңіз келетін тізбекке немесе компонентке параллель жалғаңыз.
- томды оқыңызtagСКД экранындағы e мәні.

Image 5.2: Measuring voltage by inserting test leads into a power outlet.
5.4 Resistance, Diode, Continuity, Capacitance, Frequency, Duty Cycle Measurement
For these measurements, connect the test leads as described for voltage өлшеу.
- Кедергі (Ω): Rotate the switch to the "Ω" position. Connect leads across the component.
- Diode (→|): Rotate the switch to the "Ω" position and press "SEL" until the diode symbol appears. Connect leads across the diode.
- Continuity (🔊): Rotate the switch to the "Ω" position and press "SEL" until the continuity symbol appears. Connect leads across the circuit. An audible beep indicates continuity.
- Сыйымдылық (F): Rotate the switch to the "F" position. Connect leads across the capacitor.
- Жиілік (Гц) / Жұмыс циклі (%): Rotate the switch to the "Hz%" position. Press "SEL" to toggle between frequency and duty cycle. Connect leads to the signal source.

Сурет 5.3: Мысалыamples of various measurements including voltage, resistance, battery, and diode testing using the meter and its test leads.
5.5 Температураны өлшеу
Температураны өлшеу үшін:
- Rotate the Function Range Switch to the "°C/°F" position.
- Insert the temperature probe into the "INPUT" and "COM" terminals, observing polarity.
- Температура зондының ұшын температурасын өлшегіңіз келетін объектінің үстіне немесе жанына қойыңыз.
- Read the temperature on the LCD. Press "SEL" to switch between Celsius and Fahrenheit.
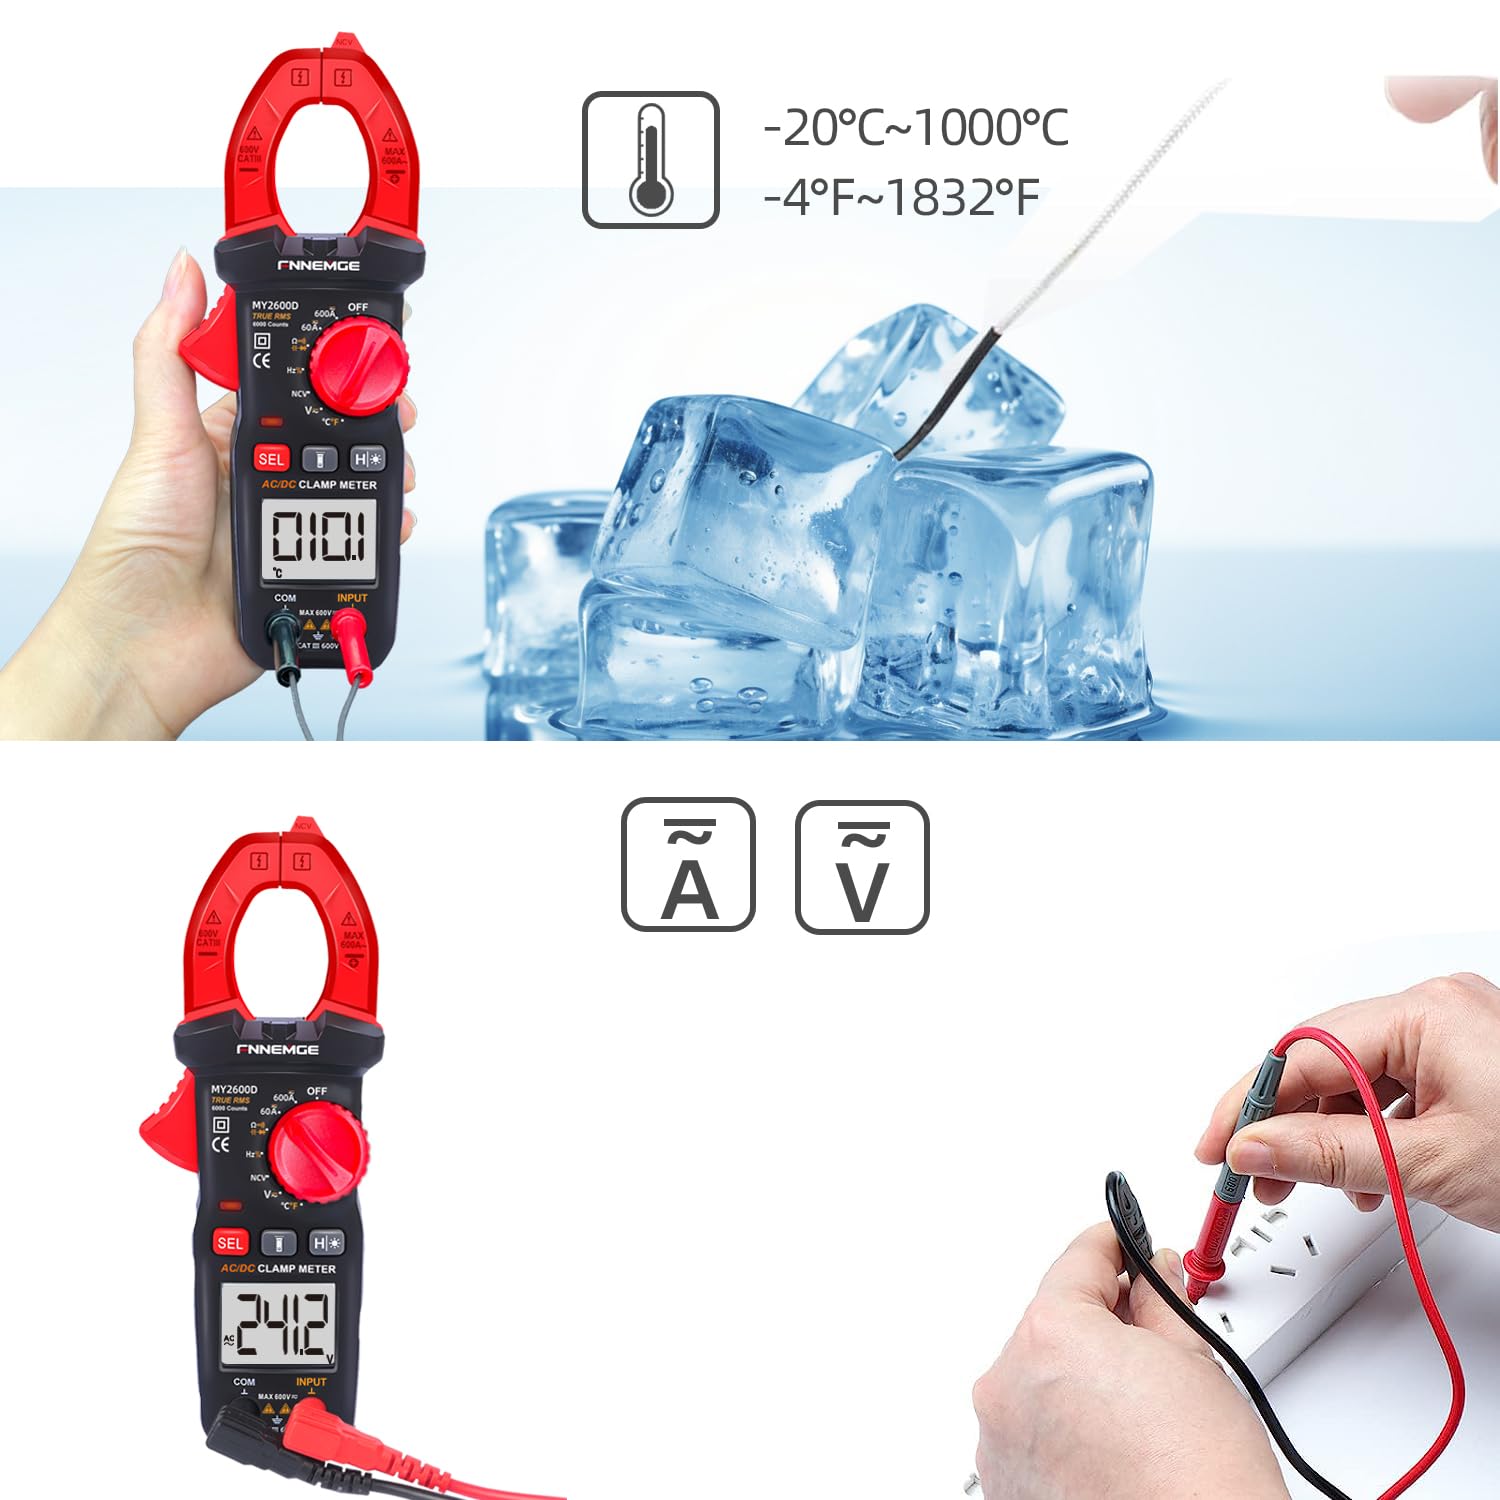
Image 5.4: Using the temperature probe to measure the temperature of ice, demonstrating the meter's temperature function.
5.6 Арнайы функциялар
- Байланыссыз томtage (NCV): Rotate the switch to the "NCV" position. Bring the NCV detection probe (top of the clamp jaw) near a live AC voltage source. The meter will indicate the presence of voltage with an audible alarm and visual warning.
- Төмен өтетін сүзгі (LPF): Айнымалы ток көлемін өлшеу кезіндеtage or current in circuits with variable frequency drives or other noise sources, activate LPF by pressing the dedicated button (if available, or via SEL in AC V/A mode). This filters out high-frequency interference for more accurate True RMS readings.
- Low Impedance (LowZ): This function helps prevent ghost voltages by providing a low impedance input, which drains away stray capacitance. Activate LowZ by selecting the appropriate function on the rotary switch or via the "SEL" button.
- True RMS (TRMS): The meter automatically measures True RMS for AC voltage and current, providing accurate readings for non-sinusoidal waveforms.
- Data Hold (H): Press the "H" button to freeze the current reading on the display. Press it again to release.
- Артқы жарық/жарық шамы: Press the backlight button to turn on the LCD backlight. Press the flashlight button to activate the LED flashlight for illuminating the measurement area.

5.5 сурет: clamp meter's flashlight in use, illuminating a dark area for easier measurement, with the NCV indicator visible.
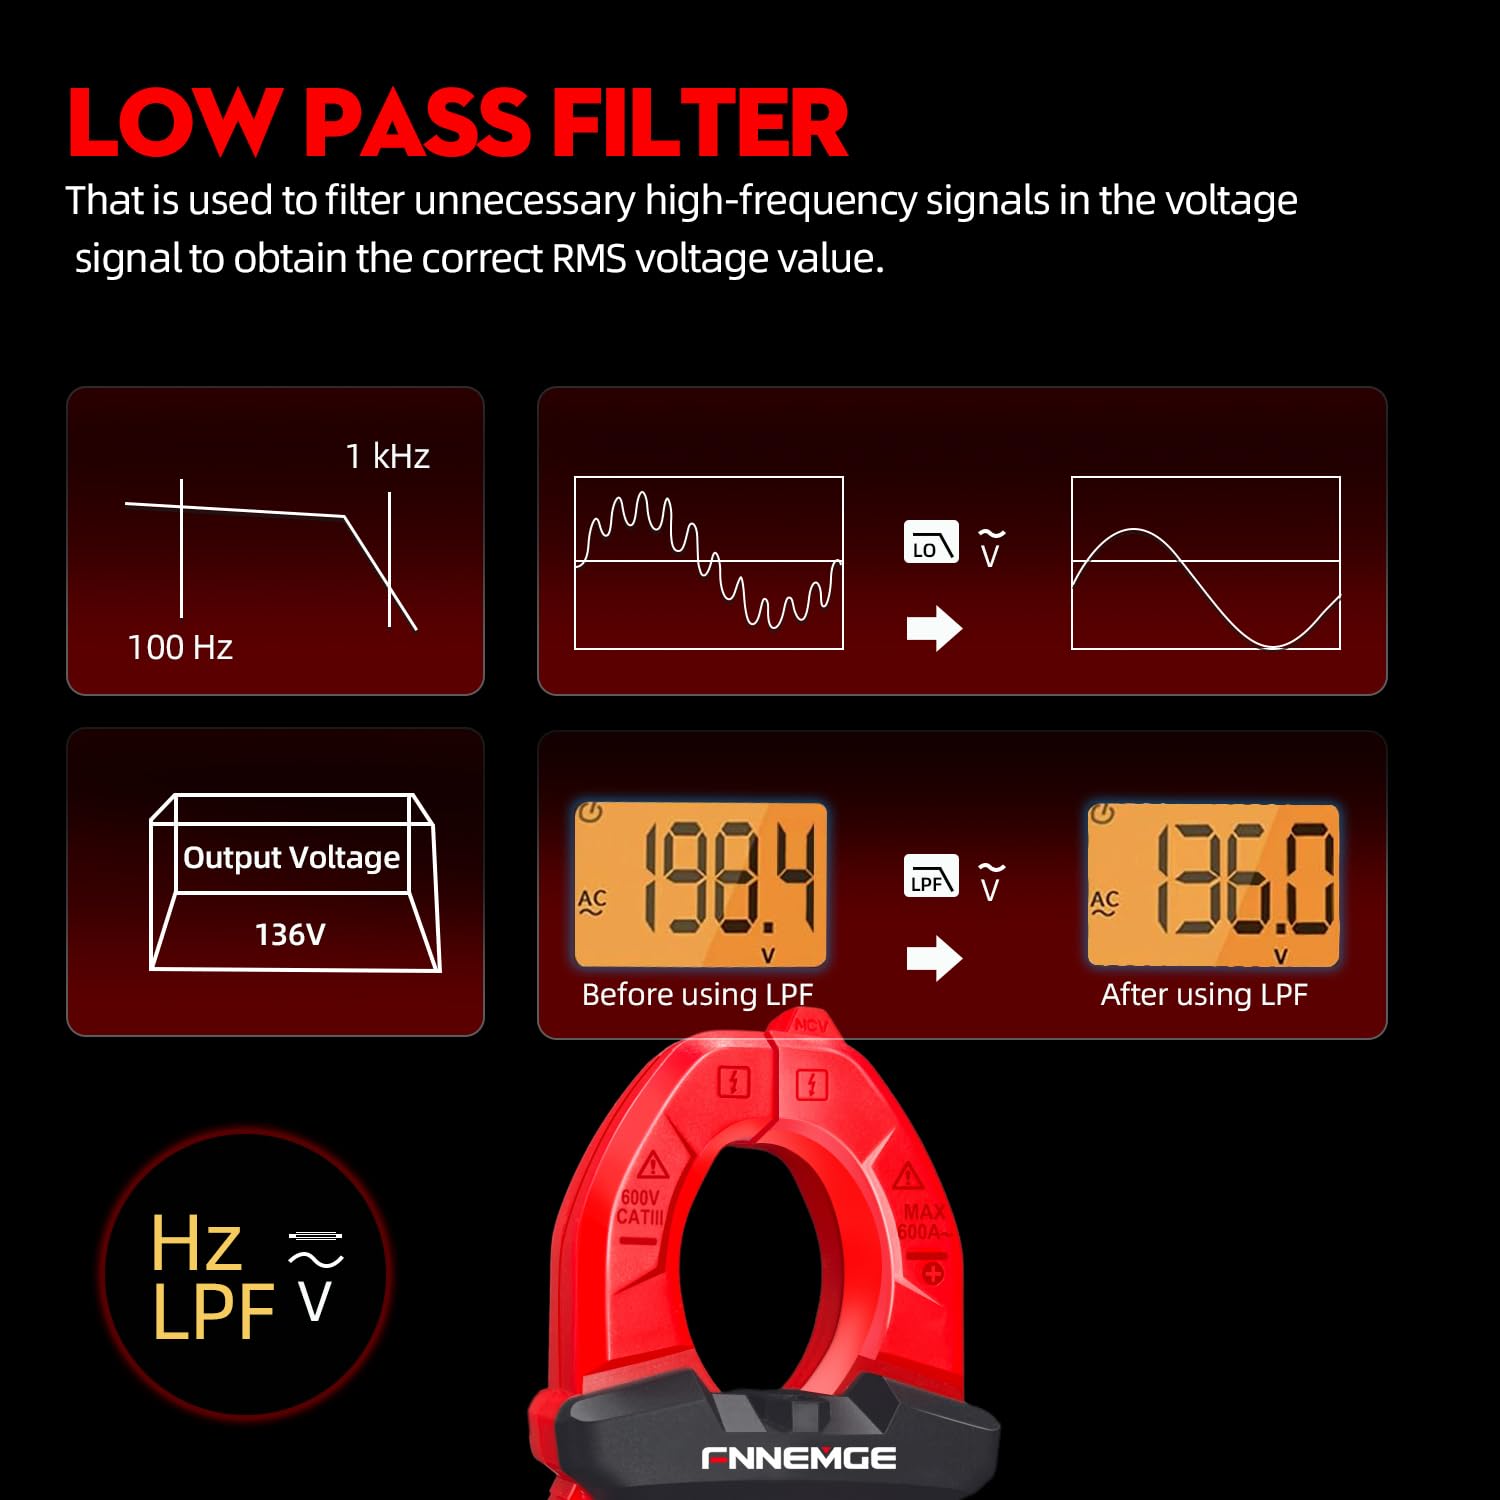
Image 5.6: An illustration detailing the function of the Low Pass Filter (LPF) in filtering out high-frequency noise for accurate voltage оқулар.
6. Техникалық қызмет көрсету
6.1 Тазалау
Wipe the meter with a dry, soft cloth. Do not use abrasives or solvents. Keep the terminals free of dirt and moisture.
6.2 Батареяны ауыстыру
When the low battery indicator appears on the LCD, replace the batteries as described in Section 4.1. Remove batteries if the meter is not used for an extended period.
6.3 Сақтау
Store the meter in a cool, dry place, away from direct sunlight and extreme temperatures. Use the provided carrying case for protection.
7. Ақаулықтарды жою
If you encounter issues with your FNNEMGE MY2600D, refer to the following common problems and solutions:
- Дисплей жоқ/Өлшегіш қосылмайды:
- Батареяның орнатылуын тексеріңіз және дұрыс полярлықты тексеріңіз.
- Батареялар таусылған болса, оларды ауыстырыңыз.
- Ensure the Function Range Switch is not in the "OFF" position.
- Дұрыс емес көрсеткіштер:
- Verify the correct measurement function is selected.
- Сынақ сымдарының дұрыс жалғанғанына және зақымдалмағанына көз жеткізіңіз.
- For current measurement, ensure only one conductor is within the clamp жақ.
- Check for external interference or strong magnetic fields.
- For AC measurements, consider using the LPF function if high-frequency noise is suspected.
- «OL» немесе шамадан тыс жүктеме көрсеткіші:
- The measured value exceeds the meter's range for the selected function. Switch to a higher range if available, or ensure the input is within the meter's capabilities.
- NCV көлемді анықтамайдыtage:
- Ensure the NCV function is selected.
- Bring the NCV probe closer to the live AC source.
- Томды тексеріңізtage source is active.
Мәселелер жойылмаса, көмек алу үшін тұтынушыларды қолдау қызметіне хабарласыңыз.
8. Техникалық сипаттамалар
| Ерекшелік | Техникалық сипаттама |
|---|---|
| Бренд | FNNEMGE |
| Үлгі нөмірі | MY2600D |
| Дисплей | 6000 санау |
| Өлшеу түрі | True RMS Digital Clamp метр |
| AC/DC Current Range | 0-600A |
| Максималды жұмыс көлеміtage | 600 вольт |
| Қарсыласу диапазоны | 60 МΩ дейін |
| Сыйымдылық диапазоны | Up to 100 mF |
| Температура диапазоны | -20°C – 1000°C (-4°F – 1832°F) |
| Арнайы функциялар | NCV, LowZ, LPF, Data Hold, Auto Ranging, Backlight, Flashlight |
| Қауіпсіздік стандарттары | IEC 61010-1, CAT III 600V, CE |
| Қуат көзі | 2 x AAA батареялары (жинаққа кіреді) |
| Өнім өлшемдері (L x W x H) | 18 x 6.4 x 3.4 см |
| Өнімнің салмағы | 400 грамм |
| Шығу елі | Қытай |
9. Кепілдік және қолдау
FNNEMGE provides a 36-month after-sales service and lifetime technical support for the MY2600D Digital Clamp Meter. If you have any questions, require technical assistance, or need to claim warranty service, please contact FNNEMGE customer support through your purchase platform or the official FNNEMGE webсайт.