Goldair GOR-900A
Goldair 2000W 9-Fin Oil Radiator User Manual
Model: GOR-900A
1. Кіріспе
Thank you for choosing the Goldair 2000W 9-Fin Oil Radiator, Model GOR-900A. This instruction manual provides important information for the safe and efficient operation of your new oil radiator. Please read this manual thoroughly before use and retain it for future reference.
This portable oil radiator is designed to provide efficient and consistent warmth for indoor spaces. It features automatic thermostat control, overheat protection, and multi-directional castors for easy movement.
2. Маңызды қауіпсіздік нұсқаулары
Электр құрылғыларын пайдаланған кезде өрт шығу, электр тогының соғуы және адамдардың жарақат алу қаупін азайту үшін әрқашан негізгі қауіпсіздік шараларын сақтау керек.
- Осы радиаторды пайдаланбас бұрын барлық нұсқауларды оқып шығыңыз.
- Do not use this radiator outdoors.
- Бұл радиатор пайдаланылған кезде ыстық. Күйіп қалмас үшін, жалаңаш терінің ыстық беттерге тиюіне жол бермеңіз.
- Радиаторды пайдаланбаған кезде әрқашан розеткадан ажыратыңыз.
- Сымы немесе ашасы зақымдалған радиаторды, сондай-ақ радиатор дұрыс жұмыс істемегеннен кейін, құлағаннан немесе қандай да бір жолмен зақымданғаннан кейін пайдаланбаңыз.
- Сымды кілем астынан өткізбеңіз. Сымды кілемшелермен, жүгіргіштермен немесе ұқсас жабындармен жаппаңыз. Сымды қозғалыс аймағынан алыс және оны құлап қалмайтын жерге орналастырыңыз.
- To disconnect the radiator, turn controls to OFF, then remove plug from outlet.
- Do not insert or allow foreign objects to enter any ventilation or exhaust opening as this may cause an electric shock or fire, or damage the radiator.
- Ықтимал өрттің алдын алу үшін ауа кіретін немесе шығатын жерлерді ешбір жолмен жауып тастамаңыз. Тесіктері бітеліп қалуы мүмкін төсек сияқты жұмсақ беттерде қолданбаңыз.
- A radiator has hot and arcing or sparking parts inside. Do not use it in areas where gasoline, paint, or flammable liquids are used or stored.
- Бұл радиаторды тек осы нұсқаулықта сипатталғандай пайдаланыңыз. Өндіруші ұсынбаған кез келген басқа пайдалану өртке, электр тогының соғуына немесе адамдардың жарақат алуына әкелуі мүмкін.
- Always plug radiators directly into a wall outlet/receptacle. Never use with an extension cord or relocatable power tap (outlet/power strip).
- Ensure the radiator is placed on a stable, level surface.
- Keep flammable materials such as furniture, pillows, bedding, papers, clothes, and curtains at least 1 meter (3 feet) from the front and sides of the radiator.
3. Пакет мазмұны
Ашқан кезде барлық заттардың бар екеніне және зақымдалмағанына көз жеткізу үшін қаптаманың ішіндегісін тексеріңіз.
- 1 x Goldair 2000W 9-Fin Oil Radiator (Model GOR-900A)
- 2 x Castor Wheel Assemblies (with mounting hardware)
- 1 x Нұсқаулық
4. Орнату және құрастыру
Before operating the radiator, follow these steps to assemble the castor wheels and prepare the unit for use.
4.1 Attaching the Castor Wheels
- Carefully turn the radiator upside down on a soft, non-abrasive surface to prevent damage to the finish.
- Locate the two U-shaped bolts and four wing nuts provided.
- Align each castor wheel assembly with the mounting holes on the bottom of the radiator, positioning them between the fins at each end.
- Insert the U-shaped bolts through the holes in the castor assembly and around the base of the radiator fins.
- Secure each U-bolt with two wing nuts, tightening them firmly but without over-tightening.
- Once both castor assemblies are securely attached, carefully turn the radiator upright.
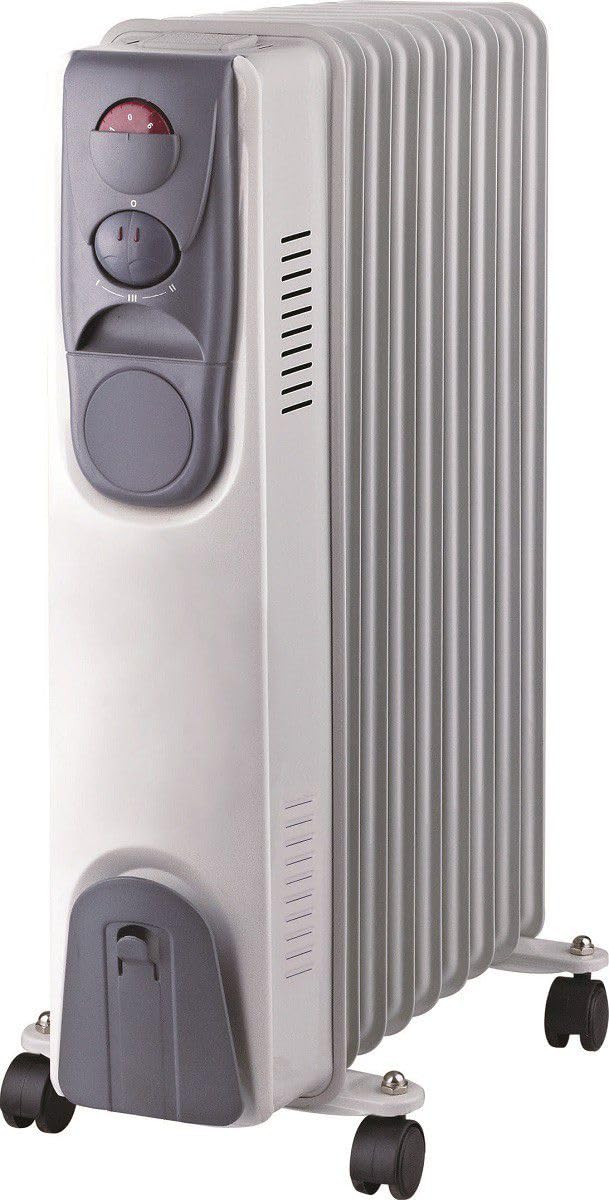
Image: The Goldair 2000W 9-Fin Oil Radiator with its castor wheels correctly installed, ready for use.
4.2 Орналастыру
- Радиаторды қатты, тегіс жерге қойыңыз.
- Ensure there is at least 1 meter (3 feet) of clear space around the radiator from walls, furniture, and other objects to allow for proper air circulation and prevent fire hazards.
- Радиаторды тікелей розетканың астына қоймаңыз.
- Avoid placing the radiator in areas where it could be easily knocked over.
5. Пайдалану нұсқаулары
Familiarize yourself with the controls before operating the radiator.
5.1 Басқару элементтеріview
- Қуат қосқышы: Құрылғыны ҚОСУ немесе ӨШІРУ.
- Heat Setting Switches: Allows selection between two heat settings.
- Термостатты басқару тетігі: Қажетті бөлме температурасын реттейді.
- Индикатор шамы: Қыздыру элементтері белсенді болған кезде жанады.
5.2 Бастапқы операция
- Ensure the radiator is placed on a stable surface and the power cord is fully uncoiled.
- Plug the power cord into a suitable 220-240V AC wall outlet.
- Turn the thermostat control dial to its maximum setting (usually marked 'MAX' or '6').
- Select a heat setting using the heat setting switches. You can choose between two settings for different heat outputs.
- The indicator light will illuminate, signifying that the heating elements are active.
- Allow the radiator to operate for a few minutes to reach its initial operating temperature.
5.3 Термостатты орнату
Once the room reaches a comfortable temperature:
- Slowly turn the thermostat control dial counter-clockwise until the indicator light turns off.
- The radiator will now maintain this temperature by cycling on and off automatically.
- If the room temperature drops below the set level, the radiator will switch on again. If the room temperature rises, it will switch off.
5.4 Overheat Protection and Auto Safety Cut-Off
This radiator is equipped with an overheat protection system and an auto safety cut-off feature. If the radiator overheats due to restricted airflow or other reasons, the safety system will automatically switch off the unit. To reset:
- Unplug the radiator from the power outlet.
- Allow the radiator to cool down for at least 30 minutes.
- Identify and remove the cause of overheating (e.g., clear any obstructions).
- Plug the radiator back in and resume normal operation. If the issue persists, contact customer support.
6. Техникалық қызмет көрсету және сақтау
6.1 Тазалау
- Тазалау алдында әрқашан радиаторды розеткадан суырыңыз және оны толығымен суытыңыз.
- Сыртқы беттерді жұмсақ шүберекпен сүртіңіз, damp мата. Абразивті тазартқыштарды немесе еріткіштерді қолданбаңыз.
- Радиаторды суға батырмаңыз немесе судың ішкі бөлікке тамып кетуіне жол бермеңіз.
- Regularly remove dust from the fins and control panel using a soft brush or vacuum cleaner with a brush attachment.
6.2 Сақтау
- When not in use, store the radiator in a cool, dry place.
- If possible, store it in its original packaging to protect it from dust and damage.
- Coil the power cord neatly and secure it to prevent tangling or damage.
7. Ақаулықтарды жою
If your radiator is not operating correctly, please refer to the following common issues and solutions:
| Мәселе | Ықтимал себебі | Шешім |
|---|---|---|
| Радиатор қосылмайды. |
|
|
| Radiator produces insufficient heat. |
|
|
| Radiator cycles on and off too frequently. |
|
|
If the problem persists after checking these solutions, please contact Goldair customer support.
8. Техникалық сипаттамалар
| Ерекшелік | Мәлімет |
|---|---|
| Үлгі нөмірі | GOR-900A |
| Бренд | Голдэйр |
| Қуат шығысы | 2000 Вт |
| Қанаттар саны | 9 |
| Жылу параметрлері | 2 |
| Арнайы мүмкіндіктер | Portable, Automatic Thermostat Control, Overheat Protection, Auto Safety Cut-Off, Cool Touch Handles, Multi-directional Castors |
| Жылыту әдісі | Конвекция (май толтырылған) |
| Қуат көзі | Сымды электр |
| Ішкі/сыртқы пайдалану | Ішкі |
| Өнім өлшемдері (D x W x H) | 46D x 16 Вт x 66 H сантиметр |
| Түс | Ақ |
9. Кепілдік және тұтынушыларды қолдау
Goldair products are manufactured to the highest quality standards. In the unlikely event of a defect arising from faulty materials or workmanship, your product is covered by a manufacturer's warranty.
Please retain your purchase receipt as proof of purchase. For warranty claims, technical assistance, or any questions regarding your Goldair 2000W 9-Fin Oil Radiator, please contact Goldair customer support through their official webсайт немесе сатып алу құжаттамасымен бірге берілген байланыс ақпараты.
Do not attempt to repair the appliance yourself, as this will void the warranty and could lead to electric shock or fire.
Ask a question about this manual
Ask about setup, troubleshooting, compatibility, parts, safety, or missing instructions. Manuals+ will review the question and use this page’s manual context to help answer it.