
Vetroo AL800
Vetroo AL800 Mid Tower ATX PC Computer Case
Нұсқаулық
Кіріспе
This manual provides detailed instructions for the assembly, operation, and maintenance of your Vetroo AL800 Mid Tower ATX PC Computer Case. Please read this manual thoroughly before beginning installation to ensure proper setup and optimal performance.

Figure 1: Vetroo AL800 Mid Tower ATX PC Computer Case (Black)
Қауіпсіздік туралы ақпарат
- Кез келген құрамдас бөліктерді орнатпас немесе алып тастамас бұрын әрқашан қуат көзін қабырға розеткасынан ажыратыңыз.
- Handle components with care to avoid damage from electrostatic discharge. Consider using an anti-static wrist strap.
- Keep the case and components away from liquids and excessive humidity.
- Қызып кетудің алдын алу үшін дұрыс желдетуді қамтамасыз етіңіз.
- Do not attempt to modify the case or its components, as this may void your warranty and pose safety risks.
Пакет мазмұны
Барлық элементтер пакетте бар екенін тексеріңіз:
- Vetroo AL800 Mid Tower ATX PC Computer Case
- Accessory Box (screws, standoffs, cable ties)
- Pre-installed 1x 120mm PWM/ARGB Fan (rear)
- Пайдаланушы нұсқаулығы (бұл құжат)
Негізгі мүмкіндіктер
- ARGB LED Strip: Integrated LED lighting and ARGB case fans can be synchronized with compatible motherboards via a 5V 3-pin interface.
- Door Opening Design: Features a 4mm thick tempered glass side panel with a convenient door-opening mechanism for easy access to internal components.
- High Performance Airflow: A mesh front panel and strategically placed dust filters ensure optimal airflow and system cooling.
- Кең үйлесімділік: Supports ATX, M-ATX, and ITX motherboards. Accommodates GPUs up to 340mm in length and CPU coolers up to 165mm in height.
- Сұйық салқындатуды қолдау: Front panel supports up to a 360mm liquid cooling radiator.
- Желдеткіш қолдау: Supports up to 8 x 120mm fans.
- Қарапайым кабельді басқару: Includes two soft silicone cord grommets for organized cable routing.
- Powerful I/O Panel: Features 1x USB 3.2 Type-C port, 2x USB 3.0 ports, and a combined microphone/headphone jack.
Орнату және орнату
1. Жалпы дайындық
- Корпусты тегіс, тұрақты бетке қойыңыз.
- Open the tempered glass side panel by gently pulling it open. It is hinged for easy access.
- Remove the tempered glass panel if necessary for easier installation by lifting it off its hinges once open.

Figure 2: Tempered Glass Door Opening Design
2. Аналық платаны орнату
- Кіріс/шығару қалқанын (бар болса) корпустың артқы саңылауына орнатыңыз.
- Align your ATX, M-ATX, or ITX motherboard with the pre-installed standoffs.
- Secure the motherboard using the provided screws from the accessory box.
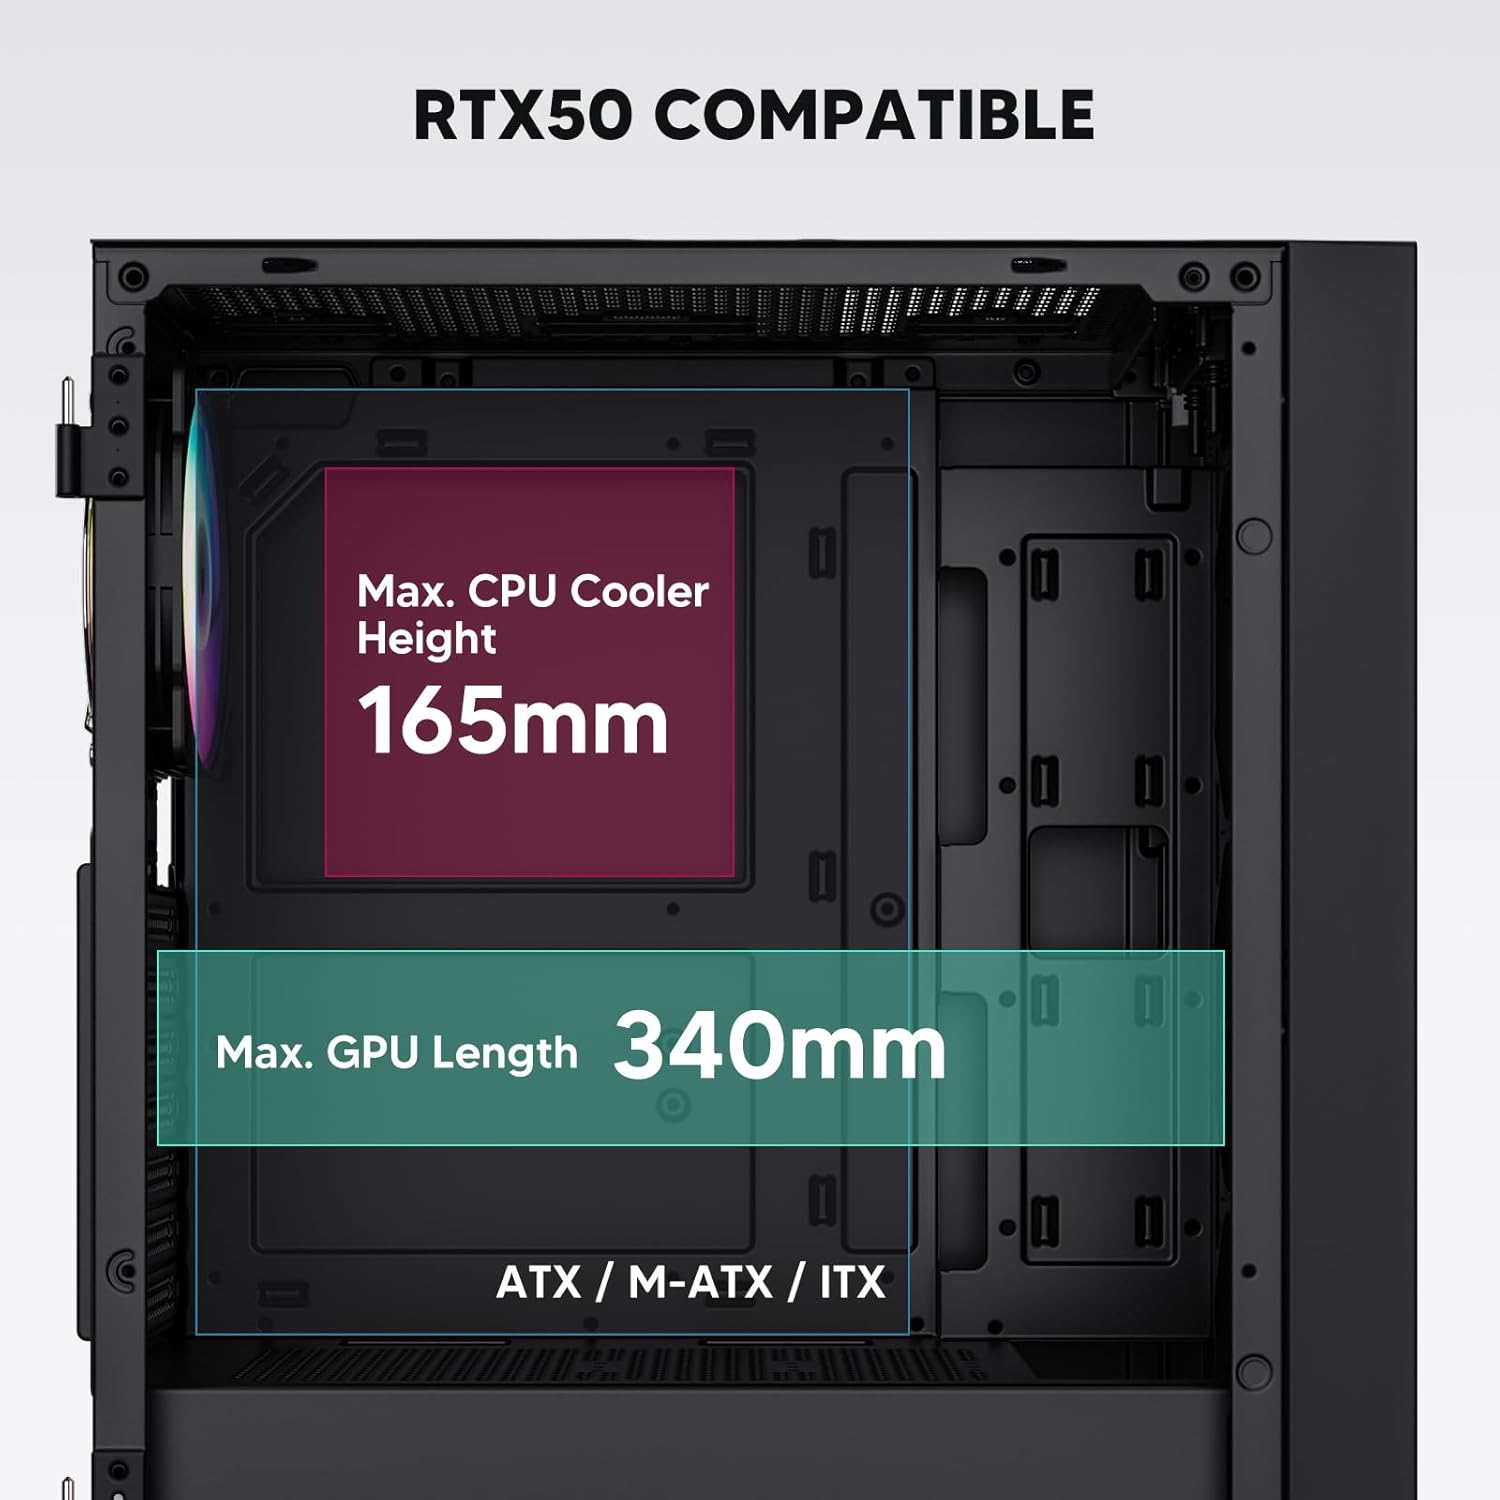
Figure 3: Motherboard and Component Clearance (Max CPU Cooler Height 165mm, Max GPU Length 340mm)
3. Storage Device Installation (HDD/SSD)
- Locate the dedicated mounting points for SSDs and HDDs.
- Install 2.5" SSDs onto the SSD trays or mounting brackets.
- 3.5 дюймдік қатты дискілерді корпустың төменгі жағында орналасқан жетек ұясына орнатыңыз.
- Secure all drives with the appropriate screws.

Figure 4: Internal Layout with Drive Bay Locations (SSD, HDD, Power Supply)
4. Қуат көзін орнату
- Mount your power supply unit (PSU) in the dedicated compartment at the bottom rear of the case.
- Ensure the PSU fan faces downwards (if the case has a bottom vent) or upwards, depending on your cooling preference.
- Secure the PSU with screws from the rear of the case. The case supports PSUs up to 200mm in length.
5. Кеңейту картасын (GPU) орнату
- Remove the necessary PCI-E slot covers from the rear of the case.
- Insert your graphics card or other expansion cards into the motherboard's PCI-E slots.
- Secure the cards with screws. The case supports GPUs up to 340mm in length.
6. Cooling System Installation (Fans/Radiators)
- The case comes with one pre-installed 120mm PWM/ARGB fan at the rear.
- Additional fans (120mm or 140mm) can be installed at the front, top, and bottom.
- Liquid cooling radiators up to 360mm can be installed at the front, and up to 240mm at the top.
- Refer to the diagram for supported fan and radiator configurations.

Figure 5: Fan and Liquid Radiator Support Diagram
7. Алдыңғы панель қосылымдары
- Connect the front panel cables (Power, Reset, USB 3.0, USB Type-C, HD Audio) to the corresponding headers on your motherboard.
- Consult your motherboard manual for the exact pin layout of these headers.
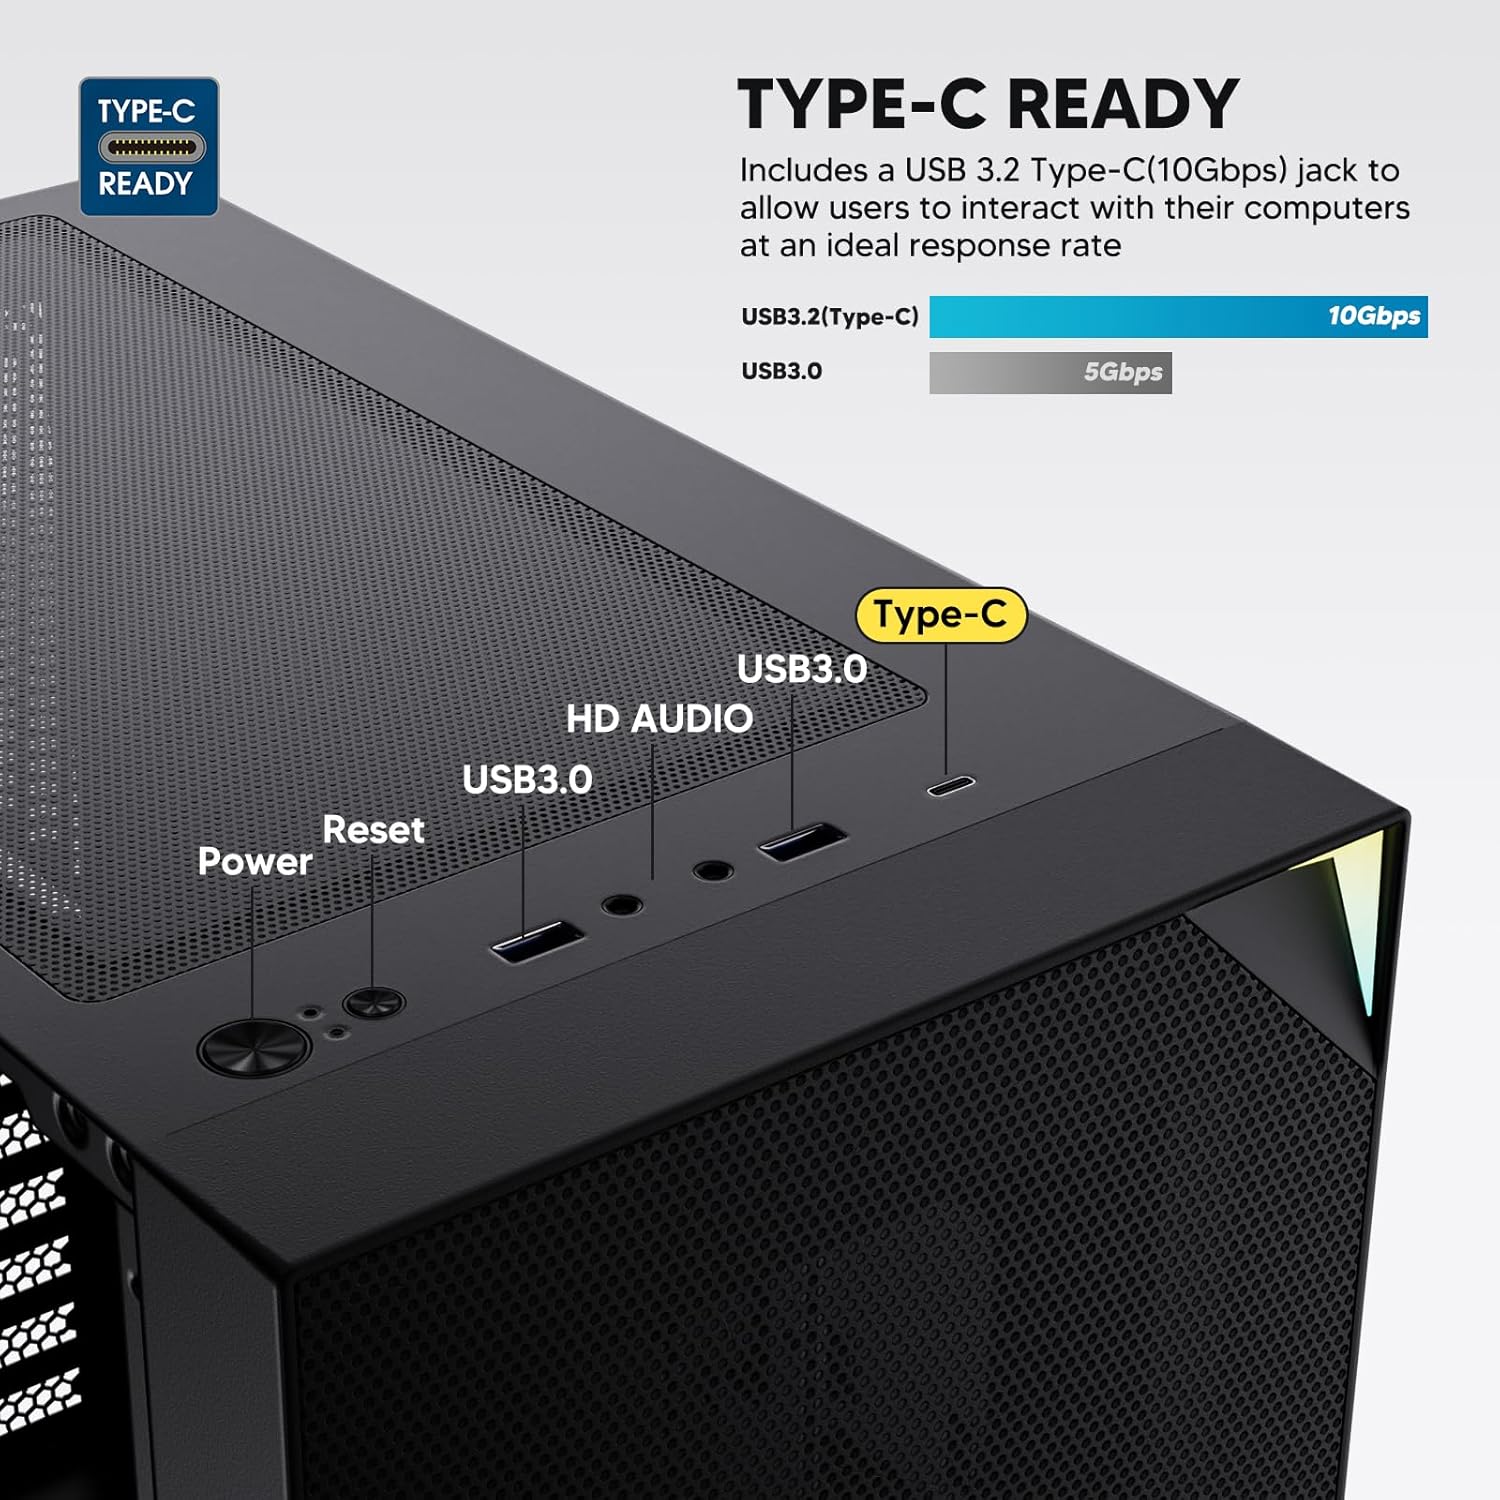
Figure 6: Top I/O Panel Connections
8. ARGB and PWM Connections
- The pre-installed fan and ARGB LED strip require connection to your motherboard.
- Connect the 4-pin PWM connector from the fan to a compatible fan header on your motherboard for speed control.
- Connect the 3-pin ARGB connector from the fan and LED strip to a 5V 3-pin ARGB header on your motherboard for lighting synchronization. Do not connect to a 12V RGB header, as this will damage the LEDs.
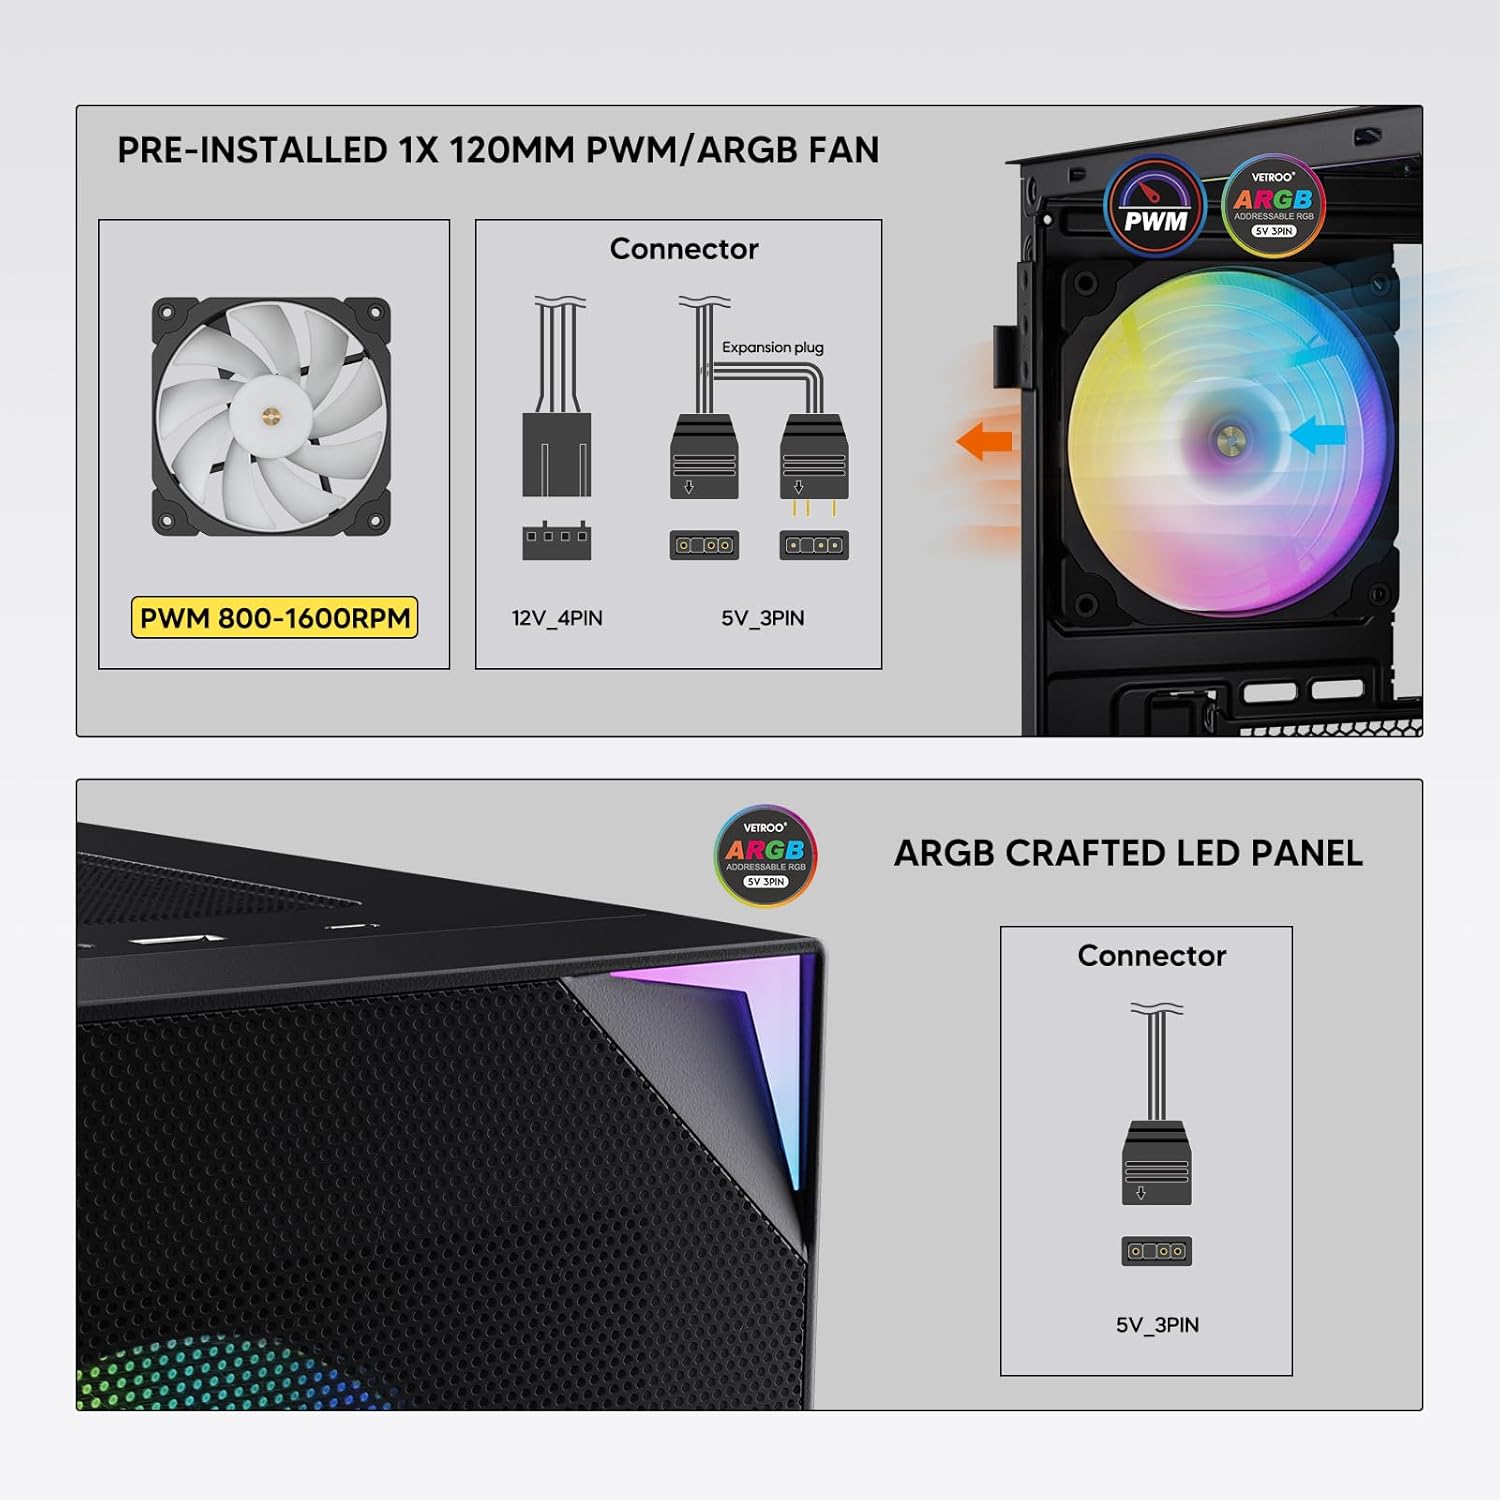
Figure 7: PWM and ARGB Connector Details
9. Кабельді басқару
- Кабельдерді ұйымдастыру үшін аналық плата науасының артындағы кабельді өткізу ойықтары мен бекіту нүктелерін пайдаланыңыз.
- The soft silicone grommets help protect cables and provide a clean look.
- Proper cable management improves airflow and aesthetics.
Операция
1. Бастапқы қосу
- After all components are securely installed and cables connected, close the tempered glass side panel.
- Connect your monitor, keyboard, mouse, and power cable to the PC.
- Flip the power switch on your PSU to the 'ON' position.
- Press the power button on the top I/O panel of the case to start your system.
2. ARGB жарықтандыруды басқару
- If connected to a compatible motherboard's 5V 3-pin ARGB header, the lighting of the pre-installed fan and LED strip can be controlled via your motherboard's RGB software (e.g., ASUS Aura Sync, MSI Mystic Light Sync, Gigabyte RGB Fusion, ASRock Polychrome Sync).
- Refer to your motherboard's manual for specific instructions on using its ARGB control software.
3. Ауа ағынын басқару
- The mesh front panel is designed for optimal air intake.
- Ensure that intake fans (typically front and bottom) and exhaust fans (typically rear and top) are configured to create positive or neutral air pressure for efficient cooling and dust prevention.

Figure 8: Airflow Diagram with Dust Filters
Техникалық қызмет көрсету
1. Шаң сүзгісін тазалау
- The case is equipped with dust filters on the top and bottom panels.
- Regularly check and clean these filters to maintain optimal airflow and prevent dust buildup inside the system.
- Gently remove the magnetic dust filters and clean them with compressed air or by rinsing with water (ensure they are completely dry before re-installation).
2. Tempered Glass Panel Care
- Clean the tempered glass panel with a soft, lint-free cloth and a non-abrasive glass cleaner.
- Avoid harsh chemicals or abrasive materials that could scratch or damage the glass.
Ақаулықтарды жою
- Жүйе қосылмайды:
- Қуат кабелінің қуат көзіне де, қабырға розеткасына да мықтап қосылғанына көз жеткізіңіз.
- Қуат көзі қосқышының «Қосулы» күйінде екеніне көз жеткізіңіз.
- Алдыңғы панельдегі қуат түймесінің кабелінің аналық платаның жоғарғы жағына дұрыс қосылғанын тексеріңіз.
- Confirm all power cables (24-pin ATX, CPU, GPU) are properly seated in the motherboard and components.
- Fans Not Spinning / ARGB Not Lighting Up:
- Check that the fan's PWM connector is securely plugged into a motherboard fan header.
- Verify the ARGB 3-pin connector is correctly attached to a 5V 3-pin ARGB header on the motherboard (not 12V RGB).
- Ensure your motherboard's ARGB software is installed and configured correctly.
- USB порттары жұмыс істемейді:
- Confirm the USB 3.0 and USB Type-C front panel cables are correctly connected to their respective motherboard headers.
- Check your motherboard manual for correct header locations.
- For other component-specific issues, refer to the instruction manuals for your motherboard, CPU, GPU, and other installed hardware.
Техникалық сипаттамалар
| Бренд | Vetroo |
| Модель атауы | AL800 |
| Элемент үлгі нөмірі | VT-CASE-AL800-BK (FBA) |
| Іс түрі | Орта мұнара |
| Аналық платаның үйлесімділігі | ATX, M-ATX, ITX |
| Түс | Қара |
| Материал | Металл, шыңдалған шыны |
| Элемент салмағы | 12.37 фунт (шамамен 5.61 кг) |
| Өнім өлшемдері (LxWxH) | 18.4 x 8.6 x 17.9 дюйм (шамамен 46.7 x 21.8 x 45.5 см) |
| Максималды GPU ұзындығы | 340 мм |
| CPU салқындатқышының максималды биіктігі | 165 мм |
| Максималды PSU ұзындығы | 200 мм |
| Алдыңғы енгізу-шығару порттары | 1x USB 3.2 Type-C, 2x USB 3.0, HD Audio (Mic/Headphone), Power, Reset |
| Желдеткіш қолдау | Front: 3x 120mm or 2x 140mm; Top: 2x 120mm or 2x 140mm; Rear: 1x 120mm; Bottom: 2x 120mm |
| Радиаторды қолдау | Front: 120/140/240/280/360mm; Top: 120/140/240mm; Rear: 120mm |
| Алдын ала орнатылған желдеткіштер | 1x 120mm PWM/ARGB (Rear) |
Кепілдік және қолдау
For warranty information, technical support, or to inquire about replacement parts, please visit the official Vetroo webсайтына өтіңіз немесе тұтынушыларға тікелей хабарласыңыз. Кепілдік талаптары үшін сатып алуды растайтын құжатты сақтаңыз.
Official Vetroo Store: Vetroo Amazon Store
Ask a question about this manual
Ask about setup, troubleshooting, compatibility, parts, safety, or missing instructions. Manuals+ will review the question and use this page’s manual context to help answer it.