1. Кіріспе
Thank you for choosing the COUGAR MX360 RGB Mid Tower Case. This manual provides essential information for the proper installation, operation, and maintenance of your new PC case. The MX360 RGB combines a sleek design with ARGB LED strips on the front panel, offering excellent cooling performance and support for a wide range of components, including up to a 360mm radiator, 315mm graphics cards, and 170mm CPU coolers. Its compact layout and full-length PSU shroud contribute to a clean and organized build.
2. Қауіпсіздік туралы ақпарат
- Кез келген құрамдас бөліктерді орнатпас немесе алып тастамас бұрын әрқашан қуат көзін қабырға розеткасынан ажыратыңыз.
- Статикалық электр тогының әсерінен зақымдануды болдырмау үшін бөлшектерді абайлап ұстаңыз. Антистатикалық білезік бауын пайдалануды қарастырыңыз.
- Кішкентай бөлшектер мен бұрандаларды балалардан алыс ұстаңыз.
- Қызып кетудің алдын алу үшін корпустың айналасында дұрыс желдетуді қамтамасыз етіңіз.
- Do not attempt to modify the case or its components, as this may void your warranty and pose safety risks.
3. Пакет мазмұны
Сіздің пакетіңізде келесі элементтердің барлығы бар екенін тексеріңіз:
- COUGAR MX360 RGB Mid Tower корпусы
- Қосалқы қорап (бұрандалар, тіректер, кабельдік байланыстар және т.б. бар)
- Пайдаланушы нұсқаулығы (бұл құжат)
4. Өнім аяқталдыview
The COUGAR MX360 RGB case features a minimalist design with integrated ARGB lighting and a tempered glass side panel for showcasing your build.

4.1-сурет: алдыңғы жағы view of the COUGAR MX360 RGB case, showing the interior and active RGB lighting.
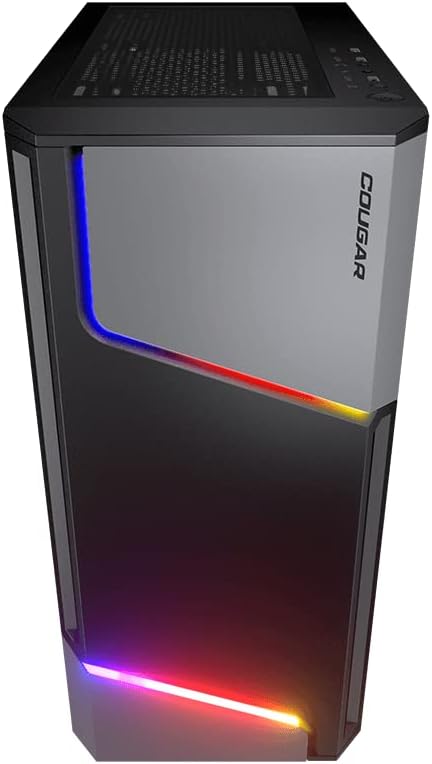
4.2-сурет: Алдыңғы view of the COUGAR MX360 RGB case, highlighting the integrated ARGB LED strips.
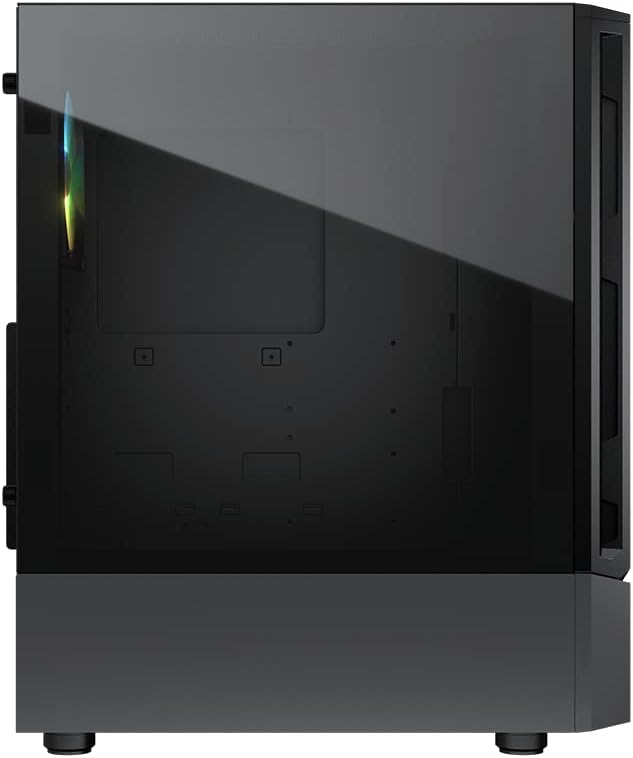
4.3-сурет: жағы view of the COUGAR MX360 RGB case, featuring the tempered glass panel.

4.4-сурет: Бұрыштық фронт view of the COUGAR MX360 RGB case, showcasing its design and ARGB elements.
5. Орнату және орнату
Follow these steps to install your components into the COUGAR MX360 RGB case.
5.1 Істі дайындау
- Корпусты тегіс, тұрақты бетке қойыңыз.
- Remove the tempered glass side panel by unscrewing the thumb screws at the rear of the case and carefully sliding the panel off.
- Remove the opposite metal side panel by unscrewing the thumb screws and sliding it off.
5.2 Аналық платаны орнату
- Install the I/O shield (if not pre-installed on your motherboard) into the rear opening of the case.
- Ensure the correct standoffs are installed for your motherboard form factor (ATX, Micro-ATX, Mini-ITX). Adjust or add standoffs as needed.
- Аналық платаны бұранда тесіктерін туралап, тіректер үстіне абайлап орналастырыңыз.
- Аналық платаны берілген бұрандалармен бекітіңіз.
5.3 Қуат блогын (PSU) орнату
- Locate the PSU shroud at the bottom of the case.
- Slide your PSU into the designated compartment from the rear of the case.
- Қуат блогын корпустың артқы жағынан бұрандалармен бекітіңіз.
- Route necessary cables through the cutouts in the PSU shroud for cable management.
5.4 Сақтау дискісін орнату
The MX360 RGB supports various storage configurations.
- 3.5 дюймдік қатты дискілер: Install into the drive cage located under the PSU shroud.
- 2.5 дюймдік SSD/HDD дискілері: Mount onto the dedicated trays or mounting points behind the motherboard tray.
5.5 Графикалық картаны (GPU) орнату
- Корпустың артқы жағынан қажетті PCIe ұясының қақпақтарын алыңыз.
- Графикалық картаңызды аналық платадағы сәйкес PCIe ұясына салыңыз.
- Secure the graphics card with screws. The case supports graphics cards up to 315mm in length.
5.6 Cooling System Installation (Fans/Radiators)
The case supports up to six fans and a 360mm water cooling radiator.
- Алдыңғы: Supports up to 3 x 120mm or 2 x 140mm fans, or a 240/280/360mm radiator.
- Жоғарғы: Supports up to 2 x 120mm or 2 x 140mm fans, or a 240/280mm radiator.
- Артқы: Supports 1 x 120mm fan.
Install fans or radiators using the provided screws, ensuring proper airflow direction.
5.7 Алдыңғы панель қосылымдары
Connect the front panel cables (USB, Audio, Power, Reset, LED) to their corresponding headers on your motherboard. Refer to your motherboard manual for exact header locations.
5.8 ARGB Lighting Connection
The integrated ARGB LED strips on the front panel connect via a 5V/3Pin ARGB connector. Connect this cable to a compatible 5V/3Pin ARGB header on your motherboard to synchronize lighting effects with your system.
6. Істі жүргізу
Once all components are installed and connected, replace the side panels. Power on your system using the power button on the top I/O panel. The ARGB lighting will illuminate, controlled by your motherboard's software or a dedicated ARGB controller if you have one installed.
7. Техникалық қызмет көрсету
Тұрақты техникалық қызмет көрсету компьютер компоненттерінің оңтайлы өнімділігі мен ұзақ қызмет ету мерзімін қамтамасыз етуге көмектеседі.
- Шаң сүзгілері: The MX360 RGB includes removable dust filters (e.g., top, bottom). Periodically remove and clean these filters with compressed air or water (ensure they are completely dry before reinstallation).
- Ішкі тазалау: Use compressed air to remove dust from internal components like fans, heatsinks, and the motherboard.
- Сыртқы тазалау: Сыртқы беттерді жұмсақ шүберекпен сүртіңіз, damp мата. Абразивті тазалағыштардан аулақ болыңыз.
8. Ақаулықтарды жою
Мәселелерге тап болсаңыз, келесі жалпы ақауларды жою қадамдарын қараңыз:
- Қуат жоқ: Ensure all power cables (24-pin ATX, 8-pin CPU, GPU power) are securely connected. Check the PSU switch is in the 'ON' position. Verify front panel power button connection to the motherboard.
- ARGB жарықтандыруы жұмыс істемейді: Confirm the 5V/3Pin ARGB connector is correctly plugged into a compatible motherboard header. Check your motherboard's RGB software for control settings.
- Қызып кету: Ensure all case fans are spinning and oriented correctly for optimal airflow. Check for dust buildup on filters and components. Verify CPU cooler and GPU cooler are properly installed.
- Бос қосылымдар: Re-seat all components (RAM, GPU, storage drives) and check all power and data cables.
9. Техникалық сипаттамалар
| Ерекшелік | Техникалық сипаттама |
|---|---|
| Бренд | COUGAR |
| Модель атауы | MX360 RGB |
| Элемент үлгі нөмірі | CGR-5CC6G-RGB |
| Іс түрі | Орта мұнара |
| Өлшемдері (LxWxH) | 14.88 x 8.27 x 18.11 дюйм (378 x 210 x 460 мм) |
| Элемент салмағы | 10.56 фунт (4.8 килограмм) |
| Материал | Tempered Glass, Fine Metal |
| Түс | Қара |
| Аналық платаға қолдау көрсету | Мини ITX / Micro ATX / ATX |
| Макс. Графикалық карта ұзындығы | 315 мм |
| Макс. CPU салқындатқыш биіктігі | 170 мм |
| PSU қолдауы | Стандартты ATX PS2 |
| Салқындату әдісі | Ауа / Су |
| Радиаторды қолдау | Front: 360mm / 280mm / 240mm / 140mm / 120mm Жоғарғы: 280мм / 240мм / 140мм / 120мм Артқы: 120 мм |
| Желдеткіш қолдау | Алдыңғы: 3 x 120 мм / 2 x 140 мм Жоғарғы: 2 x 120 мм / 2 x 140 мм Артқы: 1 x 120 мм |
| Драйвер ұялары | 3.5" HDD: 2 2.5" SSD: 2+2 (converted from 3.5" drive bays) |
| I/O панелі | USB 3.0 x 2, USB 2.0 x 1, Mic x 1, Audio x 1, RGB Button |
| Арнайы мүмкіндік | ARGB LED Strips, Full-length PSU Cover for Cable Hiding and Improved Airflow |
10. Кепілдік және қолдау
COUGAR products are designed and manufactured to the highest quality standards. For warranty information, please refer to the warranty card included with your product or visit the official COUGAR webсайт. Кепілдік шағымдары үшін сатып алуды растайтын құжатты сақтаңыз.
For technical support or further assistance, please visit the official COUGAR webсайтына өтіңіз немесе тұтынушыларға қызмет көрсету бөліміне хабарласыңыз. Қосымша ақпарат пен ресурстарды мына жерден таба аласыз COUGAR Store on Amazon.