1. Кіріспе
Сатып алғаныңыз үшін рахметasing the Klipsch Reference Premiere RP-1400SW 14-inch High Excursion Subwoofer. This subwoofer is designed to deliver powerful and accurate low-frequency sound, enhancing your home theater or music listening experience. This manual provides essential information for proper setup, operation, and care of your new subwoofer.

Figure 1.1: Klipsch Reference Premiere RP-1400SW Subwoofer (Grille Removed)
2. Қауіпсіздік туралы маңызды ақпарат
Please read all safety instructions before operating this product. Keep these instructions for future reference.
- Қуат көзі: Connect the subwoofer only to a power supply of the type described in the operating instructions or as marked on the appliance.
- Желдету: Тиісті желдетуді қамтамасыз етіңіз. Желдету саңылауларын жаппаңыз. Өндірушінің нұсқауларына сәйкес орнатыңыз.
- Жылу: Радиаторлар, жылу регистрлері, пештер немесе басқа құрылғылар (соның ішінде) сияқты жылу көздерінің жанына орнатпаңыз ampжылу шығаратын көтергіштер).
- Су және ылғал: Бұл құрылғыны судың немесе ылғалдың жанында пайдаланбаңыз.
- Тазалау: Тек құрғақ шүберекпен тазалаңыз.
- Қызмет көрсету: Барлық қызмет көрсетуді білікті қызмет көрсету қызметкерлеріне тапсырыңыз. Құрылғы кез келген жолмен зақымдалғанда, мысалы, қуат көзінің сымы немесе ашасы зақымдалғанда, сұйықтық төгілгенде немесе құрылғының ішіне заттар түсіп кеткенде, құрылғы жаңбырға немесе ылғалға ұшырағанда, қалыпты жұмыс істемесе, қызмет көрсету қажет. , немесе түсірілген.
- Ауыр нысан: This subwoofer is heavy (85 lbs). Exercise caution when moving to prevent injury.
3. Қорапта не бар
Барлық компоненттердің бар екенін тексеріңіз:
- Klipsch Reference Premiere RP-1400SW Subwoofer
- Қуат сымы
- Нұсқаулық (бұл құжат)
4. Орнату
4.1 Сабвуферді орналастыру
The Klipsch RP-1400SW features a front-firing driver and Aerofoil front slot port, allowing for flexible placement within your room. Experiment with different locations to find the optimal bass response for your listening environment. Generally, corner placement can enhance bass output, while placement along a wall can provide a more balanced sound. The shock-absorbing rubber feet help isolate the subwoofer from the floor.

Figure 4.1: Front-Firing Driver and Aerofoil Front Slot Port

Figure 4.2: Subwoofer Design Features (Rounded Corners, Shock-Absorbing Feet)
4.2 Қосылымдар
Your RP-1400SW subwoofer offers both wired and wireless connectivity options.

Figure 4.3: Subwoofer Rear Panel Connections and Controls
- Wired Connection (RCA/LFE):
Connect an RCA cable from the LFE output of your AV receiver to the LFE input on the subwoofer's rear panel. If your receiver does not have an LFE output, use a standard RCA stereo cable to connect the receiver's pre-out (subwoofer output) to both the left and right RCA inputs on the subwoofer.
- Wireless Connection (Optional WA-2 Kit):
For wireless operation, you can connect your subwoofer with a Klipsch WA-2 Wireless Subwoofer Kit (sold separately). This allows for flexible placement without the need for long RCA cables. Refer to the WA-2 kit's instructions for pairing and setup.

Figure 4.4: Wireless Connectivity with Optional WA-2 Kit
- Қуат қосылымы:
Once audio connections are made, plug the supplied power cord into the subwoofer's power inlet and then into a suitable wall outlet.
5. Сабвуферді пайдалану
5.1 Басқару элементтеріview
The rear panel of your subwoofer features several controls to fine-tune its performance:

Figure 5.1: Easy-to-Use Controls on Rear Panel
- GAIN (Volume): Сабвуфердің шығыс деңгейін реттейді. Төмен параметрден бастап, бас негізгі динамиктермен біркелкі үйлескенше біртіндеп арттырыңыз.
- LOW-PASS (Crossover): This control sets the upper frequency limit for the subwoofer. If using an AV receiver with LFE output, set this to LFE (or bypass if available on your receiver). If connecting via stereo RCA, adjust this to blend with your main speakers' low-frequency cutoff.
- ФАЗА (0°/180°): Adjusts the phase of the subwoofer output relative to your main speakers. Experiment with both settings to find the one that provides the most impactful and coherent bass.
- POWER (ON/AUTO/OFF):
- ҚОСУЛЫ: Subwoofer remains continuously on.
- АВТОМАТТЫ: Subwoofer automatically turns on when an audio signal is detected and enters a low-power standby mode after a period of inactivity.
- ӨШІРУЛІ: Сабвуфер өшірілген.
The 1/2-watt standby mode in AUTO setting ensures exceptional efficiency and reduces energy costs.
5.2 Initial Power On and Adjustment
- Барлық қосылымдардың қауіпсіз екеніне көз жеткізіңіз.
- Set the GAIN control to its minimum position.
- Set the LOW-PASS control to LFE if using an AV receiver, or to a suitable frequency (e.g., 80Hz) if connecting via stereo RCA.
- Set the PHASE switch to 0°.
- Set the POWER switch to AUTO.
- Play some audio with significant bass content. Gradually increase the GAIN control until the subwoofer output blends with your main speakers.
- Experiment with the PHASE switch (0° vs. 180°) to determine which setting provides the most impactful and seamless bass response in your listening position.
For optimal performance, consider using your AV receiver's automatic room correction system (if available) after initial setup.
5.3 Product Video: Reference Premiere Subwoofers
Video 5.1: An official Klipsch video showcasing the features and design of the Reference Premiere Subwoofers, including the RP-1400SW. This video highlights advanced acoustics, balanced performance, front-firing Cerametallic woofers, high-efficiency Class D amplifier, front-firing slot port, detailed design, and easy-to-use controls.
6. Техникалық қызмет көрсету
To ensure the longevity and optimal performance of your Klipsch RP-1400SW subwoofer, follow these simple maintenance guidelines:
- Тазалау: Dust the cabinet regularly with a dry, soft cloth. Avoid using abrasive cleaners, solvents, or strong detergents, as these can damage the ebony vinyl finish.
- Орналастыру: Avoid placing the subwoofer in direct sunlight or near heat sources, which can cause discoloration or damage to the cabinet.
- Желдету: артқы жағында екеніне көз жеткізіңіз amplifier panel has adequate airflow. Do not block the heat sink.
- Тор: The durable woven cloth grille can be gently cleaned with a soft brush or vacuum cleaner attachment to remove dust.
7. Ақаулықтарды жою
If you experience issues with your subwoofer, consult the following table for common problems and solutions:
| Мәселе | Ықтимал себебі | Шешім |
|---|---|---|
| Сабвуферден дыбыс жоқ |
|
|
| Әлсіз немесе бұрмаланған басс |
|
|
| Сабвуфер ызыңдайды немесе гуілдейді |
|
|
If the problem persists after trying these solutions, please contact Klipsch customer support.
8. Техникалық сипаттамалар
Key technical specifications for the Klipsch Reference Premiere RP-1400SW Subwoofer:
| Ерекшелік | Мәлімет |
|---|---|
| Үлгі нөмірі | RP-1400SW |
| Бренд | Клипш |
| Динамик түрі | Сабвуфер |
| Вуфердің диаметрі | 14 дюйм |
| Аудио драйвер түрі | Dynamic Driver (Cerametallic) |
| Динамиктің максималды шығыс қуаты | 600 Вт |
| RMS қуаты | 500 Вт |
| Жиілік реакциясы | 20Hz - 1kHz (approximate, based on A+ content) |
| Қосылу технологиясы | Wired RCA, LFE, and WA-2 Wireless Port |
| Дыбысты шығару режимі | Стерео, көлемді дыбыс |
| Монтаждау түрі | Еденнің тірегі |
| Қоршау материалы | Ағаш |
| Түс | Қара ағаш |
| Қуат көзі | Сымды электр |
| Элемент өлшемдері (D x W x H) | 25.67"D x 20"W x 21.34"H |
| Элемент салмағы | 85 фунт |
| UPC | 743878047424 |
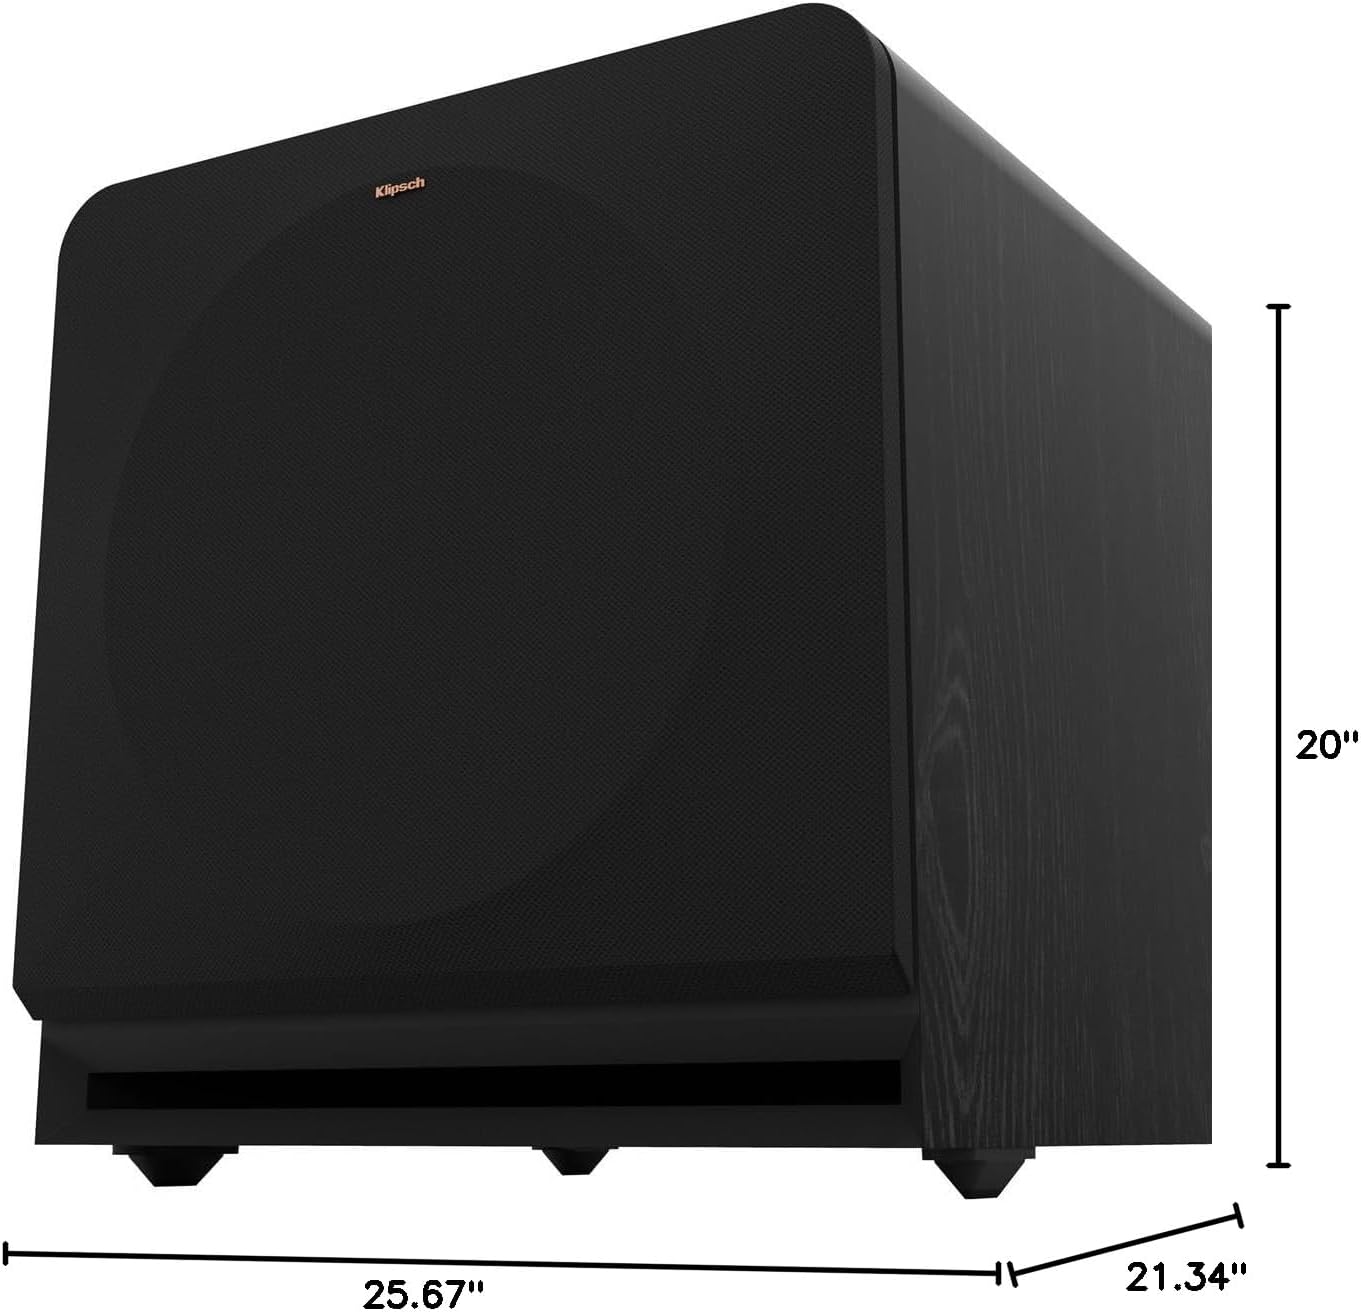
Figure 8.1: Subwoofer Dimensions
9. Кепілдік және қолдау
9.1 Кепілдік туралы ақпарат
The Klipsch Reference Premiere RP-1400SW Subwoofer comes with a limited warranty:
- Электроника: Екі (2) жыл
- Woofer, Cabinet, and Non-Electrical Mechanics: Бес (5) жыл
Please retain your proof of purchase for warranty claims. For full warranty terms and conditions, refer to the official Klipsch webсайтқа немесе тұтынушыларға қолдау көрсетуге хабарласыңыз.
9.2 Тұтынушыларды қолдау қызметі
For further assistance, technical support, or warranty inquiries, please visit the official Klipsch website or contact their customer service department. Contact details can typically be found on the Klipsch webсайтында «Қолдау» немесе «Бізбен байланыс» бөлімінде.