Deeyaple F-8816
Deeyaple жарықдиодты сандық оятқыш сағатының пайдаланушы нұсқаулығы
Үлгі: F-8816
1. Кіріспе
Сатып алғаныңыз үшін рахметasing the Deeyaple LED Digital Alarm Clock. This manual provides detailed instructions for setting up, operating, and maintaining your new alarm clock. Please read this manual thoroughly before use to ensure proper functionality and to maximize your user experience. This clock features adjustable brightness, dual alarms, a snooze function, and a clear LED display showing both time and day.
2. Қауіпсіздік туралы ақпарат
- Құрылғыны шектен тыс температураға, тікелей күн сәулесіне немесе жоғары ылғалдылыққа шығармаңыз.
- Құрылғыны судан және басқа сұйықтықтардан алыс ұстаңыз.
- Use only the provided USB cable for power. An AC adapter is not included.
- Құрылғыны өзіңіз бөлшектеуге немесе жөндеуге әрекеттенбеңіз. Мәселелер туындаса, тұтынушыларды қолдау қызметіне хабарласыңыз.
- Балалардың қолы жетпейтін жерде сақтаңыз.
3. Пакет мазмұны
- Deeyaple LED Digital Alarm Clock (Model: F-8816)
- USB Power Cable (Note: Power adapter not included)
- Пайдаланушы нұсқаулығы (осы құжат)

Figure 3.1: Back panel and side view of the alarm clock, showing control buttons and USB port.
4. Өнім аяқталдыview
4.1 Алдыңғы дисплей
The front of the clock features a large LED display that shows the time, day of the week, and indicators for Alarm 1 and Alarm 2. The display uses vibrant, multi-colored digits for enhanced readability.

4.1-сурет: Алдыңғы view of the alarm clock with time and day displayed.
4.2 Top Buttons
- NOOZE/LIGHT түймесі: Located on the top. Press to activate snooze during an alarm or to adjust display brightness.
4.3 Back Controls
- TIME SET Button: Уақытты орнату режиміне кіру үшін қолданылады.
- ALARM SET түймесі: Дабылды орнату режиміне кіру үшін қолданылады.
- ЖОҒАРЫ (+) түймесі: Increases values during setting or toggles functions.
- ТӨМЕН (-) түймесі: Decreases values during setting or toggles functions.
- DC 5V порты: USB power input.
- RESET түймесі: Small button to reset the clock to factory settings.

4.2-сурет: Артқы view of the alarm clock, highlighting the USB power input and control buttons.
5. Орнату
5.1 Құрылғыны қуаттандыру
- Connect the provided USB power cable to the DC 5V port on the back of the alarm clock.
- Plug the other end of the USB cable into a standard USB power adapter (not included) or a powered USB port (e.g., computer, power bank).
- Дисплей жанады, бұл сағаттың қосулы екенін көрсетеді.

Figure 5.1: The alarm clock is powered via a USB cable, ensuring continuous display.
6. Пайдалану нұсқаулары
6.1 Уақытты орнату
- түймесін басыңыз УАҚЫТ ОРНАТЫЛДЫ button on the back of the clock. The hour digits will start flashing.
- пайдаланыңыз ЖОҒАРЫ (+) or ТӨМЕН (-) түймелері сағатты реттеуге арналған.
- түймесін басыңыз УАҚЫТ ОРНАТЫЛДЫ сағатты растау және минут параметріне өту үшін қайтадан түймесін басыңыз. Минут сандары жыпылықтайды.
- пайдаланыңыз ЖОҒАРЫ (+) or ТӨМЕН (-) минуттарды реттеу үшін түймелер.
- түймесін басыңыз УАҚЫТ ОРНАТЫЛДЫ a third time to confirm the minutes and move to 12/24H format selection.
- пайдаланыңыз ЖОҒАРЫ (+) or ТӨМЕН (-) buttons to select between 12-hour (with AM/PM indicator) or 24-hour format.
- түймесін басыңыз УАҚЫТ ОРНАТЫЛДЫ one last time to save the settings and exit time setting mode.
6.2 Setting Alarms (Dual Alarms)
The clock supports two independent alarms (Alarm 1 and Alarm 2).
- түймесін басыңыз ДАБЫЛДЫ ОРНАТУ button. The Alarm 1 hour digits will start flashing, and the Alarm 1 icon will appear.
- пайдаланыңыз ЖОҒАРЫ (+) or ТӨМЕН (-) buttons to adjust the Alarm 1 hour.
- түймесін басыңыз ДАБЫЛДЫ ОРНАТУ again to confirm the hour and move to Alarm 1 minute setting. The minute digits will flash.
- пайдаланыңыз ЖОҒАРЫ (+) or ТӨМЕН (-) buttons to adjust the Alarm 1 minutes.
- түймесін басыңыз ДАБЫЛДЫ ОРНАТУ a third time to confirm minutes and move to Alarm 1 day setting.
- пайдаланыңыз ЖОҒАРЫ (+) or ТӨМЕН (-) buttons to select the alarm days:
- 1-1: Бір күндік дабыл
- 1-5: Дүйсенбіден жұмаға дейін
- 1-6: Дүйсенбіден сенбіге дейін
- 1-7: Monday to Sunday (Every day)
- 6-7: Saturday to Sunday (Weekend)
- түймесін басыңыз ДАБЫЛДЫ ОРНАТУ again to confirm Alarm 1 settings and proceed to Alarm 2 setting. Repeat steps 2-6 for Alarm 2.
- After setting Alarm 2, press ДАБЫЛДЫ ОРНАТУ one last time to save all alarm settings and exit.

Figure 6.1: Alarm days setting options for customized wake-up schedules.
6.3 Кідірту функциясы
Дабыл естілгенде, үлкен түймесін басыңыз ҰЙЫҚТЫРУ / ЖАРЫҚ button on the top of the clock. The alarm will pause for 5 minutes and then sound again. You can repeat the snooze cycle multiple times.

Figure 6.2: Activating the snooze function by touching the top button for an additional 5 minutes of rest.
6.4 Дисплей жарықтығын реттеу
The clock has 3 levels of brightness (Bright, Medium, Low) and an option to turn off the display.
- түймесін басыңыз ҰЙЫҚТЫРУ / ЖАРЫҚ button on the top of the clock (when no alarm is sounding) to cycle through the brightness levels: Bright > Medium > Low > Off > Bright.
- Select the brightness level that best suits your environment and preference.
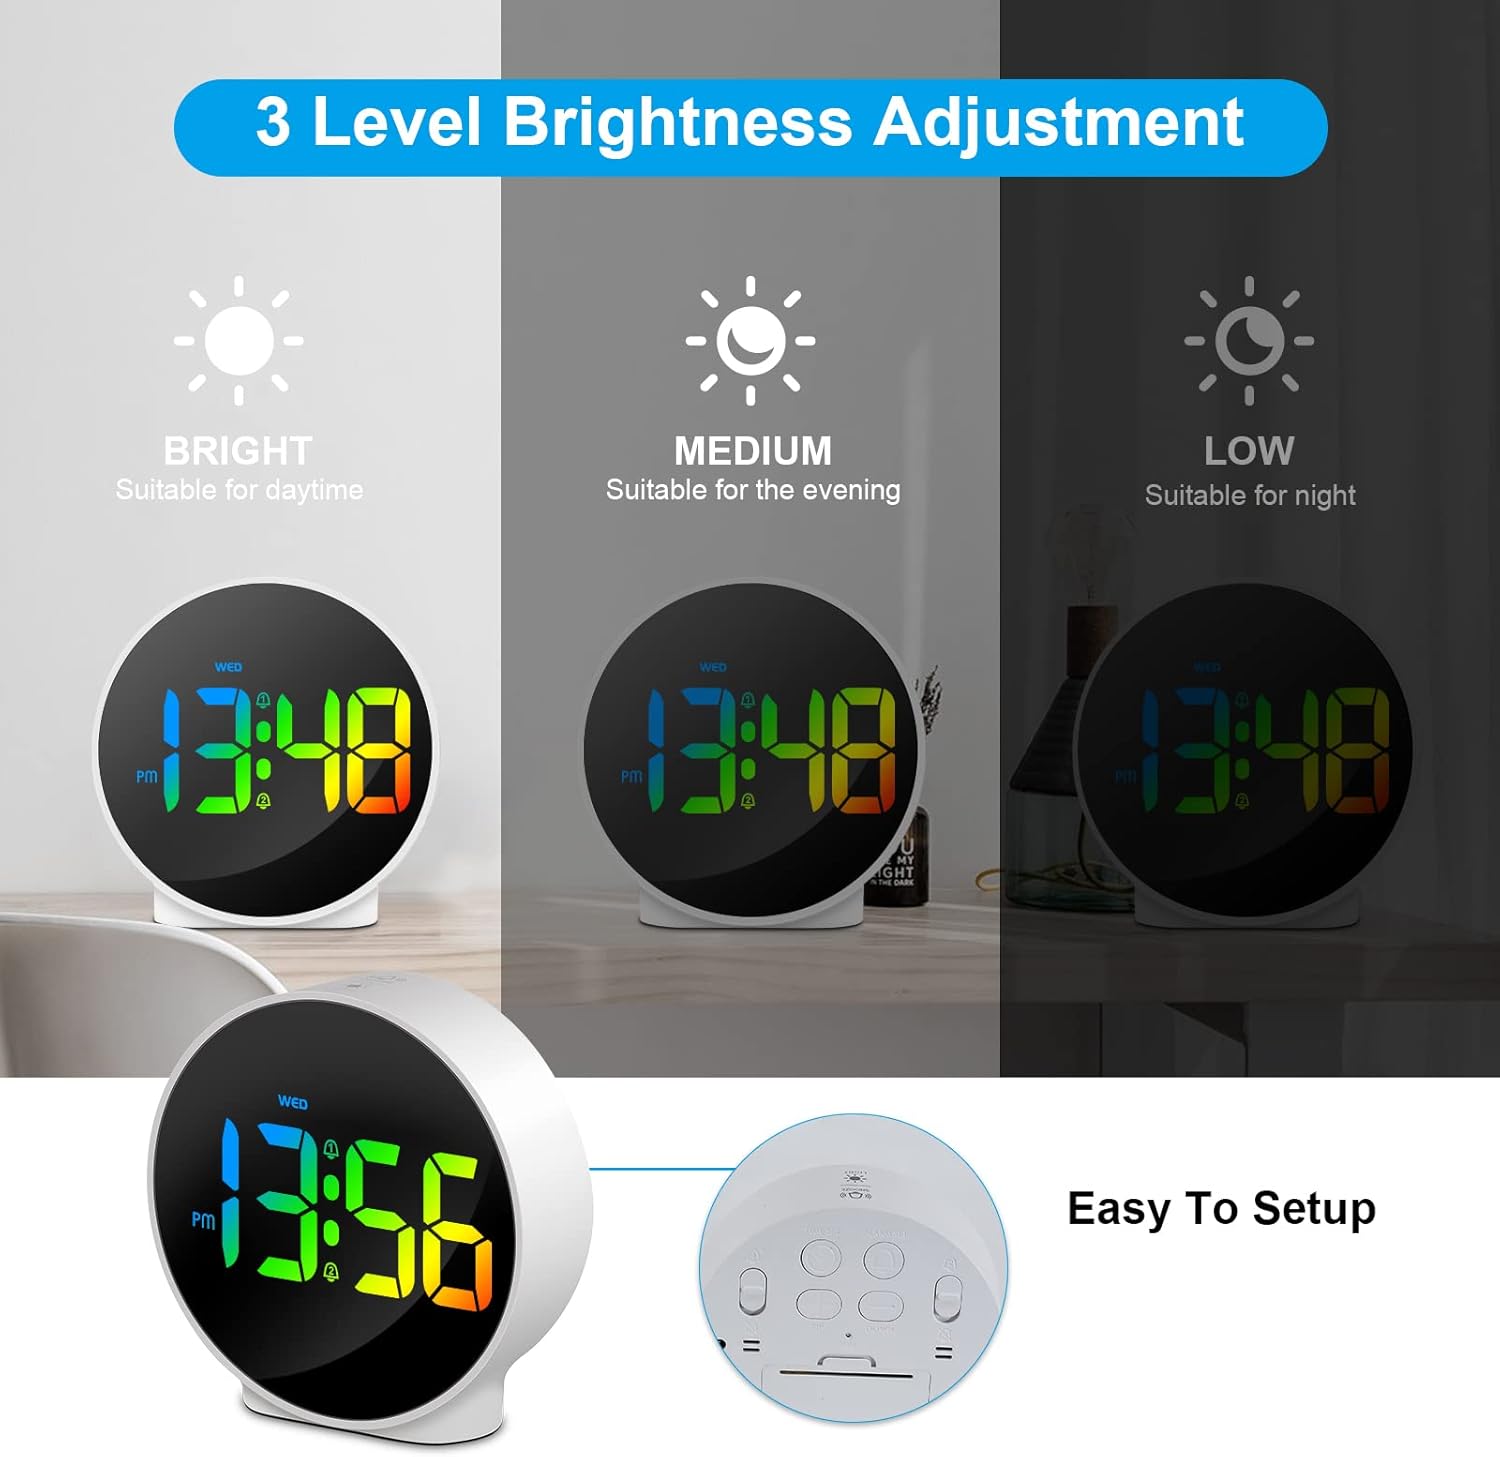
Figure 6.3: Three adjustable brightness levels for optimal viewәр түрлі жарық жағдайында.
6.5 Week and Time Display
The clock simultaneously displays the current time and the day of the week on the same screen, eliminating the need to switch displays.

Figure 6.4: The clock displays both the time and the day of the week on a single screen for convenience.
7. Техникалық қызмет көрсету
- Тазалау: Сағаттың бетін тазалау үшін жұмсақ, құрғақ шүберекті пайдаланыңыз. Абразивті тазартқыштарды немесе еріткіштерді пайдаланбаңыз.
- Сақтау орны: Егер сағатты ұзақ уақыт сақтасаңыз, оны қуат көзінен ажыратып, салқын, құрғақ жерде сақтаңыз.
8. Ақаулықтарды жою
| Мәселе | Ықтимал себебі | Шешім |
|---|---|---|
| Дисплей өшірулі немесе күңгірт. | Not powered, brightness set to off/low. | Ensure USB cable is securely connected to a power source. Press SNOOZE/LIGHT button to adjust brightness. |
| Дабыл естілмейді. | Alarm not set, alarm volume too low (not applicable for this model), incorrect alarm days. | Verify alarm time and ensure the alarm icon is displayed. Check alarm day settings. |
| Уақыт дұрыс емес. | Time not set correctly, power interruption. | Re-set the time following Section 6.1. Ensure continuous power supply. |
| Түймешіктер жауап бермейді. | Уақытша бағдарламалық құрал ақауы. | Unplug the USB cable, wait 10 seconds, then plug it back in. If issue persists, use the RESET button on the back (requires a thin object like a paperclip). |
9. Техникалық сипаттамалар
- Бренд: Deeyaple
- Модель нөмірі: F-8816
- Түсі: White shell with multi-color display
- Өлшемдері (L x W x H): 10 x 3.81 x 10 см (3.94 x 1.5 x 3.94 дюйм)
- Салмағы: 180 грамм (0.4 фунт)
- Ерекше өзгешеліктері: Dual Alarm, Snooze, Adjustable Brightness (3 levels + off), 12/24H Display, Week Display, Corded Electric
- Қуат көзі: USB Cable (DC 5V)
- Дисплей түрі: Сандық жарықдиодты
- Материал: Акрилонитрил бутадиен стироны (ABS)

Figure 9.1: Dimensions of the Deeyaple LED Digital Alarm Clock.
10. Кепілдік және қолдау
Deeyaple products are designed for quality and reliability. For any questions, technical support, or warranty claims, please contact the seller or manufacturer directly through your purchase platform. Please retain your proof of purchase for warranty purposes.
Ask a question about this manual
Ask about setup, troubleshooting, compatibility, parts, safety, or missing instructions. Manuals+ will review the question and use this page’s manual context to help answer it.