1. Кіріспе
The SPL 2Control is a compact and user-friendly stereo monitor controller designed to provide comprehensive control over your digital audio workstation's (DAW) monitoring functions. It ensures high-quality audio reproduction through both studio monitors and headphones, allowing you to hear every detail of your mix. Key features include a precise speaker volume potentiometer, active circuitry for sound integrity, and a unique Crossfeed control for accurate headphone monitoring that simulates a stereo speaker image.
2. Қауіпсіздік нұсқаулары
- Құрылғыны іске қоспас бұрын осы нұсқауларды мұқият оқып шығыңыз.
- Бұл нұсқаулықты болашақта анықтама үшін сақтаңыз.
- Өрт немесе электр тогының соғуын болдырмау үшін құрылғыны жаңбырға немесе ылғалға ұшыратпаңыз.
- Тиісті желдетуді қамтамасыз етіңіз; ешқандай желдету саңылауларын жаппаңыз.
- Өндіруші көрсеткен қосымшаларды/керек-жарақтарды ғана пайдаланыңыз.
- Найзағай кезінде немесе ұзақ уақыт пайдаланбаған кезде қуат сымын ажыратыңыз.
- Барлық қызмет көрсетуді білікті қызмет көрсету қызметкерлеріне тапсырыңыз.
- Құрылғыны радиаторлар, жылытқыштар, пештер немесе басқа құрылғылар (соның ішінде) сияқты жылу көздеріне жақын қоймаңыз. ampжылу шығаратын көтергіштер).
3. Пакет мазмұны
Қаптаманы ашқаннан кейін мына заттардың қамтылғанын тексеріңіз:
- 1 x SPL 2Control Module
- 1 х қуат сымы
- Осы пайдаланушы нұсқаулығы
4. Өнім аяқталдыview
4.1 Алдыңғы панельдің басқару элементтері мен индикаторлары
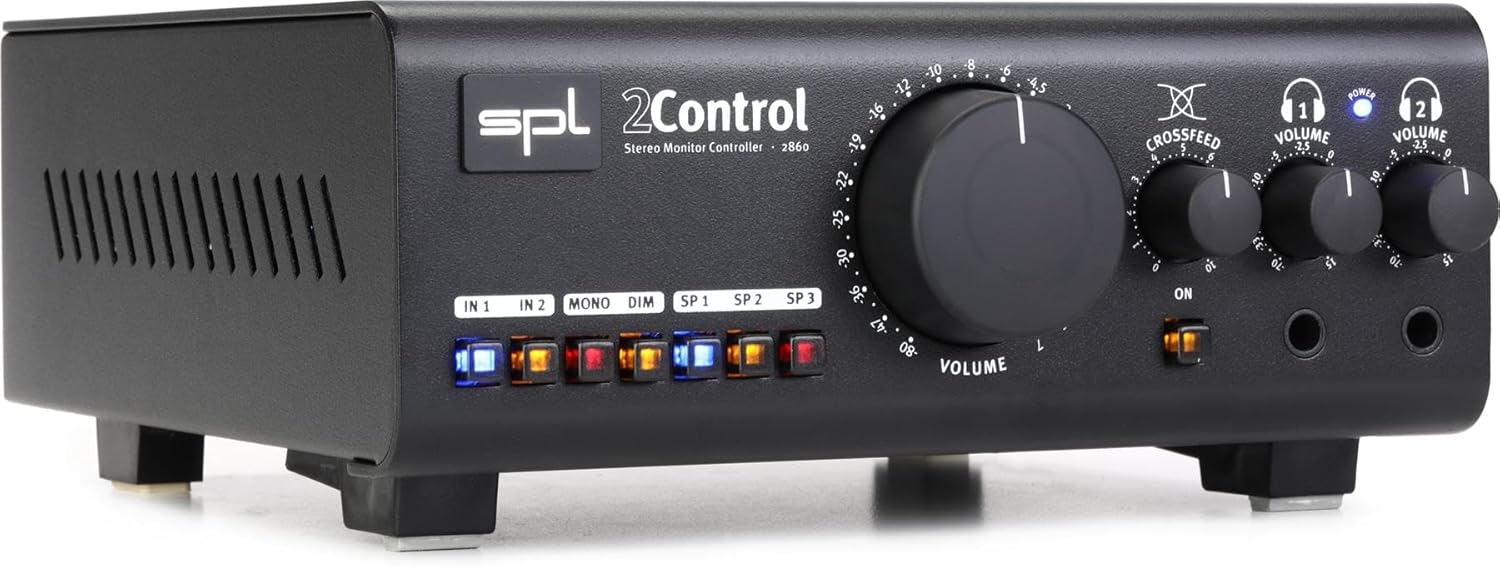
1-сурет: Front Panel of the SPL 2Control Stereo Monitor Controller.
This image displays the front panel of the SPL 2Control. From left to right, it features input selection buttons (IN 1, IN 2), function buttons (MONO, DIM), speaker output selection buttons (SP 1, SP 2, SP 3), a large central master VOLUME knob, a CROSSFEED knob, and two individual headphone VOLUME knobs with corresponding headphone output jacks. A power indicator LED is visible above the headphone controls.
- IN 1 / IN 2 Buttons: Selects the active stereo input source.
- МОНО түймесі: Sums the stereo signal to mono for compatibility checking.
- DIM түймесі: Reduces the output volume by a fixed amount (e.g., -20dB) for temporary level reduction.
- SP 1 / SP 2 / SP 3 Buttons: Selects the active stereo speaker output pair.
- VOLUME тұтқасы: Master volume control for selected speaker outputs.
- CROSSFEED Knob: Adjusts the stereo panorama for headphone monitoring to simulate a speaker listening environment.
- HEADPHONE VOLUME 1 / 2 Knobs: Independent volume controls for the two headphone outputs.
- HEADPHONE 1 / 2 Jacks: 1/4-inch stereo headphone outputs.
- Қуат жарық диоды: Құрылғының қосулы екенін көрсетеді.
4.2 Rear Panel Connections (Inferred)
The rear panel typically houses the audio input and output connections, as well as the power input. Based on common audio equipment and product specifications, you can expect:
- Аналогтық кірістер: Balanced XLR or TRS inputs for connecting your audio interface or mixer.
- Динамиктің шығуы: Multiple sets of balanced XLR or TRS outputs for connecting up to three pairs of studio monitors.
- Қуат кірісі: Connector for the included power cord.
5. Орнату
- Орналастыру: Position the SPL 2Control on a stable, flat surface, ensuring adequate ventilation around the unit.
- Қуат қосылымы: Connect the provided power cord to the power input on the rear panel of the 2Control and then to a suitable AC power outlet.
- Кіріс қосылымдары: Connect the stereo outputs of your audio interface, mixer, or other audio source to the IN 1 and/or IN 2 inputs on the rear panel using balanced XLR or TRS cables.
- Динамик қосылымдары: Connect your studio monitors to the SP 1, SP 2, and/or SP 3 outputs on the rear panel using balanced XLR or TRS cables. Ensure correct left and right channel connections.
- Headphone Connections: Plug your headphones into the HEADPHONE 1 and/or HEADPHONE 2 jacks on the front panel.
- Бастапқы қуат қосулы: Ensure all volume controls are set to their minimum positions before powering on the unit. Then, connect the power cord to the wall outlet. The POWER LED on the front panel will illuminate.
6. Пайдалану нұсқаулары
- Енгізуді таңдау: түймесін басыңыз 1 ЖЫЛ or 2 ЖЫЛ button to select your desired audio source. The active button will illuminate.
- Selecting Speaker Outputs: түймесін басыңыз SP 1, SP 2, немесе SP 3 button to route the audio to the corresponding pair of studio monitors. Only one speaker output can be active at a time.
- Adjusting Master Volume: Slowly turn the large DOLUM knob clockwise to increase the listening level for the selected speaker outputs. Turn counter-clockwise to decrease.
- Mono Summing: түймесін басыңыз MONO button to sum the stereo signal to mono. This is useful for checking phase compatibility and mix balance. Press again to return to stereo.
- Dim функциясы: түймесін басыңыз DIM button to temporarily reduce the output volume. This is useful for quick conversations or when you need to lower the volume without losing your main volume setting. Press again to restore the original volume.
- Құлаққапты бақылау:
- Plug your headphones into the desired headphone jack (HEADPHONE 1 or 2).
- Жеке тұлғаны реттеңіз HEADPHONE VOLUME 1 or 2 knob to set the listening level for your headphones.
- пайдаланыңыз ҚЫСҚА БЕРУ knob to adjust the stereo image for headphone listening. Turning it clockwise increases the crossfeed, simulating a more natural speaker-like stereo field by blending the left and right channels slightly.
7. Техникалық қызмет көрсету
- Тазалау: Құрылғының сыртын тазалау үшін жұмсақ, құрғақ шүберекті пайдаланыңыз. Сұйық тазалағыштарды немесе еріткіштерді пайдаланбаңыз.
- Желдету: Ensure that the ventilation slots are kept clear of dust and debris to prevent overheating.
- Сақтау орны: Құрылғыны ұзақ уақыт сақтасаңыз, оны қуат көзінен ажыратып, салқын, құрғақ жерде сақтаңыз.
8. Ақаулықтарды жою
| Мәселе | Ықтимал себебі | Шешім |
|---|---|---|
| Динамиктерден дыбыс жоқ. |
|
|
| Құлаққаптан дыбыс шықпайды. |
|
|
| Бұрмаланған дыбыс. |
|
|
9. Техникалық сипаттамалар
| Ерекшелік | Мәлімет |
|---|---|
| Модель атауы | 2 Control (also known as 2860) |
| Бренд | SPL |
| Динамик түрі | Монитор |
| Ұсынылатын пайдаланулар | Control, Volume for Monitors |
| Үйлесімді құрылғылар | Monitors, Speakers |
| Көлемді дыбыс арнасының конфигурациясы | 2.0 |
| Түс | Қара |
| Қосылған құрамдас бөліктер | 1 x SPL Control Module |
| Өнім өлшемдері (D x W x H) | 8.66" x 8.46" x 3.15" |
| Элемент салмағы | 7.06 фунт (шамамен 3.2 кг) |
| Қуат көзі | Сымды электр |
| Қосылу технологиясы | TRS, XLR |
| Дыбысты шығару режимі | Стерео |
| Монтаждау түрі | Үстелге орнату |
| Өндіруші | Sound Performance Lab |
10. Кепілдік және қолдау
The SPL 2Control Monitor Controller comes with a limited warranty. For specific warranty terms, duration, and conditions, please refer to the documentation provided with your purchase or visit the official SPL website. For technical support, service, or inquiries, please contact the manufacturer, Sound Performance Lab, or your authorized dealer.
Өндіруші: Sound Performance Lab