1. Кіріспе
This manual provides essential information for the safe and efficient operation of your Crosley WR18 Mini Bubbler Jukebox. Please read these instructions thoroughly before using the unit and retain them for future reference.
The Crosley WR18 is a reproduction of a 1946-style jukebox, featuring percolating bubble tubes, neon lights, a front-loading compact disc player, FM radio, and stereo speakers. It is operated primarily via a 12-button remote control.
2. Қауіпсіздік нұсқаулары
- Құрылғыны жаңбырға немесе ылғалға ұшыратпаңыз.
- Желдету саңылауларын жаппаңыз.
- Құрылғының тұрақты, тегіс бетке қойылғанына көз жеткізіңіз.
- Найзағай кезінде немесе ұзақ уақыт пайдаланбаған кезде құрылғыны электр желісінен ажыратыңыз.
- Барлық қызмет көрсетуді білікті қызмет көрсету қызметкерлеріне тапсырыңыз.
3. Орнату
3.1 Қаптаманы ашу және орналастыру
Carefully remove the jukebox from its packaging. Place the unit on a flat, stable surface away from direct sunlight, heat sources, and excessive dust or moisture. Ensure there is adequate space around the unit for ventilation.
3.2 Қуат қосылымы
Connect the AC power cord to the power input on the back of the unit, then plug it into a standard wall outlet. The unit is designed for 120V AC, 60Hz power supply.
3.3 Қашықтан басқару пультін орнату
Insert two AAA batteries (not included) into the remote control, observing the correct polarity. The remote control is essential for operating most functions of the jukebox.
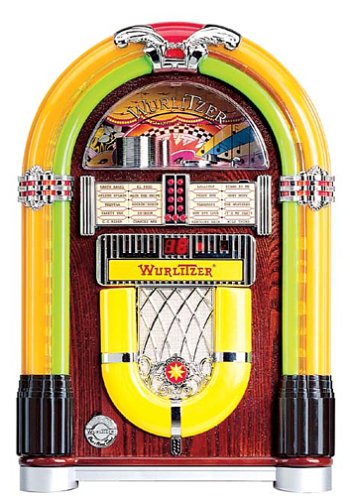
1-сурет: Алдыңғы view of the Crosley WR18 Mini Bubbler Jukebox. This image shows the main unit with its distinctive bubble tubes, neon lights, and speaker grilles. The CD player slot is visible below the main display area.
4. Пайдалану нұсқаулары
4.1 Қуатты қосу/өшіру
түймесін басыңыз ҚУАТ құрылғыны қосу немесе өшіру үшін қашықтан басқару пультіндегі түймені басыңыз.
4.2 CD ойнатқышының жұмысы
- түймесін басыңыз CD button on the remote to select CD mode.
- түймесін басыңыз АШУ/ЖАБУ button on the remote to open the CD tray.
- Place a compact disc, label side up, into the tray.
- түймесін басыңыз АШУ/ЖАБУ again to close the tray. The unit will begin reading the disc.
- пайдаланыңыз ОЙНАТУ/ТОҚТАТУ ойнатуды бастау немесе кідірту үшін түймесін басыңыз.
- пайдаланыңыз АЛҒА ӨТУ (|>>) немесе АРТҚА ӨТКІЗУ (<<|) buttons to navigate between tracks.
- The БАҒДАРЛАМА function allows you to create a custom playback order for tracks. Refer to the remote control diagram for specific programming steps.
- The ҚАЙТАЛАУ function allows you to repeat the current track or the entire disc.
4.3 FM радиосының жұмысы
- түймесін басыңыз FM button on the remote to select FM radio mode.
- Extend the external FM antenna located at the back of the unit for optimal reception. Adjust its position for clearer sound.
- пайдаланыңыз РЕТТЕУ (+) немесе БАҒДАРЛАУ (-) buttons on the remote to manually tune to desired radio stations.
4.4 Дыбыс деңгейін басқару
Дыбыс деңгейін реттеңіз Дыбыс деңгейін арттыру (+) және Дыбыс деңгейін төмендету (-) buttons on the remote control. Note that all volume adjustments are made via the remote.
4.5 Neon Lights and Bubble Tubes
The genuine multicolored neon lights and percolating bubble tubes activate automatically when the unit is powered on, enhancing the retro aesthetic. There are no separate controls for these features.
5. Техникалық қызмет көрсету
5.1 Шкафты тазалау
Wipe the handcrafted hardwood cabinet with a soft, dry cloth. For stubborn marks, a slightly damp матаны қолдануға болады, содан кейін дереу кептіруге болады. Абразивті тазартқыштардан немесе еріткіштерден аулақ болыңыз.
5.2 CD ойнатқышына күтім жасау
To ensure optimal performance, keep the CD tray and lens clean. Use a specialized CD lens cleaner disc periodically. Avoid touching the CD lens directly.
5.3 Bubble Tubes and Neon Lights
The bubble tubes and neon lights are sealed units and require no user maintenance. If any issues arise with these components, contact customer support.
6. Ақаулықтарды жою
| Мәселе | Ықтимал себебі | Шешім |
|---|---|---|
| Қуат жоқ | Қуат сымы қосылмаған; розетка белсенді емес | Ensure power cord is securely plugged in; test outlet with another device. |
| Дыбыс жоқ | Volume too low; incorrect mode selected | Increase volume using remote; ensure correct mode (CD/FM) is selected. |
| CD ойнатылмайды | Disc inserted incorrectly; disc dirty/scratched; CD mode not selected | Reinsert disc correctly; clean disc; select CD mode. |
| FM қабылдаудың нашарлығы | Antenna not extended/positioned correctly | Fully extend and adjust the external FM antenna. |
| Қашықтан басқару пульті жұмыс істемейді | Batteries depleted; line of sight blocked; remote malfunction | Replace batteries; ensure no obstructions between remote and unit; if remote remains unresponsive, contact customer support as many functions are remote-only. |
7. Техникалық сипаттамалар
- Модель нөмірі: WR18
- Өнім өлшемдері: 12 x 22 x 16 дюйм (ені x биіктігі x тереңдігі)
- Элемент салмағы: 16.8 фунт
- Өндіруші: Crosley Radio
- Аудио мүмкіндіктері: Stereo sound with two 4-inch speakers and built-in ampқұтқарушы
- Медиа ойнату: CD player with program and repeat functions, FM radio with external antenna
- Эстетикалық ерекшеліктері: Handcrafted hardwood cabinet, genuine multicolored neon lights, bubble tube accents
- Бақылау: 12-button mini jukebox remote control
8. Кепілдік және қолдау
The Crosley WR18 Mini Bubbler Jukebox typically comes with a manufacturer's warranty. Based on user reports, the Crosley warranty period is 90 days. Please note that for warranty service, you may be responsible for shipping the unit back to the manufacturer and an additional fee for return shipping and handling after repair.
For technical support, warranty claims, or service inquiries, please contact Crosley Radio customer service directly. Refer to the contact information provided with your product packaging or visit the official Crosley webең соңғы қолдау мәліметтері үшін сайт.